Container Gardening Tomatoes: 10 L, 20 L or 30 L Explained
A 10 L (2.6 US gal; 0.35 cu ft) pot is workable for a compact dwarf or small cherry tomato, but it turns watering into a close-monitoring job. For one patio tomato, 20 L (5.3 US gal; 0.71 cu ft) is the practical middle; for a vigorous indeterminate plant, I’d choose 30 L (7.9 US gal; 1.06 cu ft) if the balcony can carry it.
That is the short answer for container gardening tomatoes, with one condition attached: none of these pots can manufacture sunlight. A 30 L tomato on a dim windowsill may grow a handsome plant and still set very little fruit, while a well-lit 20 L pot can be the better use of a small outdoor space.
For one tomato, the choice is really a trade between root room, water reserve, plant size and the amount of attention you can give the pot.
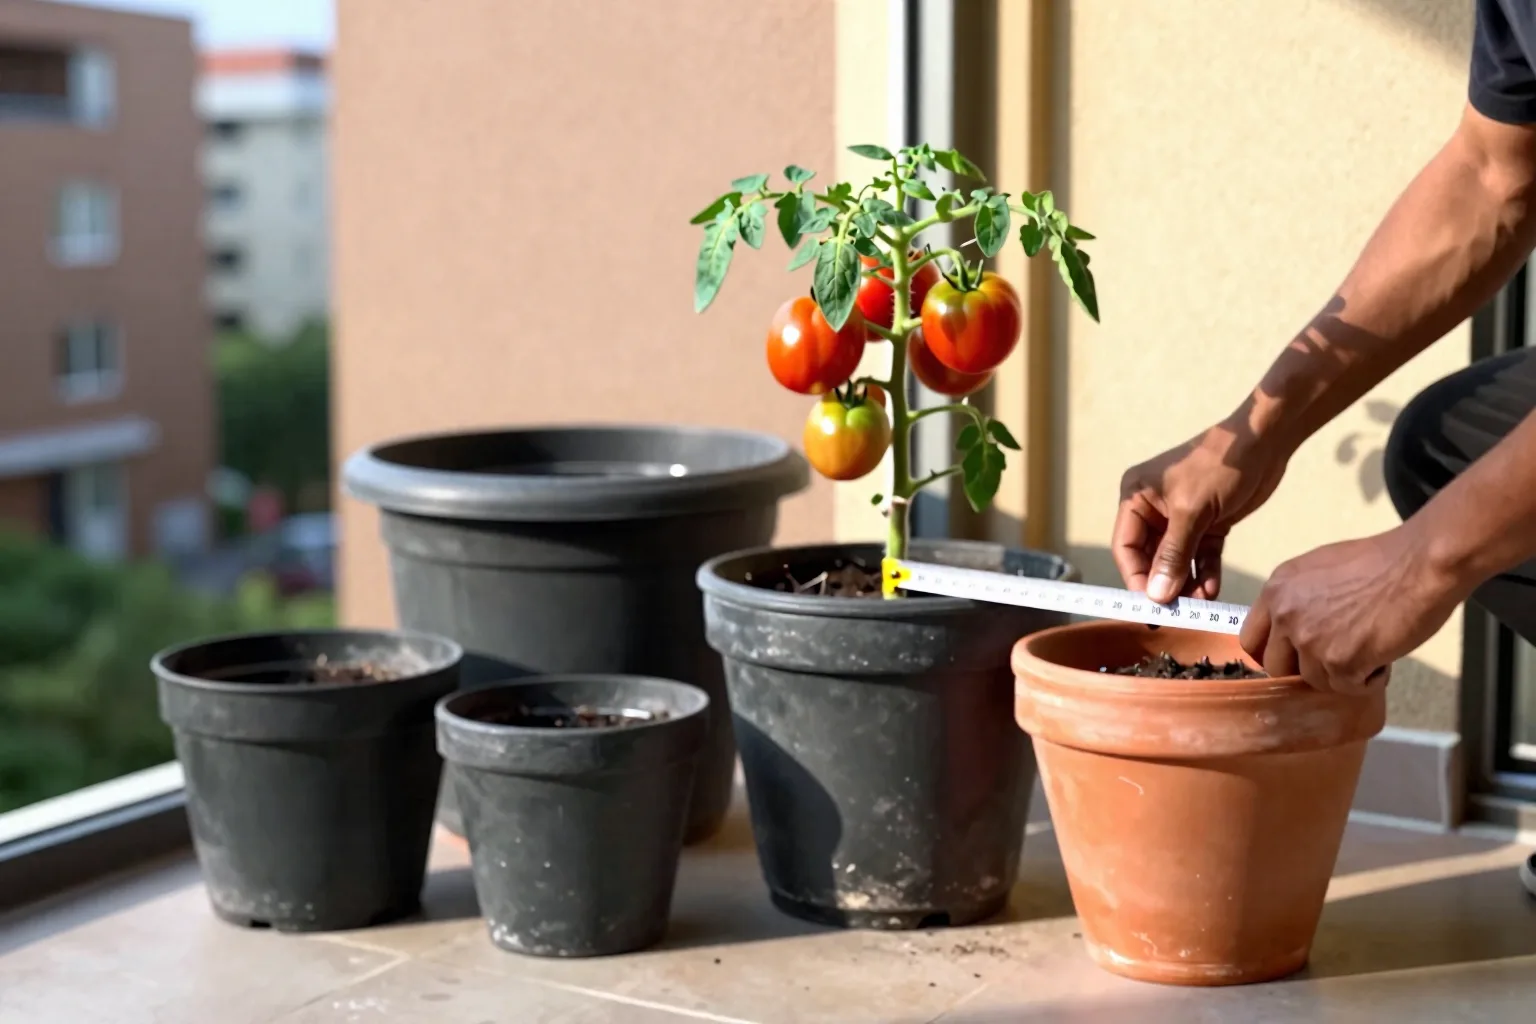
The honest choice: 10 L, 20 L or 30 L for one tomato
| Container | Approximate capacity | Best fit | Watering burden | Main trade-off |
|---|---|---|---|---|
| 10 L | 2.6 US gal; 0.35 cu ft | Dwarf, compact or small cherry tomato | High; check closely in sun and wind | Light and easy to place, but the smallest moisture reserve |
| 20 L | 5.3 US gal; 0.71 cu ft | One patio or compact tomato | Moderate; still needs regular checks | Best balance of root room, handling and water buffer |
| 30 L | 7.9 US gal; 1.06 cu ft | One vigorous, large cherry or indeterminate tomato | Most forgiving of these three | Heavier, harder to move and still needs firm support |
A 10 L pot isn’t automatically a mistake. It’s a deliberate small-container choice for a plant that stays small. Look for a dwarf or compact habit, and expect to check moisture more often than you would in a 30 L pot. A small cherry tomato can repay that attention; a vigorous plant that keeps extending will quickly turn the same container into a root, water and support problem.
A 20 L container is my sensible default for a first patio tomato. It gives one compact plant enough mix to make short gaps between waterings less punishing, without creating the awkward, heavy object that a filled 30 L planter can become on a balcony. It’s still not a set-and-forget size. Full sun, reflected heat from a wall and a steady wind can empty it quickly.
Choose 30 L for a tomato described as vigorous, tall or indeterminate. Indeterminate means the plant keeps extending and producing flower trusses under suitable conditions. A determinate plant stops extending after reaching its set habit and tends to crop over a shorter window, although variety labels aren’t perfectly consistent. The larger pot provides more room for roots and a larger reserve of water and dissolved nutrients, but it doesn’t remove the need for a cage, stake or trellis.
Buy the plant’s mature habit rather than the photograph on the label. The word patio is useful, but mature height, width and whether the plant is dwarf, determinate or indeterminate tell you more. If the label is vague, compare it with University extension or RHS guidance on tomato varieties and container culture before spending money on a small pot.
My strongest rule is one tomato per container. Splitting two plants between 20 L or 30 L may look efficient at planting time, but it divides the moisture reserve, root space and nutrient supply just when both plants are becoming demanding. Capacity buys time, not sunlight.
Capacity is not the whole specification: check diameter, depth and the real fill line
The litre number on a pot is useful only if you know what it describes. A manufacturer may measure to the brim, while the pot you actually use needs headspace above the mix and may have a tapered shape. Treat the printed capacity as a guide, then check the inside dimensions and the shape before you commit to a tomato.
For a rectangular planter, multiply the internal length by width by usable depth in centimetres, then divide by 1,000:
length × width × depth ÷ 1,000 = litres
A box measuring 30 × 30 × 30 cm internally calculates to 27 L before allowing for headspace. For a cylindrical pot, use:
3.14 × radius × radius × depth ÷ 1,000 = litres
A cylinder 34 cm across and 30 cm deep has a radius of 17 cm, so the calculation is about 27.2 L. Those examples show why outside measurements can mislead. Thick walls, a narrow base and a tapered profile all reduce the space available inside. For a separate bag calculation, How much potting mix does a 5-gallon (19 L) container hold? is a useful question to settle before buying mix.
For a full-season tomato, I’d treat roughly 30–40 cm (12–16 in) of usable depth as a safer working target. That isn’t a magic root line. It is a practical margin for a plant that must hold itself upright, keep finding water through warm weather and support fruit above the rim. A 20 L pot can meet that target if it is shaped well; a wide, shallow planter can have similar volume while giving less depth and a larger exposed surface.
Two pots with the same capacity can behave differently. A broad, low pot has a wider base and is harder for wind to tip, but its larger surface may lose water quickly. A tall, narrow pot presents less surface area but can be top-heavy once a tomato and its support rise above it. On an exposed balcony, I favour a broad base and a support that doesn’t turn the pot into a sail.
Leave about two fingers of space between the final mix level and the rim, roughly 3–5 cm (1–2 in). That gap gives you room to water slowly without washing mix over the edge. Remember that the root ball occupies part of the container: it counts as occupied root space, but it reduces the amount of new mix you need to add. Don’t fill the pot to the rim simply because the label’s capacity was measured there.
A filled 30 L pot can be substantially heavier than an empty one because wet mix, the container, the support and the plant all add load. Before placing it near a balcony edge, check local building, strata or housing guidance on balcony load limits. Put the pot in its final position before filling if moving it afterward would require lifting.
One-pot setup, in the order that prevents avoidable failures
This is the order I’d follow so the support, drainage and balcony constraints are solved before the tomato becomes difficult to handle.
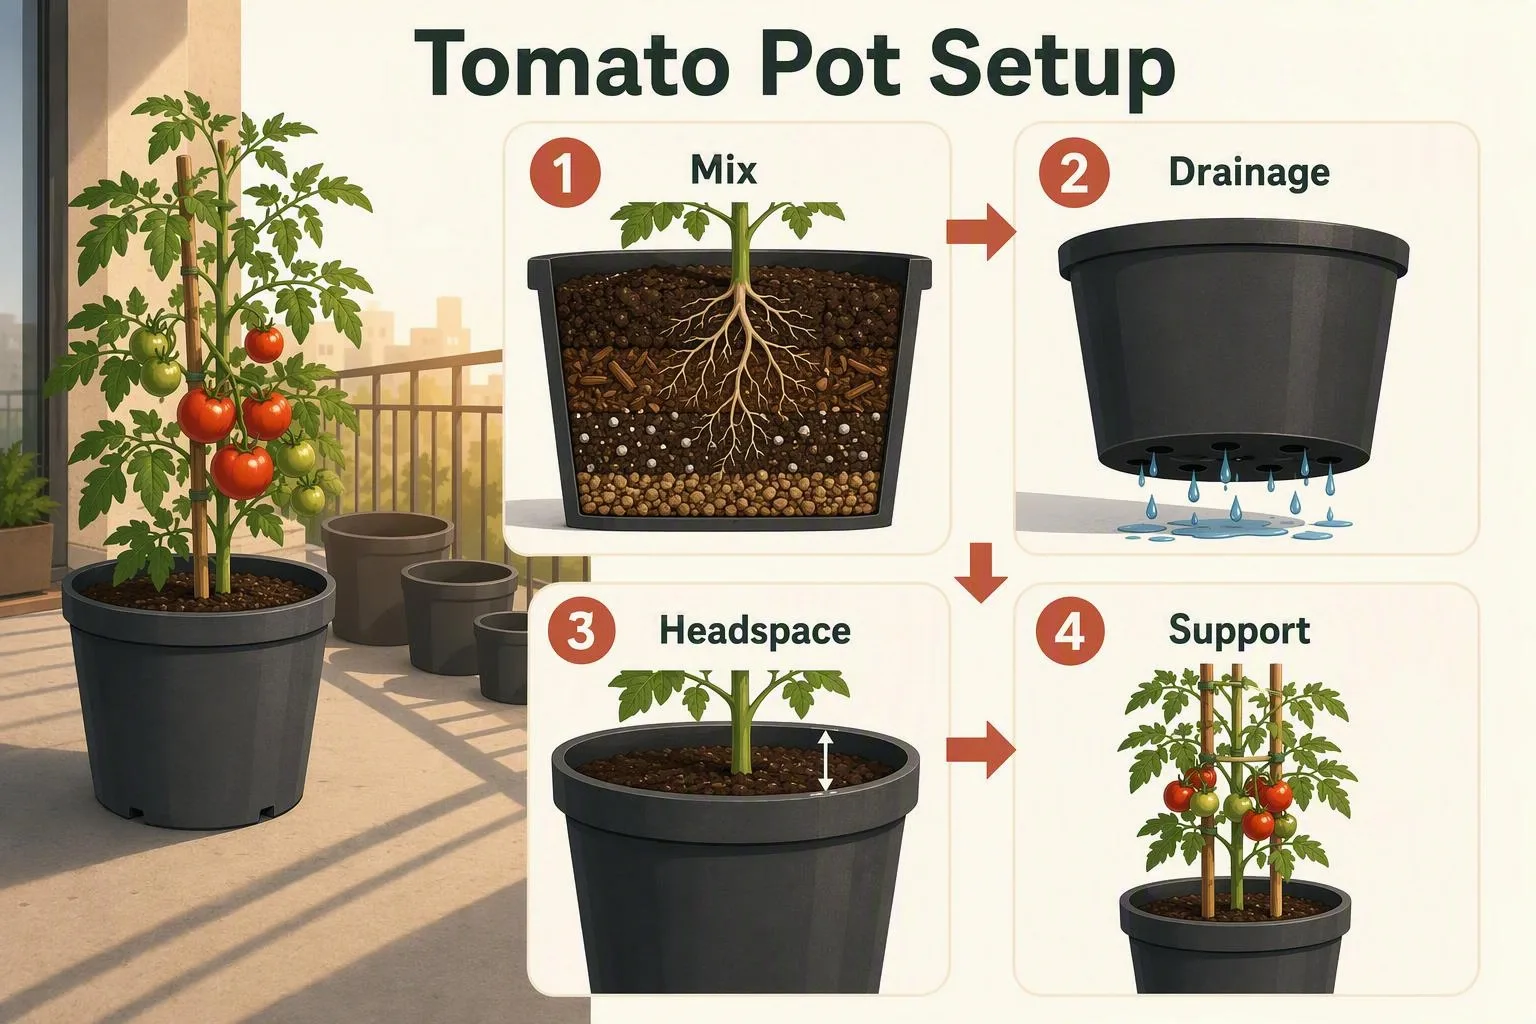
- Choose and position the container first. Use a container sold or clearly intended for edible plants, with several unobstructed drainage holes. Check the rim, base and support before filling it. Reclaimed timber may have been treated, and a decorative glaze may have an unknown composition, so check food-safety guidance for treated timber and unknown glazes rather than assuming an attractive planter is suitable for food crops. Place the empty pot where it gets the strongest available direct light, is protected from the worst wind and can’t send runoff onto a neighbour’s balcony.
- Use potting mix, not garden soil. Garden soil can compact inside a pot, closing the air spaces that roots need after watering. A purpose-made potting mix is blended for a confined container and normally contains materials that maintain more pore space. Don’t improve a poor mix by adding a layer of garden soil at the bottom; that makes the root zone less predictable.
- Keep the drainage holes open and skip the gravel layer. A pot drains through its holes; it doesn’t need a bed of stones to create a drain. The phrase Tomato pot drainage: why gravel in the bottom makes it worse explains the mechanism: fine potting mix can hold a perched water table, meaning a saturated layer remains above the drainage opening because capillary forces hold water in the small spaces. Coarse gravel underneath doesn’t pull that water down. At the fine-mix-to-gravel boundary, the water can remain perched above the gravel and you have also lost root volume.
- Fill to the correct line. Add the mix in stages and settle it with a light tap, not heavy compression. Stop two fingers below the rim. If the mix is bone dry, moisten it before planting; extremely dry mix can let water run down the sides while leaving the centre dry. The aim is an evenly damp root zone, not a muddy pot.
- Plant the tomato deeply. Remove the lower leaves and bury part of the stem, leaving the remaining foliage above the mix. Tomato stems can form additional roots along buried sections, giving the plant more contact with the container mix. If the plant is grafted and has a visible swollen graft union, keep that union above the surface so the rootstock doesn’t make unwanted roots of its own. Never bury leaves; they can stay wet against the mix and decay.
- Install support while the plant is still manageable. Put a cage around the plant or position a stake as you plant, rather than pushing it through a dense root system after the tomato is tall. Fruit and foliage move the centre of weight upward, and wind applies leverage to the stem and pot. A sturdy support is part of the container specification, not an accessory to add later.
- Water slowly until you see drainage. Pour around the root zone in a controlled stream. A little runoff shows that water has found a path through the container, but it doesn’t prove every dry pocket has been rewetted. If water races down the sides of a very dry mix, pause for a few minutes and make a second pass. Use a saucer to protect the balcony, then empty standing water after drainage stops; a pot sitting in water can keep the lower mix short of oxygen.
- Feed only after the mix is moist, and follow the fertiliser label. Watering carries soluble nutrients out through the drainage holes, so a container has a finite nutrient reserve. A feed applied to bone-dry mix can create a concentrated patch around dry roots. Moisten first, then use the product’s stated rate and interval. If the mix already contains controlled-release fertiliser, read that label before adding another full dose.
The order matters. A support added late can damage roots, a blocked hole can keep the lower root zone wet, and a pot filled before its final position may become too heavy to move safely. The tomato is easiest to manage while it is still a small plant attached to a light container.
What 10 L changes after planting: watering, feeding and the first warning signs
Container size becomes visible in the maintenance routine. A 10 L pot holds less water between the spaces in its mix, so the same sunny, windy site can move it from damp to dry in a short interval. A 30 L pot gives you a larger buffer, but the plant will also become larger and transpire more as roots and foliage fill the container.
Use conditions rather than a fixed calendar. In a plastic pot in full sun and wind, a 10 L tomato may need a daily moisture check and sometimes daily watering. In a glazed 30 L pot in cooler part shade, the next check may be every third day or longer. Those are starting conditions, not promises: a heatwave, a newly planted root ball, mature foliage, rain, wind direction or a reflective wall can flip either example.
Check a few centimetres below the surface, roughly 3–5 cm (1–2 in), and consider the pot’s weight when it is safe to lift. The surface can look dry while the lower mix is wet, or look dark after a shallow watering while the root ball remains dry. A moisture decision based on the root zone is more useful than a watering reminder that ignores pot material and weather. For the balcony version of this problem, How often to water container tomatoes in hot, windy weather is the next practical reference.
| What you see | First check | What to do |
|---|---|---|
| Limp leaves, a light pot and dry mix below the surface | Underwatering is the first place I’d look | Water slowly until drainage, then protect the pot from the strongest drying wind and recheck the mix |
| Limp leaves while the mix stays wet | Look for blocked holes or standing water | Stop adding water, clear the drainage route and empty the saucer |
| Yellowing leaves with persistently wet mix | Root oxygen and drainage, before adding feed | Correct the wet conditions; inspect roots or repot only if the problem persists |
| Cracked fruit | Recent swings between dry and heavily wet | Use deeper, more even watering rather than alternating drought with a flood |
| Brown, leathery patch at the blossom end | Disrupted calcium delivery and uneven water uptake | Keep moisture steadier and don’t assume a calcium product alone will repair the root-zone problem |
Midday wilt needs one extra check. If the mix is moist and the plant firms up again in the evening, heat load or temporary transpiration demand may be involved; wilt by itself does not prove the pot is dry. If the leaves remain limp and the pot is light, water is the more direct suspect.
Cracked fruit and blossom-end rot also tell different stories from a simple nutrient shortage. Fruit can split when water becomes available rapidly after a dry period and the fruit expands faster than its skin. Blossom-end rot is a dead, sunken patch at the end opposite the stem; in a container tomato, I’d first stabilise moisture and inspect root conditions rather than throwing calcium at a pot that is waterlogged, salt-loaded or drying unevenly.
Pot size improves consistency; it cannot promise a crop. Low light, cool conditions, disease, poor pollination and a plant that simply doesn’t suit the site can still limit fruit. If flowers appear but fail to develop, check the amount and quality of direct light before buying an even larger container. More mix cannot replace the energy a tomato needs to flower and fill fruit.
Is a fabric grow bag better than a plastic pot for tomatoes?
Neither is automatically better. Fabric allows evaporation and air exchange through its sides, which can help a wet root zone dry, but that same side loss can make a 10 L bag demanding on a sunny, windy balcony. Plastic slows side evaporation and usually holds the moisture reserve longer. I’d choose fabric when you can check the plant often and want a lighter container, and plastic when holding moisture is the bigger problem. Neither material substitutes for adequate volume, usable depth or drainage.
Can I grow a tomato indoors in a 30 L container?
Thirty litres solves a root-space limitation, not a light or pollination limitation. A tomato in a dim windowsill will likely produce foliage with disappointing fruit set. Strong direct light or a suitable grow light is needed for a worthwhile indoor attempt, and flowers may need gentle movement because indoor air doesn’t provide the same disturbance as an exposed outdoor site. The container can be perfectly sized while the window remains unsuitable.
Should I remove side shoots from a potted tomato?
Pruning depends on the variety and the support. Side shoots are stems that emerge where a leaf joins the main stem. Dwarf and determinate tomatoes often need little aggressive pruning, while an indeterminate plant can be trained to one or two main stems if its cage or stake is secure. Pruning can control shape and keep foliage from becoming unmanageable, but it cannot compensate for insufficient light or a root system cramped in the wrong pot.
Before the weekend, measure the container’s internal dimensions, check the balcony at its brightest part of the day, confirm the drainage holes and load guidance, then buy mix for one plant rather than dividing the volume. Within a week, lift the smaller pot before watering or feel 3–5 cm down in the mix; that check will tell you whether the chosen litre size matches the actual site.