How to Propagate Lavender: Cuttings, Timing and Aftercare
An 8–12 cm (3–5 in) non-flowering stem is my default starting point for propagating lavender. Take it just below a node, place it in a 7.5–10 cm (3–4 in) pot of airy, low-fertility mix, and keep the base lightly moist without turning the pot into a sealed wet box.
That sounds simple, but lavender is less forgiving than a soft-stemmed houseplant. The cutting needs enough humidity to avoid collapsing, yet enough air around its buried stem to avoid rot. Here is the balcony-scale method I use, including the points where I would stop trying to rescue a poor cutting and start again.
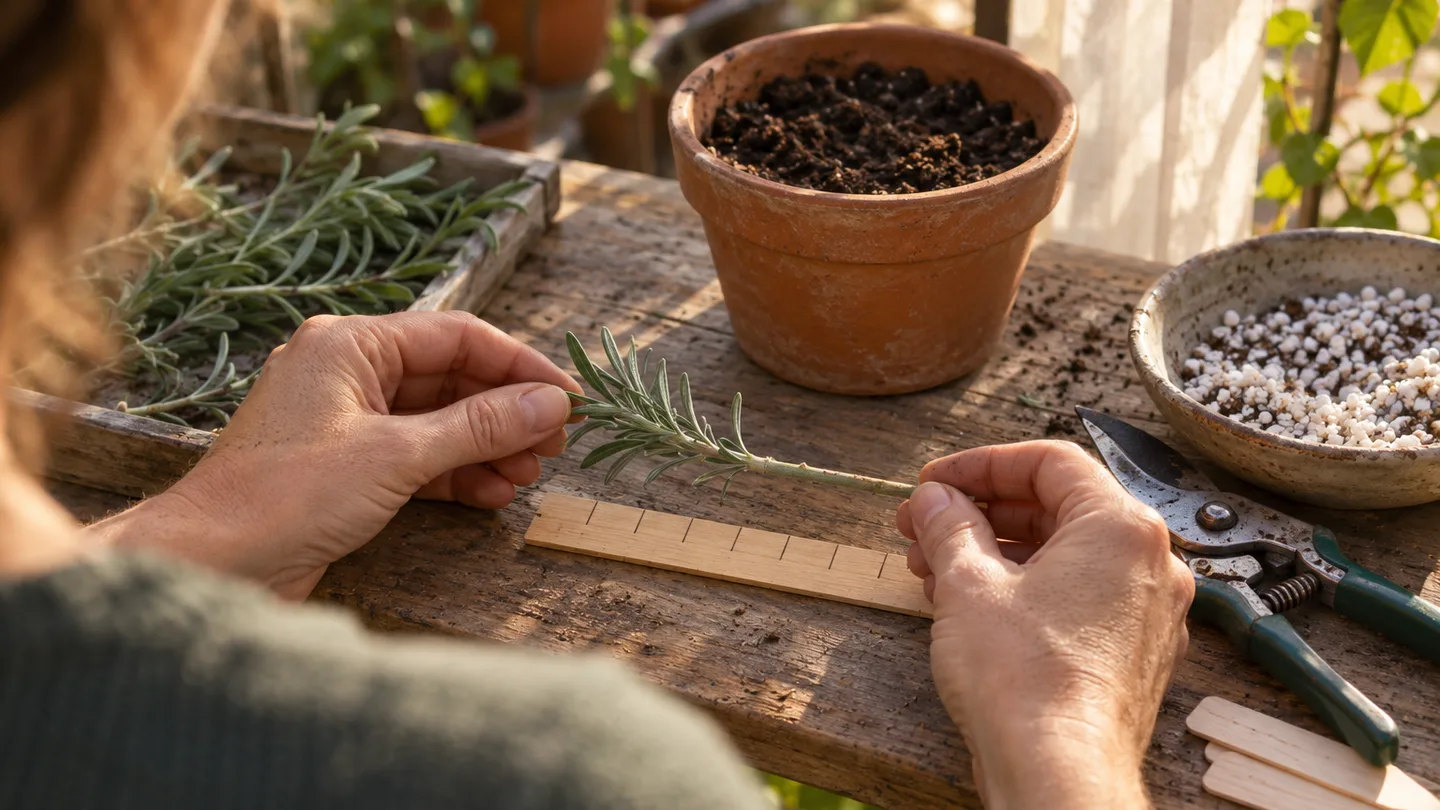
How to propagate lavender from cuttings: choose an 8–12 cm (3–5 in) stem
Choose a healthy side stem with fresh, flexible growth and no flower head. Measure roughly 8–12 cm (3–5 in) from the tip, but judge the stem by texture as well as length. It should bend slightly rather than snap like dry brown wood.
A node is the point where a pair of leaves joins the stem. I make the lower cut just below one because that junction gives the buried section a useful place to begin forming roots. The cutting does not need to be long. A short stem with two or three good nodes is easier to keep hydrated than a long, leafy piece that loses water before it has roots.
You may meet three kinds of material on the same plant:
- Softwood: new green growth that bends easily and may feel slightly succulent.
- Semi-ripe wood: newer growth with a firmer base and a still-flexible tip.
- Old woody growth: hard brown stem that bends little and may have few useful leaves.
For a first attempt, I would choose softwood or semi-ripe material. A heel cutting from semi-ripe growth can work when ordinary cuttings are scarce, but hard old wood gives you less room for error.
Cuttings are also the sensible route if you want to preserve a named lavender. Vegetative propagation makes a new plant from the parent tissue, so the flower colour, scent and general habit are carried forward more closely than they would be from seed. Label the cutting before you forget which cultivar it came from.
Timing by stem type: late spring softwood or late-summer semi-ripe cuttings
The right timing is a stage of growth rather than a date printed on the calendar. I look for active, healthy shoots, moderate weather and enough growing time left for the cutting to establish before a cold spell or a sustained heatwave.
Late spring to early summer is the usual softwood window. The new stems are flexible and green, but they should be long enough to handle and preferably free from flower buds. Softwood can root readily in a warm, bright setup, but it also loses water quickly. On an exposed balcony, wind protection matters almost as much as the rooting mix.
Late summer to early autumn suits semi-ripe cuttings. By then, the base of the current season’s growth has begun to firm while the tip remains flexible. That combination is easier to handle than very soft growth and less reluctant than hard brown wood.
I aim for moderate warmth around 15–21°C (59–70°F), bright light and enough remaining daylight for the cutting to stay active. Treat that as a working range, not a magic threshold. A cutting can remain green in a cool room without making useful roots, while a cutting in a hot, windy spot may lose water faster than its bare stem can replace it.
Winter cuttings are harder for most balcony growers because light is weaker and the pot may stay damp for too long. Heatwave cuttings present the opposite problem: leaves transpire quickly, covers overheat and the mix can swing from wet to dry. If every available shoot is flowering, I would wait for a suitable side stem rather than taking a long, stressed flowering piece.
I use RHS guidance on taking softwood and semi-ripe cuttings and growing lavender as a useful seasonal cross-check, especially when the local climate does not match the usual late-spring or late-summer pattern. The plant in front of you still gets the final vote.
A 7.5–10 cm (3–4 in) pot and an airy mix: prepare the rooting station first
Prepare the pot before you cut the stem. A fresh cutting can wilt while you look for a label, mix or clean snips, and repeatedly handling a limp stem makes the job harder.
| Item | Practical choice | Why it earns its place |
|---|---|---|
| Starter pot | 7.5–10 cm (3–4 in), with open drainage holes | Small enough to monitor moisture without holding a large unused mass of wet mix |
| Rooting mix | About one-third perlite or coarse horticultural grit by volume, with the remainder a fine seed-and-cutting mix | Creates air spaces around the stem while retaining some moisture |
| Label | Cultivar name and cutting date | Preserves the identity of a named parent plant |
| Snips | Clean and sharp | Makes a smooth cut instead of crushing the stem |
| Cover | Optional clear bag or small propagator | Slows water loss while the cutting has no roots |
I use roughly one-third perlite or coarse grit because lavender cuttings need a balance between moisture and oxygen. The mix should hold enough water for the bare stem to stay viable, but it should also contain open spaces so the stem base is not sitting in stagnant wet material. Rich compost is not an advantage at this stage. The cutting needs to make roots before it has much use for feeding.
One cutting per starter pot is the simplest arrangement because it lets you inspect and pot up each plant without disturbing its neighbours. You can place several around the edge of a larger pot, but keep the leaves from crowding and expect to separate them later. A huge pot is not safer: it leaves a small rootless stem surrounded by more wet mix than it can use.
Test the drainage holes with a quick pour of water. It should leave the pot rather than collect in a blocked saucer. Skip the gravel layer at the bottom. A coarse layer beneath fine mix does not create a hidden drainpipe; water can remain held in the finer mix above that boundary. The useful improvement comes from an open mix throughout the pot and unobstructed holes.
Before inserting a cutting, dampen the mix evenly. Pour slowly until a little water runs from the holes, then let the pot drain fully. Empty any standing water from the saucer. You want settled, evenly moist medium, not a saturated container waiting for a stem to rot.
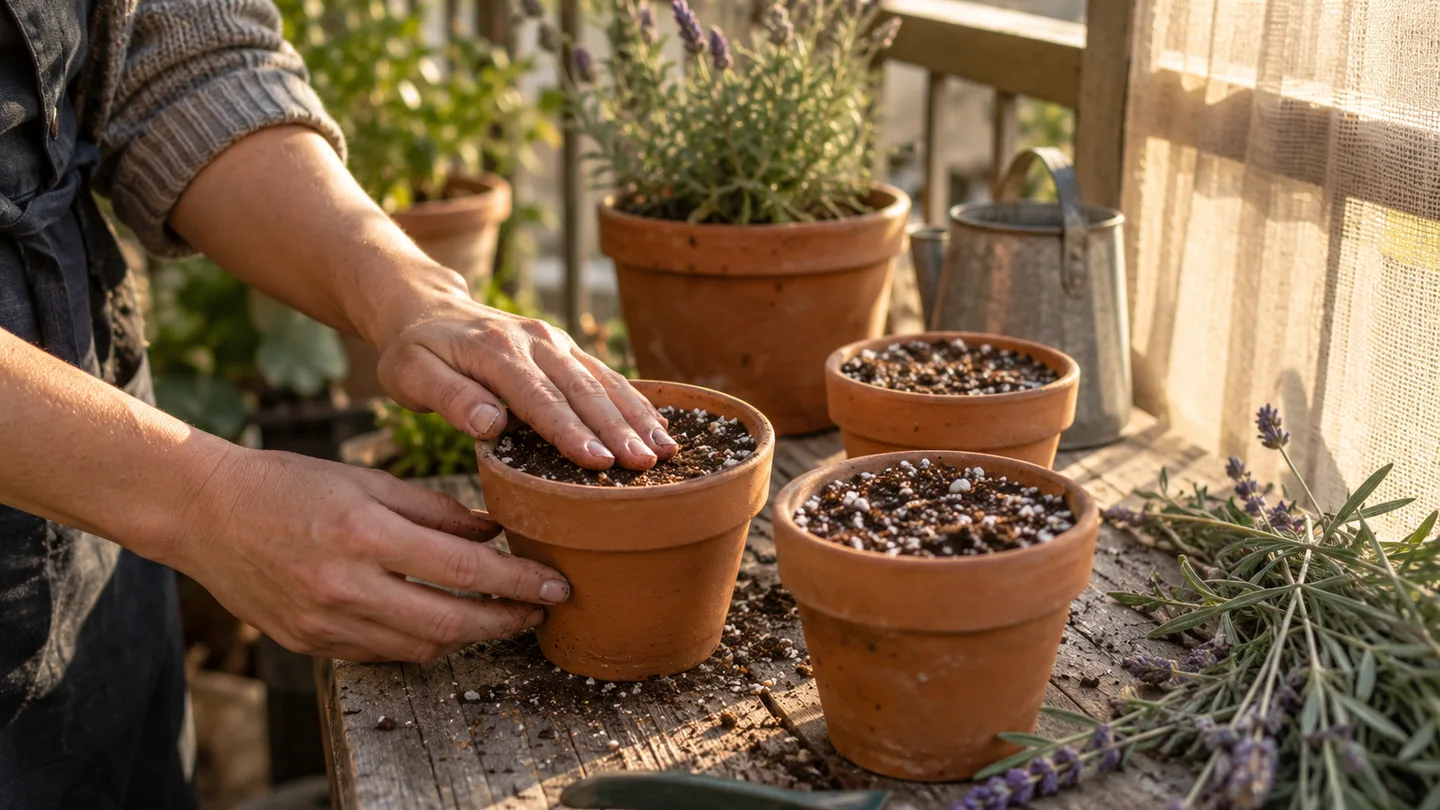
Take the cutting in four moves: cut below a node, strip the base, and remove flowers
I use four moves, in this order. The order matters because every retained leaf continues losing water before the cutting has roots, and every buried leaf becomes a soft, decaying surface in the mix.
- Choose a healthy, non-flowering side stem. Avoid black spots, insect damage, soft tissue and a damaged tip. Propagation is not a good place to give a struggling stem a second job.
- Cut an 8–12 cm (3–5 in) section. Use clean snips. Make the lower cut just below a node, and keep the top cut straight or slightly angled so you can identify which end goes into the mix.
- Strip the lower leaves. Remove leaves from roughly the bottom third to half of the stem. Leave the upper leaves intact, unless the top is so leafy that it wilts immediately.
- Remove the flower head and any very soft tip. Pinch off flowers rather than burying them. If the tip is limp and pale, trim back to firmer green tissue.
Insert the bare lower section into the mix so at least one node is below the surface. Firm the medium gently around the stem. You want contact between stem and mix, not a compressed brick. Leave roughly 3–5 cm (1–2 in) of leafy stem above the surface, adjusting that distance to the cutting’s total length.
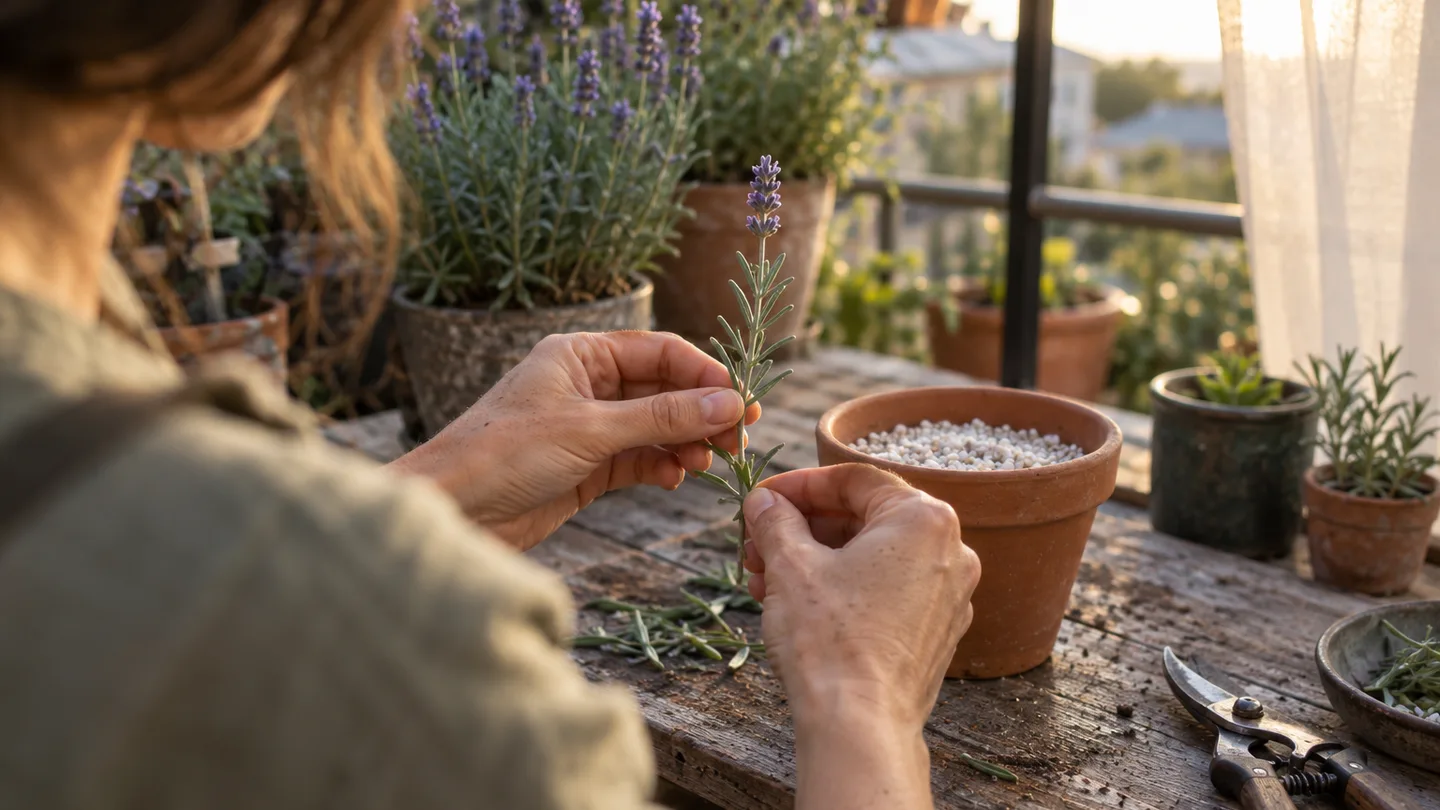
A heel cutting is made by pulling a side shoot away from the main stem so that a small sliver of older stem remains attached at its base. I would try one with a suitable semi-ripe shoot if standard cuttings are unavailable, but I would not damage a valuable parent plant just to make a heel. Fresh, clean, flexible material is the safer default.
Do not try to rescue a cutting with a crushed base, visible disease or heavily blackened tissue. Discard it, wash the snips and start with a clean stem. A cutting that begins with damaged tissue can make the moisture problem look like a watering problem later.
The first 4–8 weeks: bright light, light moisture, and moving air
Place the pot in bright filtered light. A bright windowsill, sheltered patio or balcony position out of strong midday sun is better than a dark corner or a hot wall that reflects heat onto the leaves. Protect the pot from drying wind, which can dehydrate an unrooted cutting surprisingly quickly.
A clear bag or propagator cover can help by slowing water loss, but it should not be sealed permanently. Keep the plastic off the leaves and lift or vent it regularly. Humidity is a bridge to the first roots, not a permanent habitat. Stale, wet air encourages mould, while a sealed cover can heat up when sun reaches it.
My phone-friendly check routine is simple:
- Look at the mix surface and feel the pot’s weight.
- Water when the upper layer is beginning to dry, before the whole small pot becomes dusty.
- Pour slowly until the mix is evenly damp, then empty standing water.
- Remove fallen leaves and check that the stem base remains firm.
Do not follow a fixed daily watering schedule. A small plastic pot in warm sun may need checking every day, while a glazed pot in cooler filtered light may stay damp for several days. Wind, temperature, cover, mix texture and pot material all change the answer.
In my own balcony setup, I once put two fresh lavender cuttings into a 9 cm plastic pot, covered it with a clear bag and forgot to vent it for several days. The leaves stayed present, but the lower stems softened while the mix remained wet. I discarded that pair, washed the pot and started again with an airier mix and the bag lifted on one side. The useful lesson was not that covers are bad; it was that a cover changes the moisture and airflow rules.
I treat 4–8 weeks as a working expectation for rooting under suitable conditions, not as a deadline. Cool temperatures, weak light, poor stem contact or an overly wet pot can slow the process. A cutting can remain green for a while without having enough roots to support new growth.
Pot up only when the root ball holds together
A calendar cannot tell you whether a cutting is ready for a larger pot. Look for a combination of signs: firm new growth, gentle resistance when the cutting is nudged, roots visible at the drainage holes, or a root ball that stays together when the starter pot is tipped out.
Do not yank the stem to test it. Resistance can come from the stem being wedged in the mix, and pulling can tear fine new roots. If you need to inspect the plant, squeeze the pot gently, tip the root ball into your hand and support the mix rather than pulling from above.
Move a rooted cutting from its 7.5–10 cm (3–4 in) starter pot into a modest 1–2 litre (0.25–0.5 US gal) container. The aim is to give the new roots fresh room without surrounding them with a large volume of mix that stays wet after watering. Water the new pot in, let it drain, and keep the plant sheltered while it resumes growth.
Harden it outdoors over 7–14 days. Start in a sheltered position, then increase exposure to direct sun and wind in stages. If the leaves wilt by afternoon or the new pot dries unusually fast, step back to a gentler position for another day or two rather than responding with constant watering.
Failure guide: black stem bases, wilted tips, mould, and no roots
Lavender cuttings usually tell you what went wrong if you inspect the stem base before reaching for more water. My triage order is: inspect the stem, check the medium, improve airflow, and only then adjust watering. That order prevents a wet cutting from being treated as thirsty simply because its leaves are limp.
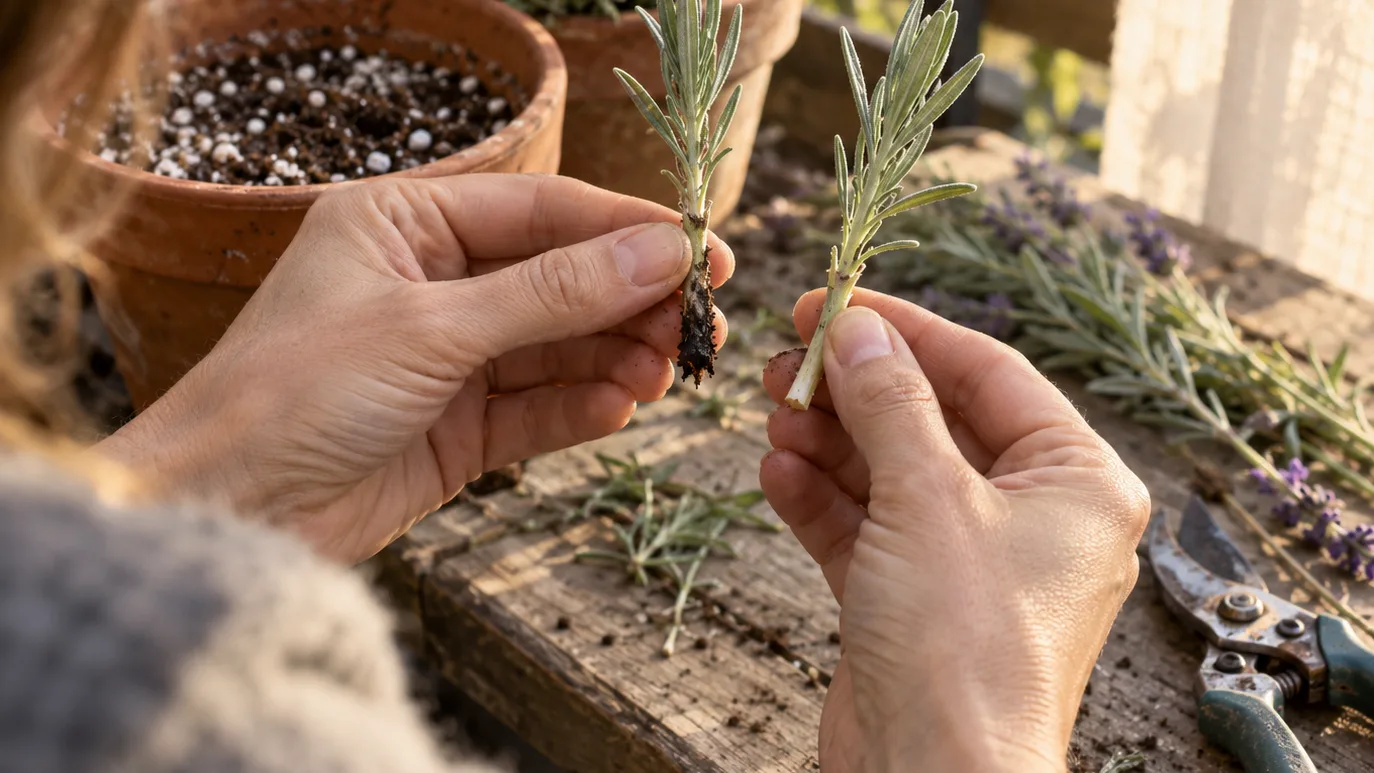
Black or soft stem base
What it looks like: the buried section is dark, soft or collapsing, sometimes with a sour smell, while the upper leaves may still look acceptable.
What I check first: saturated mix, a blocked drainage hole, a cover left sealed, a crushed cutting base or dirty snips. A stem base with little air around it can deteriorate before the leaves show the full problem.
What to do: if the dark tissue reaches upward or the stem is hollow and soft, discard the cutting. If the damage is limited and the upper section is firm, you can recut above the damaged area into clean tissue and reinsert it into fresh, slightly moist mix. I would only attempt that once; repeated handling usually makes the cutting weaker.
Limp leaves with a wet mix
Limp foliage does not automatically mean the plant needs water. Roots, or a rootless stem base, need air as well as moisture. If the medium is already wet, adding more water cannot solve the failure and may make the stem softer.
Move the pot out of hot sun, remove the cover temporarily, check the drainage hole and let the surface begin to dry. If the base remains firm, give the cutting bright filtered light and better airflow. If the base is soft, treat it as a rot problem rather than a thirst problem.
Crisp leaves and a dry pot
Brown, papery tips with a very light pot point toward water loss from heat, wind or insufficient humidity. Water the mix slowly until a little drains, then move the pot to bright shade or filtered light. A loose clear cover can help for a short period, but do not place it in direct hot sun and forget it.
If the mix is damp but the leaves are crisp, inspect the exposure before adding water. A hot balcony wall can stress a cutting even when the pot has not dried. The fix may be less reflected heat, not a wetter root zone.
Grey mould under the cover
Grey fuzzy growth on fallen leaves or the mix surface usually means the cover is holding stale, humid air around dead plant material. Remove the affected leaves, vent the cover, reduce splashing and check that the stem base is firm. If mould is joined by a soft black base, restart with clean material rather than trying to maintain the same cutting.
For a second reference, I find plant health and university extension guidance on propagation media, humidity, sanitation, damping-off and stem rot useful here. The general principle is straightforward: clean tools and controlled moisture matter more than adding feed.
Green but unchanged after several weeks
A cutting that remains green but produces no new growth may be alive without being rooted. Check whether the buried section includes a node, whether the medium is too wet or too dry, whether the stem is old and woody, and whether the pot is sitting somewhere too cool or dim.
Do not keep pulling it up every few days. Give it a stable setup, then inspect gently after a reasonable interval. If the stem stays firm but has no roots after the surrounding conditions have been corrected, I would restart with younger, non-flowering material rather than spending a whole season on an unpromising piece.
The first year after rooting: plant out, overwinter, and preserve the parent variety
Once the root ball holds together, treat the plant as a young lavender rather than as a permanent propagation project. Give it the brightest practical position, sharply drained mix and a container that is only modestly larger than the roots. Lavender dislikes sitting in a large, wet volume while the root system is still small.
English lavender and lavandin are generally easier to move outdoors once established and once the risk of severe frost has passed. French or Spanish types are less forgiving of cold and wet winter conditions in many balcony setups, so I would keep a young plant in a bright, frost-free place if the cultivar is tender in your climate. The label matters here; the care decision changes with the type of lavender, not just the colour of the flowers.
For plants going into a shared planter or a larger patio bed, allow roughly 30–60 cm (12–24 in) between plants, depending on the mature cultivar. A compact cultivar can sit closer than a broad lavandin, but crowded foliage dries slowly after rain and becomes harder to prune cleanly.
Set a modest first-year goal. The new plant is mainly building roots and branching, not trying to become a large flowering mound immediately. If it flowers lightly, that is a bonus. I would remove a weak flower spike if it leaves the young plant floppy, but I would not force a heavily pruned shape while the root system is still establishing.
Keep the cultivar label with the new pot. If this propagation is part of a larger balcony plan, Easy fruits and vegetables to grow in pots is a useful companion when deciding which plants deserve the sunniest containers and which can cope with a smaller footprint.
Can lavender cuttings root in water?
They may produce roots in water, but I prefer a free-draining rooting medium for lavender. Water makes it easy to keep the lower stem submerged, and that is also an easy way to soften or rot the base. Roots formed in water then have to adjust when moved into a medium with air spaces, so I would use water only as an experiment rather than my main method.
Do I need rooting hormone for lavender cuttings?
Rooting hormone is optional for suitable young lavender stems. If you use it, apply only a light coating to the freshly cut base and tap off excess powder. Hormone cannot compensate for saturated mix, poor-quality wood, a damaged base or a sealed cover. I would improve those conditions first.
Can I propagate lavender from a woody stem?
You can try, but old, hard brown wood is the least forgiving material. A flexible semi-ripe stem with a firmer base can work, especially as a heel cutting. For a beginner, a fresh non-flowering side stem is the better bet because it gives you more viable leaves, more flexible tissue and a cleaner section to insert.
Before the weekend, choose one healthy non-flowering shoot, label a 7.5–10 cm (3–4 in) pot, mix the airy medium and test the drainage hole. By the end of the first week, the cutting should still have a firm base and leaves that are neither crisp nor permanently limp; if it does not, inspect the stem before you add more water.
Frequently Asked Questions
Can lavender cuttings root in water?
They may produce roots in water, but lavender is better suited to a free-draining rooting medium; water-grown roots can struggle when moved into potting mix and the stem base is easier to rot if submerged.
Do I need rooting hormone for lavender cuttings?
Rooting hormone is optional rather than essential for suitable young lavender stems. Explain when it may be useful, how to apply only a light coating, and why excess powder does not compensate for saturated compost or poor-quality cuttings.
Can I propagate lavender from a woody stem?
Old, hard brown wood is the least reliable material. A flexible semi-ripe stem with a firmer base can work, especially as a heel cutting, but a fresh non-flowering stem is the safer choice for beginners.