Damping Off in Seedlings: How to Prevent It in Pots
A seedling that goes from upright to flat overnight often has damping off: look at the soil line for a brown, water-soaked or thread-thin constriction. In pots, the fix is rarely a magic spray; it is a sequence of clean materials, open drainage, controlled moisture, bright light and enough air around the stems.
On my balcony shelf, I once left newly emerged seedlings under a clear cover through a cool, grey afternoon. The mix stayed dark and wet, the stems stretched towards the window, and one seedling developed a brown narrowing exactly where it met the surface. I removed that seedling, emptied the shared tray and changed the routine for the firm ones. The useful lesson was not that a cover is forbidden. It was that cool conditions can slow water use while a closed tray keeps the root zone wet.
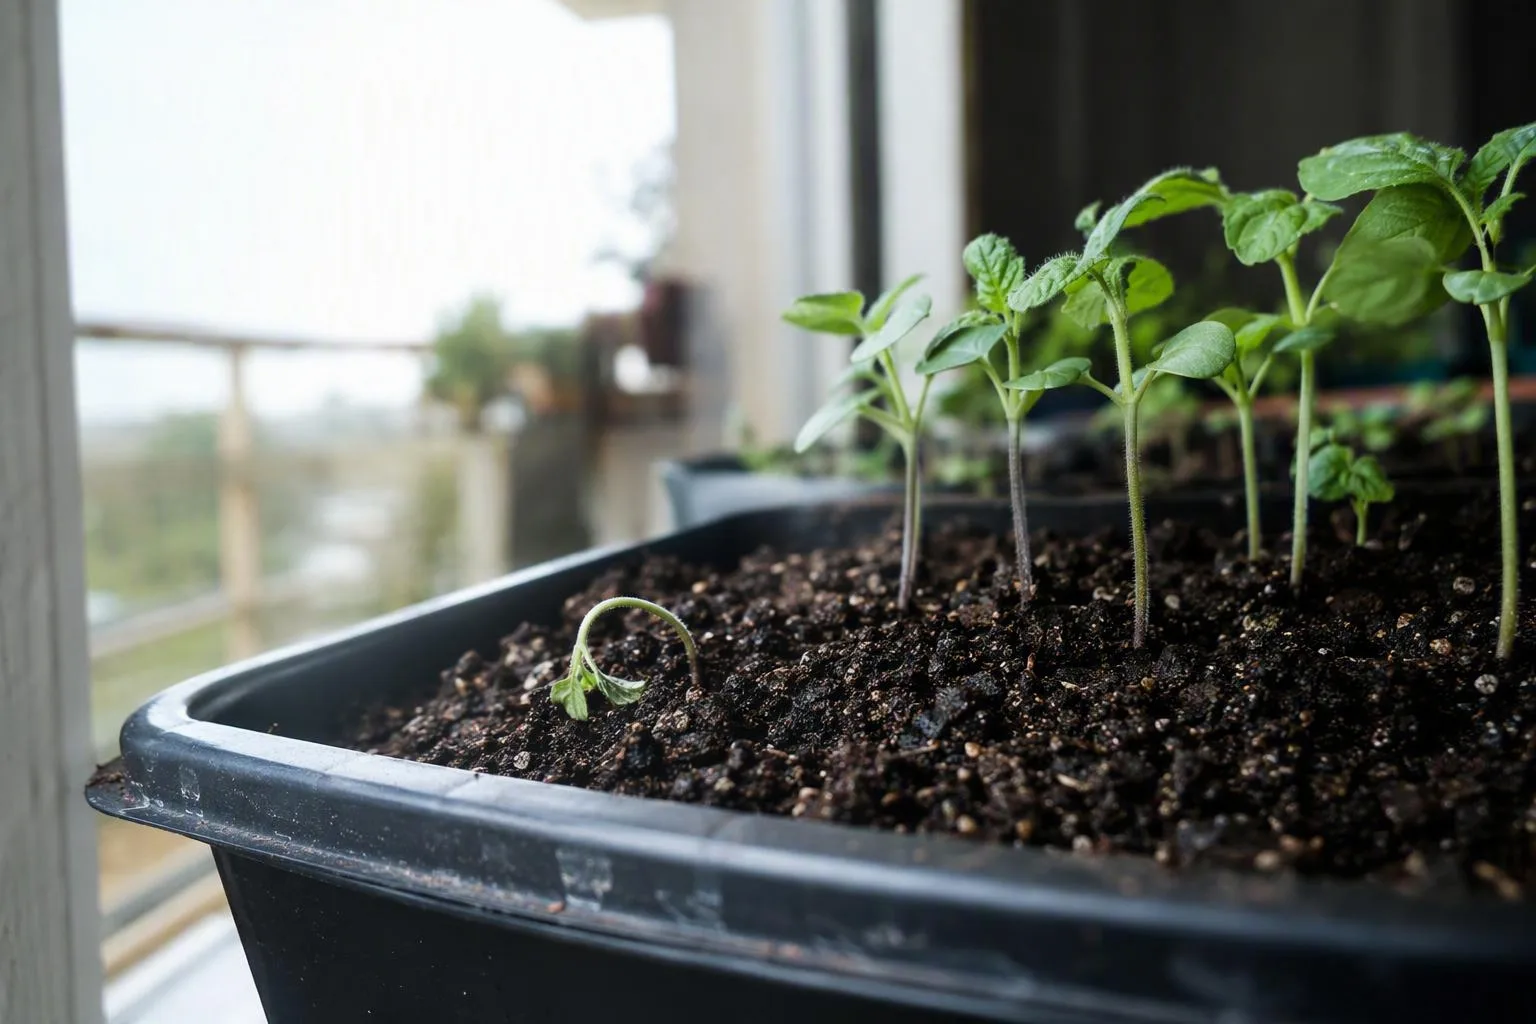
A seedling that falls at the soil line: identify damping off before changing anything
Start with the stem, not the leaves. A wilted seedling is not automatically a damping-off case. I look for the point where the stem enters the mix: if it is brown, soft, water-soaked or narrowed to a thread, the seedling has probably lost the stem tissue that carries water between its roots and leaves.
The word damping off covers a syndrome rather than one single disease. Several soil-borne fungi and fungus-like organisms can be involved, including Pythium and Rhizoctonia, so two trays with the same collapsed appearance may not respond to exactly the same treatment. The conditions matter more than identifying the organism at home: constantly wet mix, crowded stems, weak air movement and contaminated containers or tools give the problem a favourable starting point.
Timing helps, but it does not prove the diagnosis. Damping off often appears during the first few weeks after emergence, when stems are tender and roots occupy a very small volume of mix. A pot that remains saturated can still cause trouble later, especially after transplanting or during a cool spell when the plant is using little water.
| What you see | What it suggests | What I check next |
|---|---|---|
| Seed fails before a shoot appears | Pre-emergence damping off is possible, but a seed may also be old, buried too deeply or kept too cold. | Check sowing depth, seed freshness, mix moisture and whether the surface formed a crust. |
| Stem is brown, soft or pinched at the soil line | This is the classic post-emergence damping-off pattern. | Isolate the pot and inspect nearby seedlings before watering again. |
| Leaves and stem are limp, but the stem remains full and the mix is dry | Ordinary underwatering is a better first possibility. | Check about 1 cm (½ in) below the surface, then water thoroughly if that zone is dry. |
| Stem is thin, pale and leaning towards the window, with no brown constriction | This points towards a light or spacing problem. It is the separate problem of leggy seedlings. | Increase usable light, rotate the pot and thin the seedlings before they touch. |
| Leaf tips are scorched, growth is stalled and a pale crust sits on the mix | Fertilizer or salt injury may be involved rather than damping off. | Stop strong feeding and review the mix and water source before adding anything else. |
That comparison is worth saving because it stops me from treating every flat seedling the same way. A dry, firm-stemmed seedling may recover after watering; a seedling with a collapsed crown usually cannot rebuild that constricted section.
Specify the pot and mix first: a 5–8 cm container, open drainage and no gravel layer
For many small seedlings, I start with a clean container about 5–8 cm deep (2–3 in), with a drainage hole or holes that are genuinely open. That is a starting specification for lettuce, herbs and other small seedlings, not a universal lifetime pot. Large seeds, taproots and fast-growing crops need more room according to the packet and the length of time they will stay in the container.
In a shop aisle, I look for four things:
- A washable plastic or fibre pot with an open base.
- Fresh, fine-textured seed-starting mix rather than soil dug from a garden bed.
- A shallow tray that catches water but can be emptied.
- A cover that can be vented or removed as soon as shoots appear.
Fresh seed-starting mix is useful because it is made to give tiny roots a relatively open, even texture. Garden soil can compact inside a small pot into a dense block. That reduces the air-filled spaces around the roots and makes watering less predictable. For the broader mechanics behind container gardening soil, the same rule applies: a mix that behaves well in a large outdoor bed may not behave well in a restricted root volume.
An oversized pot creates a different problem from a cramped cell. A newly germinated seedling uses very little water, so a large mass of wet mix can stay damp around its small root ball for a long time. A tiny cell has the opposite weakness: its large exposed surface compared with its small volume lets it dry quickly in sun, wind or a heated room. I choose the smallest container that gives the seedling a little working room, then transplant before the root ball becomes difficult to wet evenly.
The surprising part is that a pot can have an open drainage hole and still be too wet. A perched water table is the wetter band of mix that remains just above the drainage holes after watering. Fine particles hold water by capillary forces; the hole lets excess water leave, but it does not pull every drop from the mix. The lower part can therefore stay saturated until evaporation and root use reduce it.
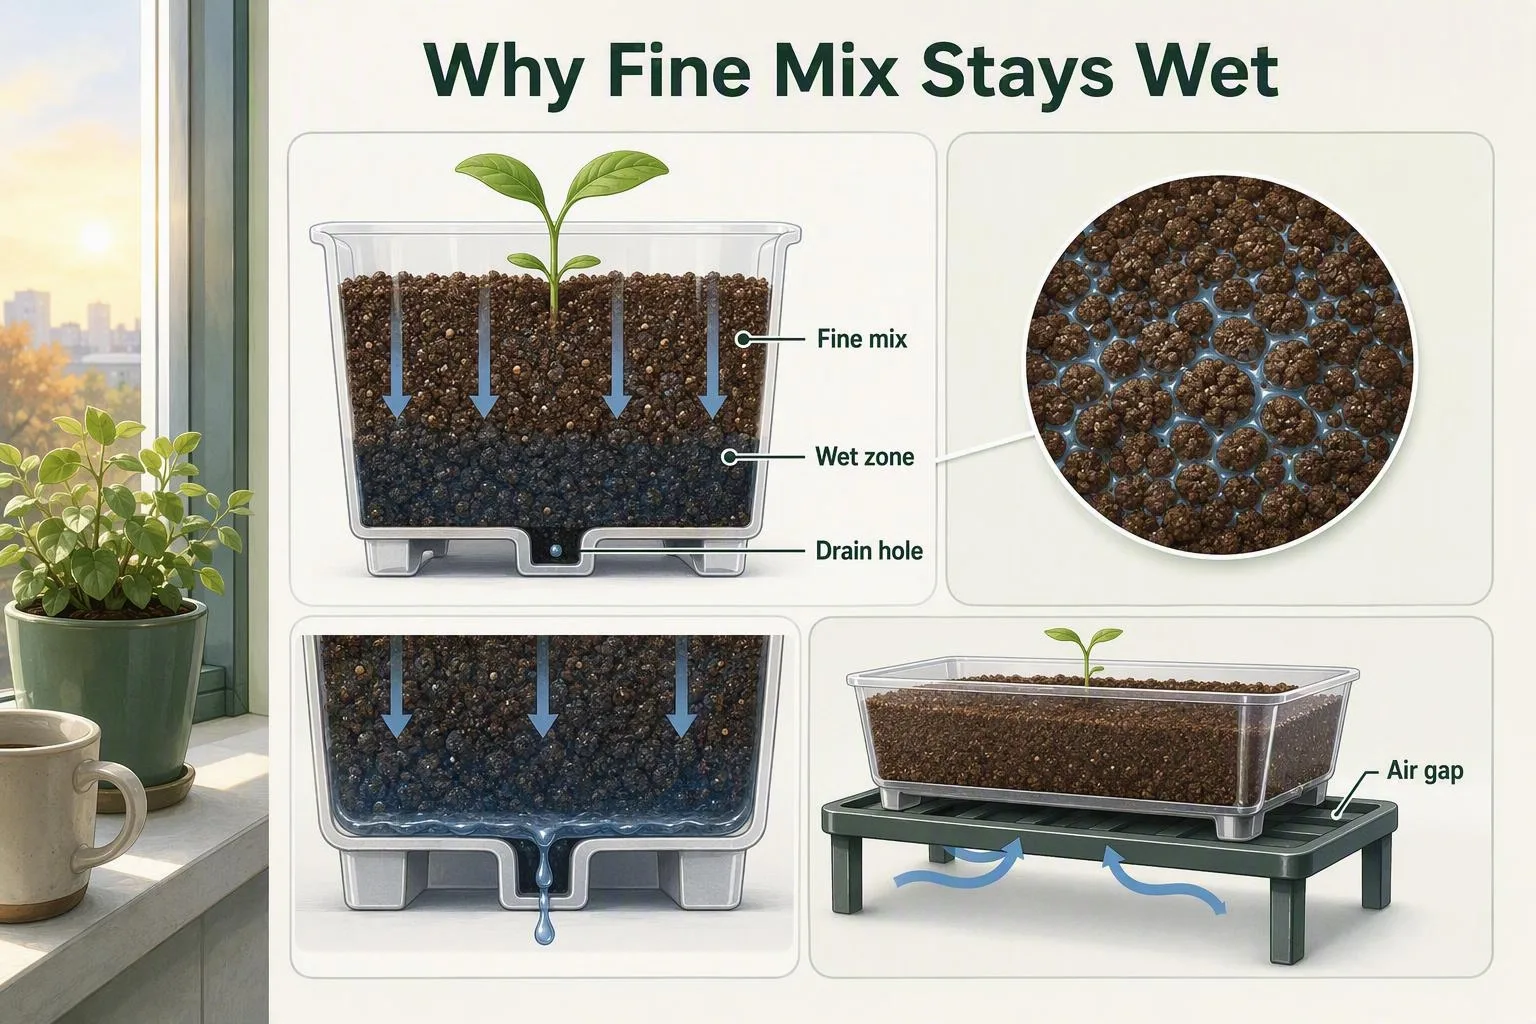
This is why I leave gravel, stones and broken pottery out of the bottom of a seedling pot. A coarse layer under fine mix can move the boundary between the two materials upwards, leaving the fine mix above it wetter rather than creating a faster escape route. The wider rules for drainage holes in pots are simple: keep the holes uncovered, use a mix suited to containers and give the water somewhere to go after it leaves the pot.
Check the pot inside its setting, not just the pot itself. A cachepot is a decorative outer container; if the growing pot sits in one, lift it out for watering or empty the outer pot afterwards. A tray that remains full can turn every small pot into a wick. Blocked holes, a liner pressed over the base or a saucer left full overnight all undo the drainage you thought you bought.
The first seven days after sowing: a moisture-and-air routine that changes at emergence
The order matters. I clean the equipment before filling it, moisten the mix before placing seeds, and change the humidity and airflow as soon as green shoots appear. That prevents me from correcting one risk by creating another.
- Before sowing, wash first. Brush old mix from the pot, tray and dibber before disinfecting. Soil residue can shield the surface underneath, so a rinse is not the same thing as sanitation. For washable plastic, a commonly used starting dilution is 1 part unscented household bleach to 9 parts water, but I use that only where the product label and material permit it. I keep the surface wet for the label-directed contact time, often around 10 minutes for this type of sanitation, then rinse thoroughly and let the equipment dry. I do not combine bleach with another cleaner.
- Pre-moisten the mix. Put the fresh mix in a bowl, add water gradually and stir until it feels evenly damp rather than dripping. Filling a dry cell and then flooding it from above can create channels, float seeds or wash them into a wetter pocket. A pre-moistened mix lets you sow into a stable surface and use less disruptive water afterwards.
- Sow shallowly and lightly. My starting rule is to cover a seed with about two to three times its own thickness, unless the packet says to sow on the surface or at a different depth. Press the mix just enough to give the seed contact; do not tamp it into a hard layer. A compact surface slows emergence and can hold a wet film around the stem as it pushes through.
- Water without leaving a reservoir. Bottom-water by placing the pot in a shallow tray and letting the mix draw up moisture until it is evenly damp. Then lift the pot out after about 10–20 minutes and let excess water drain fully. If the surface is still dry, water gently from below or at the base rather than blasting the seed line from above. Bottom watering is a method, not a permission slip to keep the pot standing in water.
- Change the setup at emergence. Before shoots appear, a cover can reduce drying. Once green stems show, vent the cover or remove it, because the plant now needs a drier, better-moving layer of air around its crown. Give emerged seedlings roughly 12–16 hours of bright light as a starting schedule, adjusted for the crop and the strength of the light. If the window is dim, the stems may stretch even while the mix stays wet.
- Thin before the stems touch. Crowded seedlings create a humid pocket at the surface and make it difficult to water one plant without splashing another. Snip unwanted seedlings at mix level instead of pulling them through the roots of the plants you want to keep. Use gentle air movement, such as a fan placed well away from the tray; strong air that continually bends or dries the seedlings creates a new stress.
In my experience, lettuce and several brassicas tolerate or prefer cooler conditions than peppers and tomatoes, so I do not use a warm, sealed setup for every packet. I follow the packet at the edge of the range and adjust the room rather than forcing all crops into one propagation routine.
Use this phone-friendly moisture check: wait until the surface has lost its glossy wet look, then test about 1 cm (½ in) below it with a clean finger or the end of a label. If that layer is still cool and damp, wait. If it is dry and the pot feels light, water until the mix is evenly moist and let the pot drain. Do not let the small root ball become bone dry. A plastic pot in full sun and wind may need checking daily; a glazed pot in part shade may take several days. The check replaces a fixed calendar.
Seed starting becomes easier when the tray is close enough to inspect without effort. If it is hidden behind other pots, I tend to notice the problem after the surface has dried hard or the stems have already crowded. Put the tray where you can see it twice a day during emergence, while keeping it away from a radiator, cold draught or intense midday glass heat.
If one collapses overnight: the salvage decision and the clean restart
When the stem is already pinched, soft or water-soaked at the soil line, I treat that seedling as a removal job rather than a rescue project. The constricted section is the plant’s narrow transport route between roots and leaves; once it has folded or liquefied, adding water cannot restore the missing tissue.
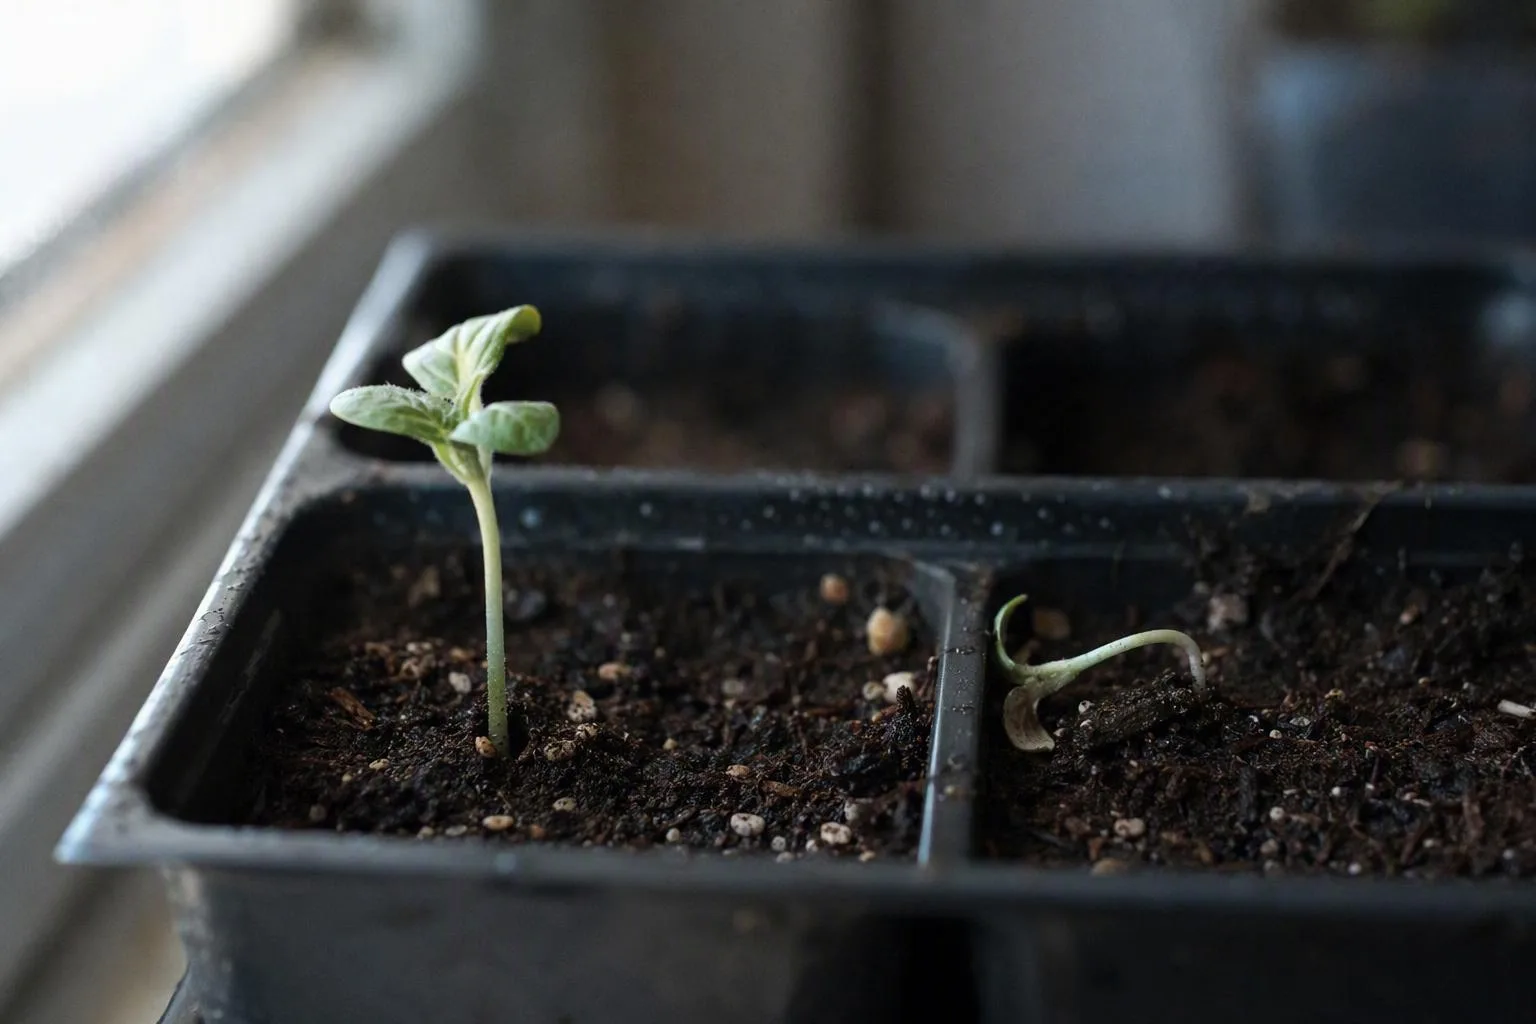
Use this decision path:
- Inspect the crown. If the stem is narrow, brown and soft at the mix line, lift out the seedling promptly. Remove a little of the nearby surface mix if it comes away easily, and keep the pot away from healthy trays.
- Separate dry from wet collapse. If the stem is still firm, test about 1 cm (½ in) down. Dry mix calls for a thorough watering followed by complete drainage. Saturated mix calls for withholding water, opening the airflow around the tray and checking whether a hole, liner, cachepot or full saucer is blocking the exit.
- React to a pattern. If several seedlings collapse within 24–48 hours, stop trying to rescue them one by one. Isolate the tray, empty shared drainage water, clean the container and restart with fresh mix. A cluster points me towards the tray environment or shared contamination, not a single thirsty plant.
- Keep what is still structurally sound. A seedling that is limp from dry mix may recover if its stem remains firm. A leggy seedling may need more light and, for crops that tolerate it, a deeper transplant later. A stem that has collapsed at the crown is the case I discard.
I put affected seedlings and the surface material I remove into a disposal route I am comfortable keeping away from new sowings. I do not rely on a cool home compost pile to heat-treat it. I also wash my hands and tools before returning to healthy seedlings, and I never pour drainage water from the affected tray into another pot.
Fungicide is not a reset button for a collapsed stem. If I consider a pesticide product at all, I check that its local label names the crop, the disease and the application site, then follow the label rather than improvising a concentration. Edible seedlings make that check especially important. For general background, I compare the symptoms with university extension guidance on damping-off symptoms and sanitation, then use your local pesticide-regulator database for the product decision in my jurisdiction.
My one-line rule: a clean pot prevents the avoidable contamination, but a dryable mix and a quick change at emergence prevent the conditions that let it take over.
Questions after a collapse
Can I reuse potting mix from a pot that had damping off?
For new seedlings, my safer restart is fresh seed-starting mix. Used mix may retain the organisms or contaminated plant material associated with the failed seedling, and a small seedling has little room to escape a bad pocket. I do reuse the empty pot after washing off all old mix, disinfecting it with a label-compatible method, rinsing and drying it completely.
Can damping off move from one seed tray to another?
The practical answer is yes, treat shared water and equipment as possible routes. Splashing, a full communal tray, dirty dibbers, hands and reused mix can move contaminated material between pots. I isolate the affected tray, empty its drainage water away from healthy pots and clean the tools before touching another batch.
Does cinnamon prevent damping off?
My opinion is that cinnamon is not a dependable substitute for clean containers, fresh mix, controlled moisture and airflow. A folk remedy does not change a blocked hole, standing water or a crowded crown. If a pesticide is being considered, the local label still decides whether that product and use are permitted for the crop.
Before the weekend, buy fresh seed-starting mix and a clean 5–8 cm (2–3 in) pot with an open base. At the next watering, lift the pot from its tray after 10–20 minutes and mark the surface level of moisture. In a week, check for upright stems, separated leaves and a crown that stays firm as the mix loses its glossy wet look.
Frequently Asked Questions
Can I reuse potting mix from a pot that had damping off?
For new seedlings, the safer restart is fresh seed-starting mix because the old mix may retain pathogens; the empty pot can be reused after washing, disinfecting, rinsing and drying.
Can damping off spread from one seed tray to another?
It can move through shared water, splashing, dirty tools, hands and reused mix, so isolate the affected tray and avoid letting drainage water flow into healthy pots.
Does cinnamon prevent damping off?
Cinnamon is a common household suggestion but not a dependable substitute for clean containers, fresh mix, controlled moisture and airflow; pesticide products should only be used when their local label permits the crop and situation.