Early Blight on Tomatoes: 7 Signs and What to Do First
For early blight on tomatoes, three clues carry more weight than any single spot: the damage begins in older lower leaves, the lesions are brown and often ringed, and fresh damage continues after leaves stay wet or soil splashes upward. A lone yellow leaf or one freckle is not enough to name the disease.
On a container plant, I start at the lowest 15–30 cm (6–12 in) of foliage, especially leaves touching potting mix or resting against the pot rim. The useful goal is to catch a spreading pattern early, then protect the healthy growth that can still feed your crop.
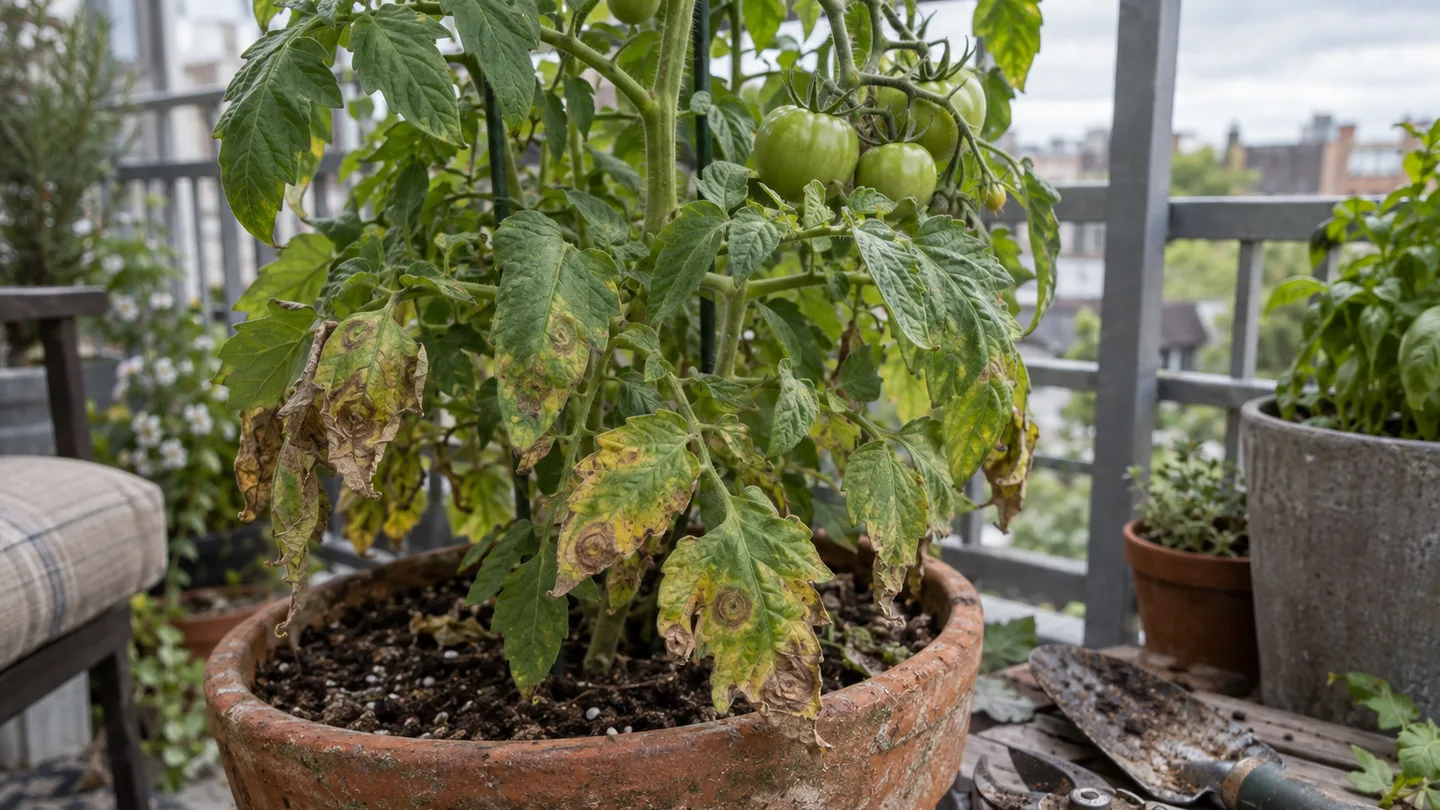
The three clues to check before you call it early blight
I use three checks before I remove a large amount of foliage. They work together; a single clue can come from several different problems.
- Where did it begin? Early blight commonly shows first on older, lower leaves. The leaves closest to the potting mix are also the ones most exposed to splash, contact with the rim, and poor air movement.
- What does each lesion look like? Look for distinct brown to black spots, sometimes with darker and lighter rings inside them. The marks usually have an edge you can see, instead of producing a smooth, plant-wide colour change.
- Is the pattern continuing? Wet foliage, rain, overhead watering, and soil splash create repeated opportunities for spotting to move upward. New lesions appearing on fresh leaves matter more than the appearance of one old mark.
This is why I inspect the underside of lower leaves, the leaf stalks, and the stem junctions before I reach for a treatment. If a plant has uniform yellowing with no discrete lesions, I first investigate watering, roots, feeding, or temperature stress. Those problems can weaken a tomato and make disease more likely, but they do not create the same visual pattern.
The 7 signs, in the order they usually appear
The seven signs below are a checking order, not a promise that every plant will display them neatly. Early blight can begin with one or two damaged leaves, and later signs may never appear if conditions improve or the season ends.
- Symptoms begin on lower leaves. The first damage is often tucked under the canopy, where older leaves receive less air movement. In a pot, check the foliage nearest the mix and any leaf pressed against the container wall. A disease that appears only on one isolated upper leaf deserves a wider inspection before you label it.
- Small brown to black spots appear. Early lesions can look like pinpricks or dark flecks. They may be round, uneven, or slightly angular where the leaf veins interrupt their spread. At this stage, the colour and location are useful clues, while the size of one spot is not a reliable diagnosis.
- Concentric rings develop inside the spot. The classic lesion has a target-like appearance, with darker and lighter bands that resemble a small bullseye. The rings may be subtle on a dry leaf or more obvious when the lesion has expanded. They are a strong supporting clue, though some lesions never form a clear target.
- Yellow tissue surrounds or bridges the lesions. The leaf may develop a pale halo around individual spots. As several lesions crowd together, the tissue between them can yellow as well. This yellowing reflects damaged leaf tissue and makes the lower canopy look patchy instead of evenly pale.
- Lesions join, followed by leaf yellowing and drop. Several spots can expand until they touch. The affected leaf then yellows, curls, dries, and falls away. Leaf drop is a sign that the problem has progressed; it does not identify the cause by itself. Check the lesion pattern on the leaves that remain.
- Dark lesions appear on stems or leaf stalks. Early blight can mark a petiole, the short stalk joining a leaf to the main stem, or create darker patches on young stems. A stem mark deserves a close look because mechanical damage, rubbing against a cage, and other diseases can look similar.
- Sunken, leathery spots appear near the stem end of fruit. Fruit symptoms are less useful when they are the only clue, but a dark, slightly depressed area near the stem end fits the wider early-blight pattern. Look for matching leaf symptoms before deciding what you are dealing with.
The seven signs are easier to judge when you photograph the whole plant and one close-up leaf. Put a coin or ruler beside the leaf for scale, keep the leaf flat, and take the picture in even daylight. The reference object helps someone see the shape and spread of the lesions; it cannot make one spot size diagnostic. Add the date and photograph the same lower leaves again after several days.
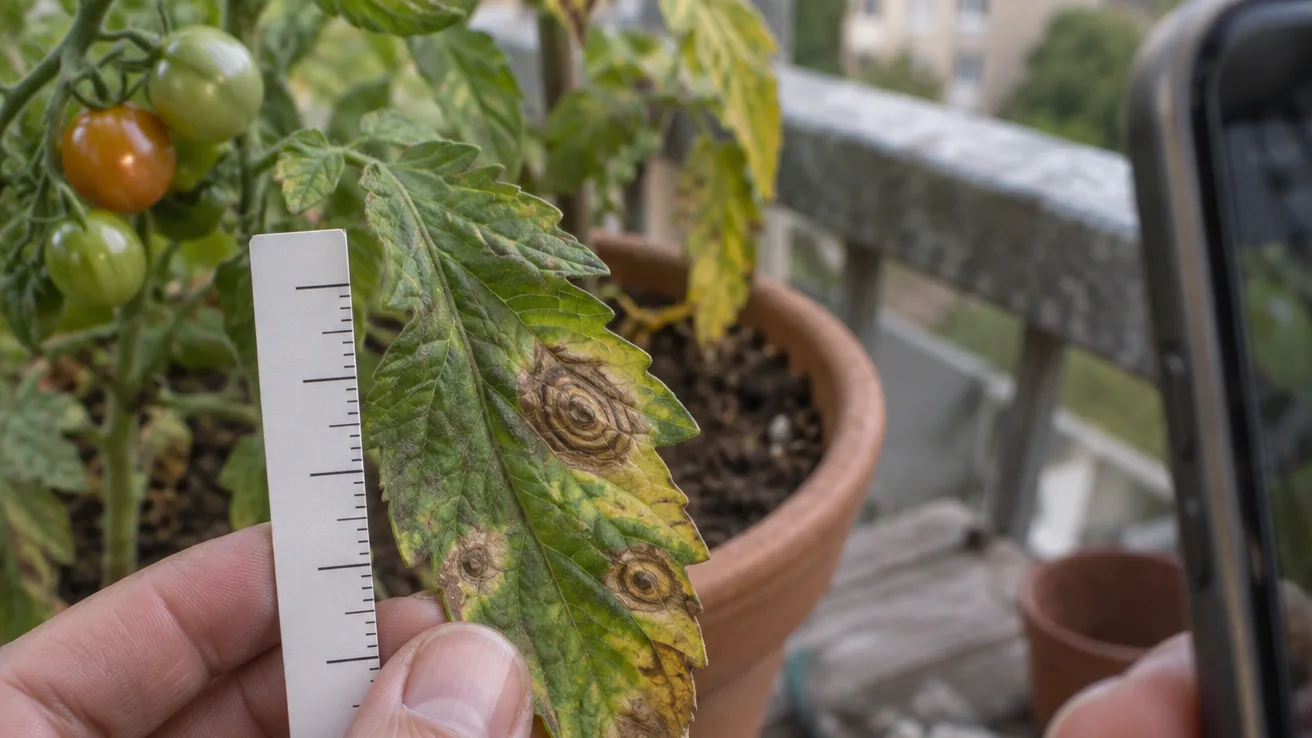
What to do first: six actions before the next watering
Once the pattern looks suspicious, I work in this order. The sequence limits splash and keeps you from moving wet debris around the plant.
- Photograph before touching the plant. Take the wide shot, the close-up, and a picture of the pot surface. A record helps you judge whether new spots are forming after the old leaves are removed.
- Remove the worst infected leaves with clean shears. Start with leaves that have many lesions, are yellowing badly, or are lying on the potting mix. Cut the leaf stalk cleanly instead of tearing it. Wipe the blades before moving to another plant.
- Contain the debris immediately. Put removed leaves into a bag or covered container. Do not leave them on the balcony floor or drop them into a nearby pot, where watering can move residue back onto foliage.
- Water at the soil line. Aim the stream at the mix beneath the canopy. Let the root ball receive a thorough drink, then allow excess water to drain. Spraying the leaves adds wetness without solving a dry root zone.
- Add about 5–8 cm (2–3 in) of mulch. A clean organic mulch or other suitable surface cover cushions soil splash. Keep it a few centimetres away from the main stem so the stem base can dry.
- Open the airflow around the plant. Shift the pot away from a wall, spread crowded stems through the cage, and tie leaves so they do not rest on the balcony floor or pot rim. Remove only what is clearly damaged if the plant is carrying fruit; a sudden bare canopy can expose developing tomatoes to strong sun.
In my own balcony setup, I once let a lower leaf sit against the rim of a fabric pot while I watered from above. The leaf stayed damp and the neighbouring foliage became difficult to inspect. I clipped the contact leaf, bagged it, changed the watering angle, and retied the stem. The useful result was not a miraculous reversal: the old mark stayed visible, while the cleaner canopy gave me a much better place to watch for new lesions.
For a fuller airflow routine, see pruning tomato plants. The disease response has a limit: avoid removing so much foliage that fruit hangs suddenly in full afternoon sun or the plant loses most of its functioning leaves.
A locally labelled fungicide for edible tomatoes is worth considering when fresh lesions keep appearing after sanitation, dry-leaf watering, and airflow corrections, and the label specifically includes tomatoes and the disease you are trying to manage. Follow the product label for application interval, protective equipment, and harvest waiting period. A fungicide can protect new tissue under suitable conditions; it cannot turn an existing brown lesion green again, and it is not a substitute for removing infected debris.
Early blight or a lookalike? Put the spots side by side
A comparison table helps me decide what to inspect next. These are practical clues, not a laboratory diagnosis. Several diseases overlap, especially on stressed container plants.
A side-by-side check helps when the pattern feels ambiguous.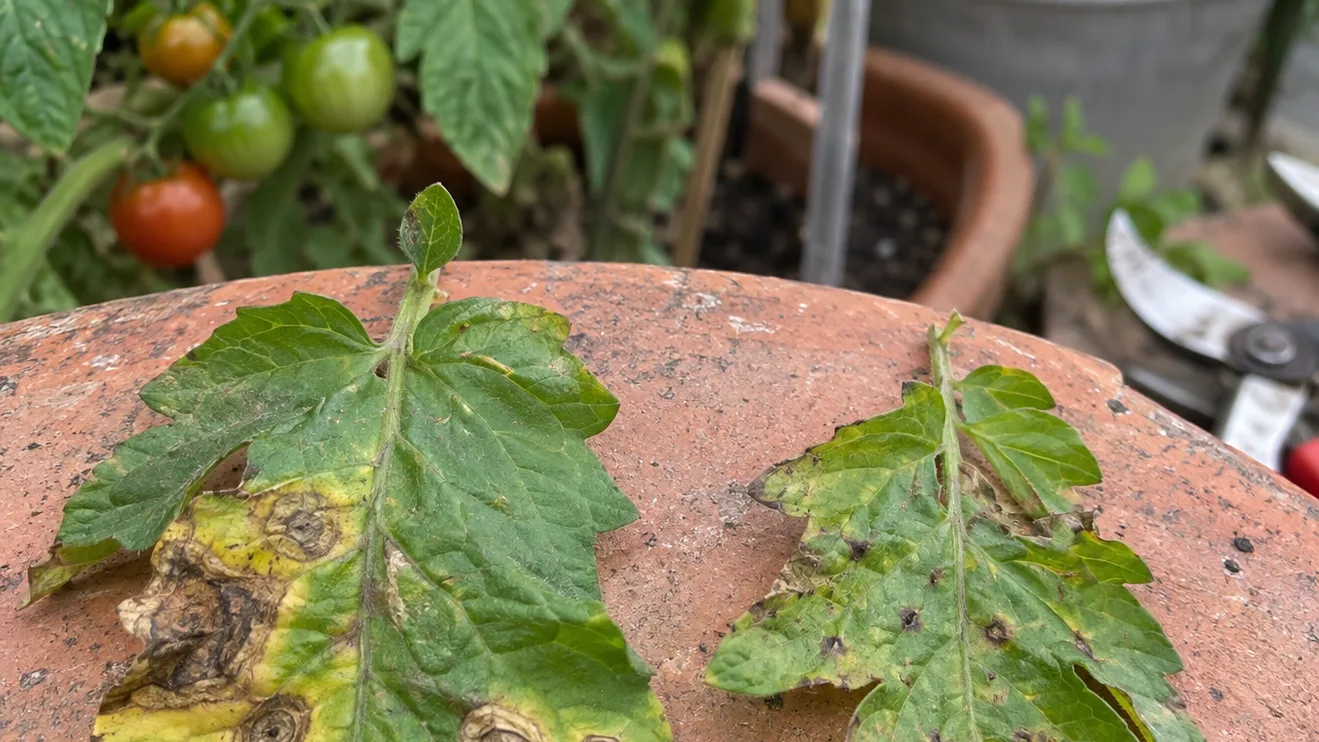
| Pattern | Early blight clue | Lookalike clue |
|---|---|---|
| Where it starts | Often older, lower leaves | Late blight can appear across the canopy; stress can affect the whole plant |
| Spot shape | Brown to black lesions, sometimes with target-like rings | Septoria often gives many pale-centred spots with tiny dark specks; bacterial spotting may look smaller and more scabby |
| Speed | Spots can enlarge, merge, and lead to lower-leaf loss | Fast, water-soaked expansion and collapse deserves quicker escalation for possible late blight |
| Surface appearance | Usually dry-looking lesions once established | Water-soaked gray-green areas point away from a typical dry early-blight lesion |
| Fruit and stems | Stem or leaf-stalk marks and sunken stem-end fruit spots can occur | Uniform yellowing without discrete lesions points toward stress, while fruit spotting can occur with several diseases |
The Septoria row deserves care. Pale centres and tiny dark dots are supporting details I would look for after noticing numerous small spots; I would not reject early blight solely because those details are hard to see in a phone photograph. The key decision is the combination of location, lesion shape, and rate of change.
My escalation rule is simple: a fast-moving, water-soaked collapse gets attention sooner than a few older lower-leaf target spots. If you want another visual reference, compare the plant with extension guidance on tomato early blight. Photographs can narrow the possibilities, yet they cannot guarantee the diagnosis from a screen.
The next 14 days: keep a sick container tomato productive
Containers change quickly. I inspect a questionable tomato every 2–3 days and make the watering decision from several clues: the top 2–3 cm (about 1 in) of mix, the weight of the pot, the plant’s posture, and the weather. A dry surface alone can mislead you because the centre of a large pot may still be wet.
- In a plastic pot in full sun and wind, check the mix daily during hot weather. A larger glazed pot in part shade may stay usable for several days between checks.
- Water deeply at the soil line when the root ball is drying. Avoid frequent leaf misting; it wets the canopy without giving the roots a useful reserve.
- Keep 5–8 cm (2–3 in) of mulch in place, with a gap around the stem. Use a cage or tie to stop leaves resting against the floor, wall, or pot rim.
- Use restrained nitrogen feeding while the plant is crowded or diseased. Pushing soft, leafy growth can make the canopy harder to dry and inspect.
For the broader watering routine, keep how much to water container plants beside this checklist. If leaves droop while the mix remains damp and yellowing spreads without distinct spots, compare the pattern with overwatered plant symptoms before adding more water.
The best recovery signal is practical: no new lesions appear on healthy leaves for roughly 7–14 days while the plant keeps producing firm growth. Old spots will remain. A tomato leaf cannot heal back to its original green surface, so judge progress by what happens above the cleaned area.
Fruit, potting mix, and next season: what to keep and what to clear out
A spotted leaf does not force me to discard every tomato on the plant. I harvest firm fruit with clean skin, wash it before eating, and discard fruit with soft rot, deep cracking, or a lesion that has moved into the flesh. A cosmetic mark on a leaf and a breaking-down tomato are separate decisions.
At the end of the season, I clear the container in this order:
- Pick up fallen leaves and remove the spent tomato plant instead of leaving residue on the mix.
- Bag or otherwise isolate diseased debris if you cannot manage a reliably hot compost process.
- Wash the pot, saucer, cage, and shears before they return to storage or another tomato.
- Decide whether to reuse the mix. It does not have to be discarded automatically, but replacement becomes more sensible when disease recurs, plant residue cannot be removed, or the next crop will again be a tomato or potato.
Inspect nearby peppers and potatoes as well. Related nightshade crops can carry similar Alternaria-type problems, and dirty tools or shared debris can move residue between containers. If you use a pesticide, check the local pesticide label database for the crop, disease, application interval, and harvest interval before buying or applying anything.
Can I eat tomatoes from a plant with early blight?
A firm tomato with clean skin can usually be harvested and washed even when the leaves are diseased. I discard fruit with rot, deep cracks, soft areas, or lesions that have entered the flesh. If the fruit itself is breaking down, it belongs in the waste or an appropriate compost process, not on the kitchen counter.
Do I need to throw away all the potting mix after early blight?
No automatic full replacement is needed for every affected pot. Remove plant debris, clean the container, and consider changing the mix when the problem keeps returning or you plan to grow another tomato or potato in the same container. A new crop gives any remaining residue another opportunity to reach fresh foliage.
Can early blight spread from tomatoes to peppers or potatoes?
Inspect nearby peppers and potatoes because related crops can host similar diseases. Keep tools clean, avoid sharing fallen leaves between pots, and treat a matching pattern as a reason to inspect more closely rather than proof that every spot has the same cause.
Before the next watering, take the two photographs, clip only the worst leaves, bag the debris, and water at the soil line. In one week, photograph the same lower leaves again and look above the cleaned area: healthy new growth with no fresh lesions is the result you want to see.
Frequently Asked Questions
Can I eat tomatoes from a plant with early blight?
Early blight affects plant tissue rather than making the fruit a human food-safety hazard. Harvest firm, unblemished tomatoes, wash them, and discard fruit with rot, deep cracks, or lesions that have spread into the flesh.
Do I need to throw away all the potting mix after early blight?
Not automatically. Removing plant debris and cleaning the container are the first steps, but replacing mix becomes more sensible when the disease recurs, residue cannot be removed, or the next crop will again be a tomato or potato.
Can early blight spread from tomatoes to peppers or potatoes?
Related nightshade crops can host Alternaria diseases, so inspect nearby peppers and potatoes, avoid sharing contaminated debris or dirty tools, and do not assume every similar-looking spot is the same disease.