Flea Beetles: How to Stop Shot-Hole Damage on Seedlings
A seedling with dozens of tiny, round holes may not need a spray. It may need a cover: flea beetles are usually only about 1.5–3 mm (1/16–1/8 in) long, they jump when disturbed, and a sealed fine row cover can stop fresh shot-hole damage before the plant has enough leaves to spare.
I treat the damage as a race between new leaf growth and new feeding. If the center of the seedling is still making a clean leaf, I protect it immediately and reassess in 24–48 hours. If the growing point is gone and most usable leaf area has been perforated, re-sowing is often a better use of a small pot than repeated rescue attempts.
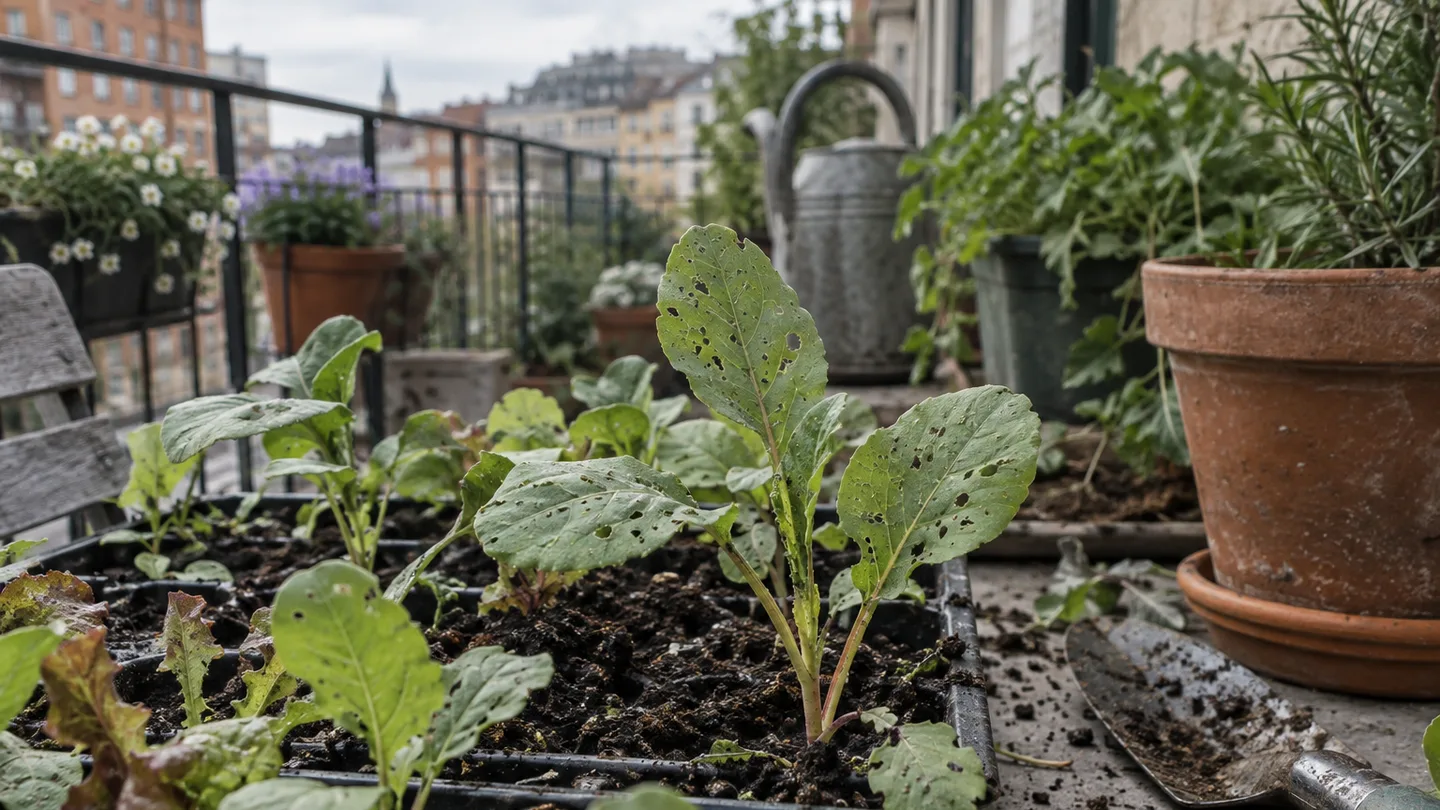
Start with the pattern: round holes and a beetle that jumps
Flea beetle identification starts with the leaf, not the insect. The adults are small enough to disappear against dark potting mix, and many will spring away the moment you touch the plant. In practical balcony gardening, I use about 1.5–3 mm (1/16–1/8 in) as a useful size range for the tiny dark beetles that create this kind of damage, rather than expecting every species to look identical.
The feeding pattern is more revealing. Flea beetles make numerous small, round or nearly round holes in cotyledons and young leaves. Cotyledons are the first seed leaves that appear after germination; the next leaves are the plant’s first true leaves. The holes can look as though someone tapped the leaf with a fine hole punch. They are often scattered across the leaf surface rather than concentrated along one ragged edge.
Warm, dry conditions are when I would make the first careful inspection. Shade the leaf with your hand, tap it gently over a pale saucer or sheet of paper, and watch the leaf surface and soil line. A beetle that springs away confirms the pattern, but you do not need to catch one if the damage is unmistakably small, round, and concentrated on young growth.
My balcony rule is to separate old damage from current pressure. Holes in an older leaf tell me what happened. A clean newest leaf tells me the plant may already be outrunning the attack. Fresh holes appearing on the newest leaf tell me the beetles are still winning.
Separate flea beetle holes from caterpillars, slugs, and weather damage
Before choosing a treatment, check three places: the leaf surface, the underside, and the pot or soil around the stem. The following comparison is not a substitute for seeing the pest, but it prevents the common mistake of treating every damaged seedling as a flea beetle problem.
| Likely cause | What the leaf looks like | Extra clue to check |
|---|---|---|
| Flea beetles | Many small, round holes, especially on cotyledons and young leaves | A tiny adult jumps when the leaf is disturbed; little or no frass |
| Caterpillars | Larger, irregular holes or sections chewed from the edge inward | Green or dark droppings, a larva under a leaf, or fresh chewing near the growing point |
| Slugs | Ragged holes and scraped patches rather than neat pinholes | Shiny slime trails, especially around the pot rim or soil surface |
| Wind or hail | Splits, tears, bruised tissue, or holes with a directional pattern | Damage also appears on stems or on the exposed side of several plants |
| Leafminers | Pale winding tunnels inside the leaf rather than open holes | A narrow trail that can be seen by holding the leaf toward the light |
Frass is the plain gardening term for insect droppings. Its presence does not identify one particular caterpillar, but it tells me to look for a chewing larva before I blame flea beetles. Slime points me toward a night inspection. A torn leaf with no missing round pieces suggests weather or handling instead.
That check matters in containers because a small pot gives you a concentrated view of the whole problem. One caterpillar can hide under a leaf; one gust can damage several plants at once; a flea beetle can leave a recognisable pattern across every seedling in the tray.
The danger window runs from emergence to several true leaves
A mature plant can lose some leaf tissue and continue growing because it has more foliage than it needs immediately. A seedling cannot. Its cotyledons and first true leaves are a small photosynthetic engine, so a few rounds of feeding can remove a large share of the plant’s working surface.
The growing point is the centre where new leaves emerge. If that centre remains green and firm, the plant still has a route back. If flea beetles chew through it, the seedling may stop producing useful leaves even when the stem and roots look alive.
For many small vegetable seedlings, I would treat emergence through roughly 3–6 true leaves as the main protection window. When growth is slow, that can mean the first 2–4 weeks after emergence. Those are working ranges, not a switch that flips on one exact day. Warm weather, a vigorous crop, strong light, a windy balcony, and the number of beetles nearby can move the cutoff in either direction.
My decision rule is simple: keep the cover on while the newest leaf is smaller than the older leaves and fresh holes are still appearing. Start considering removal when the plant is producing clean growth faster than the beetles can damage it, or when the particular crop no longer needs exclusion for its next stage.
The no-spray fix: seal a fine row cover before beetles arrive
Physical exclusion is the most dependable no-spray approach I would choose for a small container crop. A floating row cover is a permeable fabric placed over supports or directly over a bed. Fine insect netting does the same job with less insulation. Where flea beetle pressure is high, look for a material with openings around 0.8–1 mm, then check the product specification rather than judging the mesh by eye.
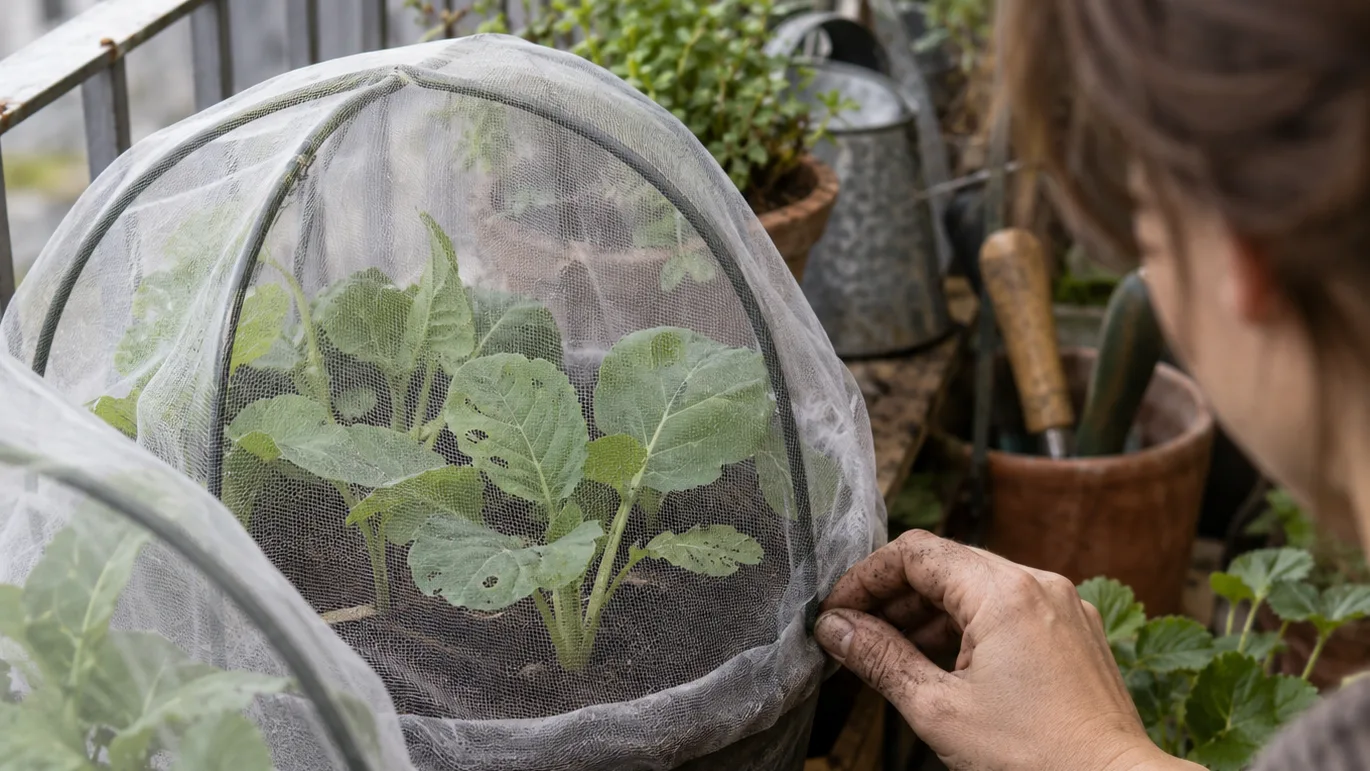
The order of installation matters more than the fabric itself:
- Prepare the pot first. Water the mix if it is dry, position the pot where it will stay, and put the hoops or support frame in place before sowing or transplanting. Moving a covered pot later often creates an unsealed corner.
- Inspect the plant or seedbed. Tap leaves gently and remove any visible adult beetles before closing the cover. If you cover a plant that already has beetles underneath, the fabric can protect the beetles from leaving while they continue feeding.
- Give the leaves room. Drape the material over hoops or a simple frame rather than laying it tightly across fragile seedlings. Leave several centimetres of growth space so a new leaf is not pressed against the mesh.
- Seal the entire edge. Use clips, boards, pegs, or a shallow covering of soil. A continuous edge matters because one open corner is enough for a small jumping insect to enter. On a pot, secure the fabric around the rim or around the support frame, not just at two opposite points.
- Check after disturbance. Watering, wind, pets, and moving the pot can lift the edge. Run a finger around the perimeter after each of those events and reset the seal immediately.
For leafy crops and root crops, pollination may not be the reason to remove the cover. For crops that need flowers pollinated, lift or open the cover when flowering begins, then replace it if the crop’s next stage is still vulnerable and local pest pressure remains high. A cover is not a permanent roof; it is a protection period matched to the plant’s growth.
A useful balcony example is a 20 cm (8 in) pot of young kale. If the newest leaf is still smaller than a postage stamp and two beetles are jumping from the rim, I would not wait for more damage to prove the diagnosis. I would fit two short hoops, remove the visible adults, seal fine netting around the pot, and inspect the centre leaf again after 24–48 hours.
When fabric is awkward, reduce pressure with cleanup and monitoring
Not every balcony can accommodate hoops. Wind can turn loose fabric into a sail, and a row cover may be awkward around a railing, watering can, or collection of mixed-height pots. In that situation, reduce the number of nearby host plants and monitor closely rather than pretending a yellow card will solve the whole problem.
Before sowing, remove weeds that resemble mustard or other brassica relatives, along with old crop debris that is still supplying fresh leaves. This lowers the amount of nearby food available to adult beetles, but it does not create a beetle-proof balcony. Adults can arrive from surrounding vegetation, so cleanup works best as pressure reduction around a physical barrier or a short planting cycle.
Yellow sticky traps are useful as activity indicators. Place one near, but not touching, the seedling canopy and check whether small beetles are present. The trap tells you that adults are moving through the area; it does not protect every leaf, and it should not be treated as a complete control method.
For the first 7–10 days after emergence, I would inspect a vulnerable pot daily. Look at the newest leaf first, then the underside of the older leaves, then the pot rim. A trap crop such as radish or mustard can sometimes draw feeding toward a sacrificial plant, but it can also become an unmanaged beetle reservoir. If you try one, remove it or manage it promptly when it is no longer serving a clear purpose.
University extension integrated pest management guidance on flea beetles is useful here as a qualitative cross-check, especially for identifying host weeds and choosing cultural controls. I still adapt the method to the pot: the smaller the growing space, the easier it is to cover the crop completely.
Choose rescue, a labelled treatment, or re-sowing once holes appear
Once damage is visible, I make the decision from two observations: is the centre still growing, and are fresh holes appearing faster than new leaves unfold?
- Growing point intact, fresh damage limited: cover the seedling immediately and reassess after 24–48 hours. The aim is to stop the next round of feeding while the plant uses its remaining leaf area.
- Growing point intact, adults still exposed: remove the beetles if practical, then consider a product only if the label specifically names the edible crop and the pest. Do not assume that a product approved for one vegetable is automatically appropriate for another.
- Growing point gone or most usable leaf area lost: re-sow or replace the plant if you have seed and space. A small container gives you less room for a weak seedling to wait out repeated damage.
Contact sprays need direct coverage of the pest. A product that lands on the top of one leaf may not reach adults hiding underneath or jumping from the soil line. Repeat intervals, crop restrictions, mixing directions, and the pre-harvest interval vary by label and jurisdiction, so I would use the national or regional pesticide regulator’s label database rather than relying on a generic garden-centre instruction.
The pre-harvest interval is the required time between the final application and eating the crop. It matters even when a plant looks small and harmless. Pollinator precautions matter too, particularly if the crop is flowering or nearby flowering plants are being visited. “Natural” is not a substitute for reading the edible-crop label.
I would not improvise with concentrated household detergent on edible leaves. The wrong concentration can damage tender foliage, and the method does not solve the entry problem if adult beetles are still arriving from outside the pot. If the crop is worth saving, exclusion is usually the first rescue step I would take; treatment is a labelled, crop-specific decision after that.
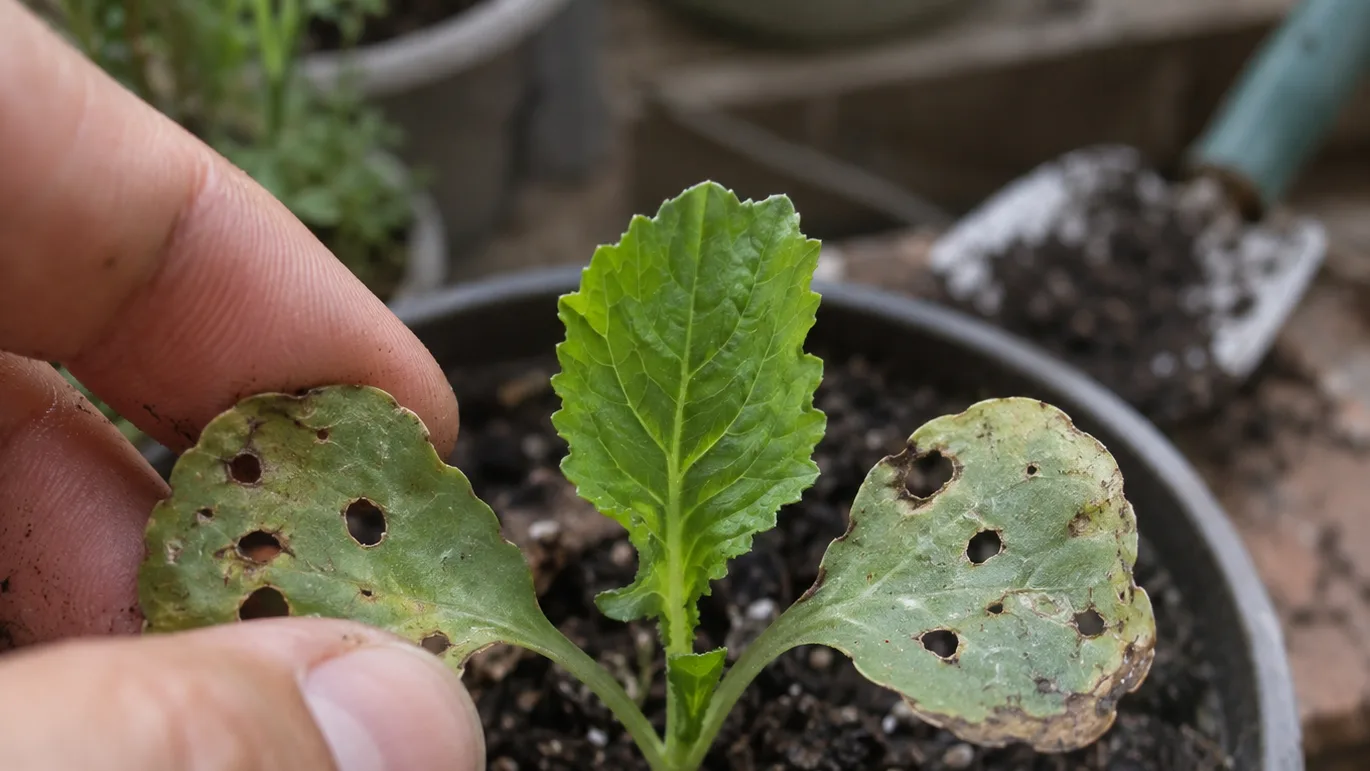
Recovery is possible when the center of the seedling survives
Not every hole means the plant is lost. A seedling with cosmetic damage can recover if the centre continues to produce a firm, green leaf. The clearest recovery sign is not that old holes disappear; they will not. It is that new growth arrives clean.
Keep the pot evenly moist without leaving the mix saturated. Damaged seedlings have fewer leaves to lose water through, so watering on an automatic schedule can turn a pest problem into a root problem. If you are unsure whether the plant is struggling from excess water, compare the symptoms with overwatered plant symptoms before adding more.
Give the plant strong usable light, protect it from a harsh reflected wall if the leaves are wilting, and avoid heavy feeding while the roots are stressed. Extra fertilizer cannot replace leaf tissue and may add salt stress to a small volume of potting mix.
In active growing conditions, I would look for a new central leaf within roughly 7–14 days. That is a practical checkpoint, not a promise. If the centre stays still, the stem collapses, or every new leaf is immediately perforated, the balance has shifted toward replacement.
The container version: protect the pot without making a hot, wet tent
A balcony pot has two problems that an open garden bed may not: wind can open the barrier, and a nearby wall or railing can reflect heat back under the fabric. A cover that is secure at breakfast may be flapping by lunch.
Use short hoops, wire supports, or a light frame to keep the material off the foliage. I like to leave about 3–5 cm (1–2 in) of air above the tallest leaf, with more space if the plant is growing quickly. The exact clearance matters less than preventing the fabric from rubbing against a wet or delicate growing point.
For a full-sun pot, my inspection routine is:
- Morning: run a hand around the rim and check that the edge is still closed.
- After a gust or watering: look for lifted corners, stretched clips, or mesh caught on a leaf.
- During a hot afternoon: watch the plant, not just the cover. If it wilts under the fabric while similar uncovered plants remain upright, loosen the cover briefly in shade and improve airflow.
- Evening: inspect the newest leaf for fresh holes and check the underside for adults.
The cover should not make you ignore water demand. A covered pot in hot weather can still dry quickly at the edges, especially in a small plastic container. Use the plant and the mix as your guide, and compare your routine with how often to water potted plants in hot weather rather than copying a fixed calendar.
If the fabric repeatedly blows loose, move the pot to a less exposed position or switch from a floating cover to a rigid mesh frame. I would rather use a smaller, fully sealed pot than a large cover with a permanent gap.
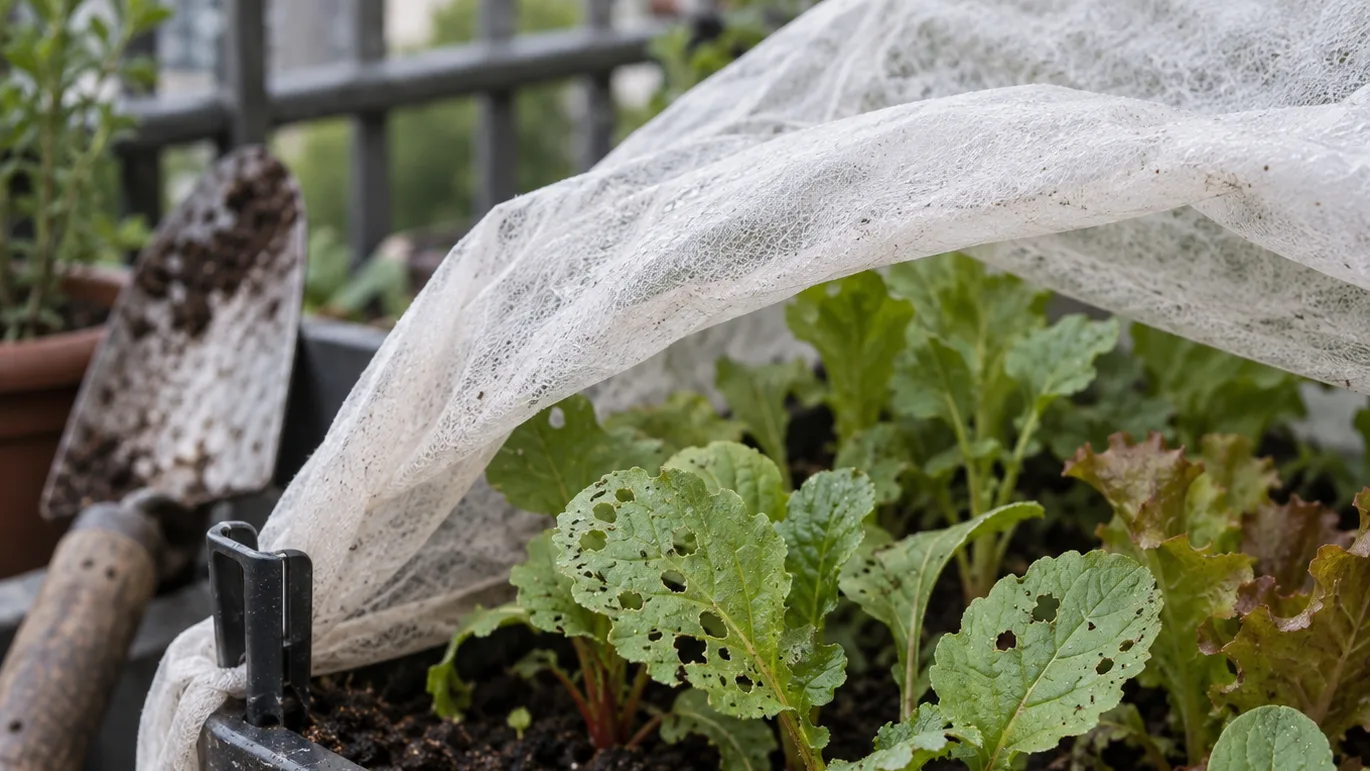
Use the seven-day checkpoint to keep, cover, or re-sow
Seven days after you install protection, do not judge success by the oldest leaves. Use this short field check:
- Look at the newest leaf. Is it clean, or are fresh round holes appearing?
- Tap the plant gently. Do live adults jump from the leaves, pot rim, or soil surface?
- Check the cover edge all the way around. Can a pencil-sized gap be found anywhere?
- Compare the centre of the seedling with the previous week. Is it producing a larger leaf, or has growth stopped?
- Decide whether growth is outrunning damage. If yes, keep the protection in place until the plant is sturdier. If no, tighten the barrier or start a replacement crop.
Before the weekend, buy the simple parts rather than another mystery treatment: fine insect netting, small hoops or supports, and enough clips to seal the whole pot. If the seedlings are already showing shot holes, cover them today, photograph the newest leaf, and compare that same leaf in seven days. A clean centre leaf is the result you are looking for.