Fungus Gnats Treatment: Break the Life Cycle in Your Pots
If tapping one pot sends tiny dark flies skimming over the mix, effective fungus gnats treatment is a two-target job: a yellow sticky card for the adults plus a moisture change or labelled larval treatment in the pot. I learned that after leaving a sticky card in a small basil pot for a week. It caught adults, but new flies still lifted off the surface because I had treated the air and ignored the damp mix below.
The useful question isn’t just how to catch the flies. It’s which stage is still living in the pot, and whether that plant can tolerate the change needed to reach it.
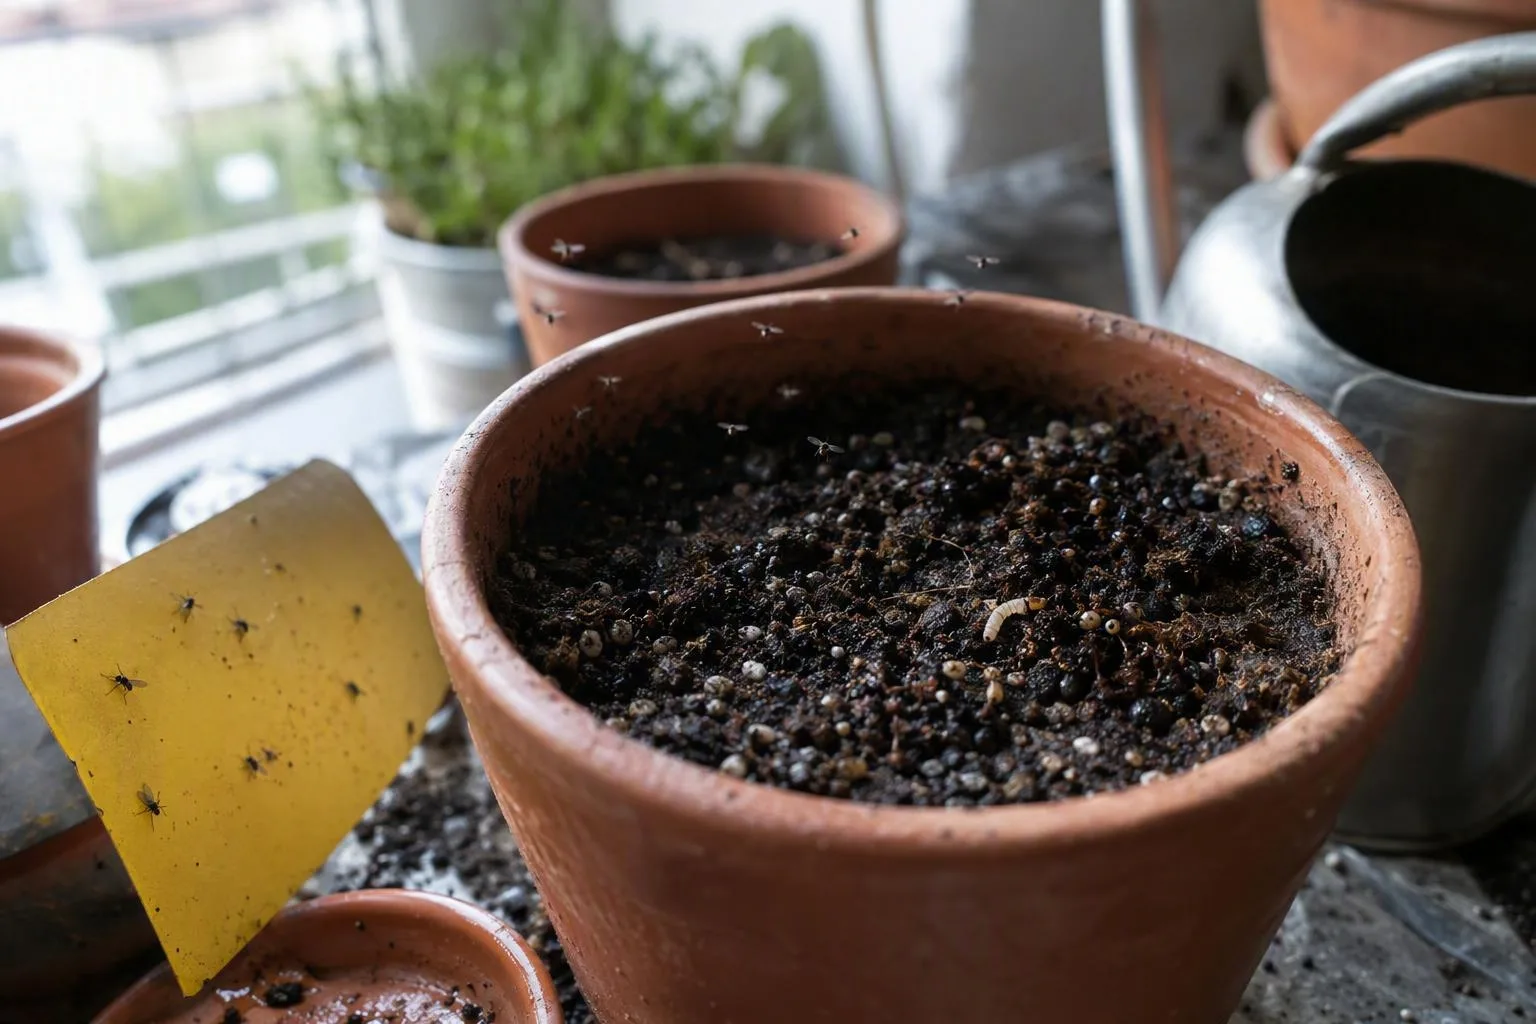
Are they fungus gnats? Check the flyer and the larva before choosing a treatment
Adult fungus gnats are usually slender, dark flies about 2–4 mm (1/16–1/8 in) long. They have conspicuously long legs and delicate wings, and they tend to make short, weak-looking flights from the pot surface. If you disturb the mix and several small flies rise together, the pot is a reasonable suspect.
The immature stage is the part that matters to the plant. Fungus gnat larvae are translucent or whitish, threadlike grubs, up to roughly 6 mm (1/4 in) long, with a dark head. They live in moist potting mix, especially where there is decaying organic material or a film of algae on the surface. They may feed on fungi and debris, but a heavy population can also rasp at fine roots.
A few lookalikes send treatment in the wrong direction:
- Shore flies are generally stockier and are often associated with algae on persistently wet surfaces. Their adult shape is less mosquito-like than a fungus gnat’s.
- Fruit flies are rounder and are more likely to gather around fermenting fruit, drink residue or a kitchen bin than to emerge from several pots.
- Drain flies look fuzzy or moth-like, with broad triangular wings, and usually cluster near a drain rather than hovering over potting mix.
Those are field clues, not a laboratory identification. If the insects are difficult to see, a phone photograph enlarged on screen can help. The larva is the stronger clue: a pale, threadlike body with a dark head in wet mix points me toward fungus gnats, while a bare adult count tells me only that flying insects are present.
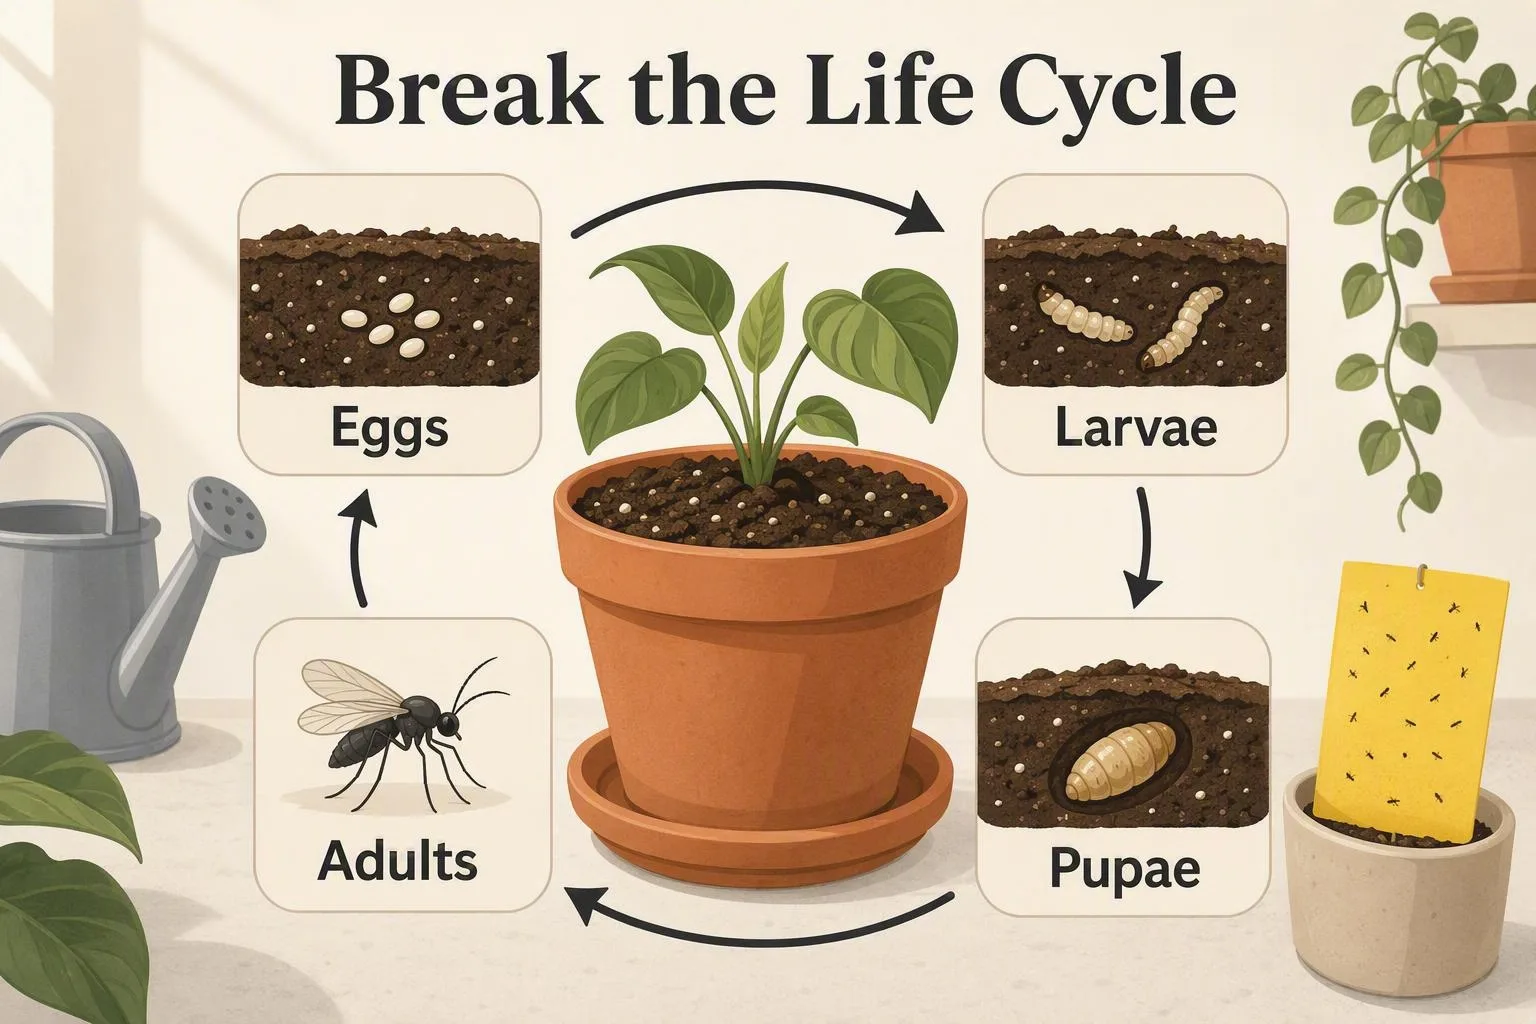
The 3–4 week life cycle is the reason adults keep reappearing
A fungus gnat’s life is a relay between the air and the pot. In warm indoor conditions around 20–24°C (68–75°F), I plan around a rough 3–4 week cycle from egg to egg-laying adult, not a guaranteed calendar. Eggs hatch in a few days, larvae feed in moist mix for roughly 1–2 weeks, pupae remain in or near the mix for several days, and the new adults then return to the potting area.
Cooler rooms can stretch that timing. The exact pace also depends on moisture, food in the mix and the plant’s surroundings. Eggs and pupae are easy to miss because they don’t announce themselves by flying across the windowsill. That is why a clean-looking sticky card for two days doesn’t prove the pot is clear.
A trap-only approach breaks one link but leaves the others. The card removes some visible adults, while larvae continue developing below and pupae can emerge later. Conversely, a larval treatment does not catch every adult already flying around the room. I treat the air and the mix as two separate work sites.
A simple way to picture it is:
- Eggs: hidden in or against damp mix.
- Larvae: feeding and growing in the moist root zone.
- Pupae: developing with little visible activity.
- Adults: flying, mating and laying the next batch.
For a second description of the pest and its controls, I’d compare university extension IPM guidance on fungus gnat identification, life cycle and biological controls with what I can actually see in the pot.
Your first 48 hours: trap adults and remove the wet breeding surface
The first two days are for containment and diagnosis, not for buying every home remedy on the shelf. I use this order because it stops a nearby pot from quietly replacing the adults I just caught.
- Isolate the suspect pot. Move it away from the main group, while keeping its light and temperature broadly suitable. Don’t put it beside another plant on the other side of the room and call that isolation; give it a separate tray or corner if your space allows.
- Place a yellow sticky card at the mix line. Push or position it at the rim, just above the potting mix, rather than hiding it high in the foliage. Adults emerging from the surface encounter it sooner there. Keep the card where children and pets cannot reach it.
- Inspect neighbouring pots. Tap each pot gently over a sheet of white paper, look beneath decorative outer pots and check for flies resting on the rim. One infested plant can be obvious while a second plant supplies the next generation.
- Remove fallen leaves and soft debris. Clear material sitting on the mix, but don’t dig through roots simply to make the surface look tidy. Disturbance can damage a small plant without solving larvae lower down.
- Stop watering by the calendar. A scheduled watering is not a reason to add more moisture when the plant still has damp mix. Use the dry-down check in the next section before deciding what happens next.
Sticky cards are useful evidence as well as a control. They show whether adult activity is falling, but they cannot reach larvae in the pot. Vinegar traps are aimed at vinegar-loving fruit flies, so I don’t use them as a substitute for a fungus gnats treatment. If water has collected beneath a pot, deal with that as part of the dry-down procedure rather than leaving a reservoir under the roots.
Dry the top 2.5–5 cm only when the plant can tolerate it
For an established plant that can tolerate a pause between waterings, let the top 2.5–5 cm (1–2 in) of mix become dry before watering again. That is a starting threshold, not permission to force every plant into drought. I use it because many fungus gnat larvae need a continuously moist surface zone, while an established plant can often draw from the deeper part of its container.
Check the pot instead of guessing:
- Push a clean finger into the top few centimetres. A dry crust over cool, dark mix is not a dry root zone.
- Slide a wooden skewer down into the mix and withdraw it. Damp mix clings to the wood; a dry surface can still conceal wetter mix lower down.
- Lift the pot before and after watering. With practice, the change in weight is more useful than a fixed Tuesday-and-Friday routine.
When the plant is ready, water slowly and thoroughly until some water drains from the holes. That flushes dry pockets and confirms that water is travelling through the container rather than running down one gap at the side. Empty the saucer or cachepot within about 10–15 minutes. I use that as a practical balcony rule: runoff left underneath can be drawn back into the pot and keep the lower mix wet.
Container conditions change the interval. In a plastic pot in full sun, I check the surface daily because heat and moving air can remove moisture quickly. In a glazed pot in part shade, the top may still be damp after three days. Those are checks, not watering instructions.
The advice flips for seedlings, fresh cuttings, shallow-rooted plants and species that genuinely prefer evenly moist mix. A seedling can wilt or stall before a fungus gnat population has been reduced. For those plants, I would choose a larval treatment labelled for use in potting media or consider a fresh-mix repot instead of imposing a severe dry-down.
Also remember that a dry top does not prove the whole pot is dry. A blocked hole, a water-holding mix or a pot sitting in runoff can leave the lower root zone saturated while the surface looks dusty. If the plant is declining and the centre of the pot stays wet, inspect the roots and drainage rather than simply waiting longer.
Three larval controls: Bti, Steinernema feltiae, or a fresh-mix repot
Once the plant cannot safely dry down, or the infestation is established, choose one larval route. I’d rather use a correctly labelled option once and monitor it than combine several harsh-looking remedies without knowing which one touched the target.
| Option | What it targets | Conditions to check | Repeat guidance | Main limitation |
|---|---|---|---|---|
| Bti | Larvae in the potting mix | The product label must name fungus gnat larvae and potting-media use | Follow the label; a 5–10-day planning window applies only when the label permits it | Does not catch flying adults or remove every hidden stage immediately |
| Steinernema feltiae | Larvae in moist mix | Keep the mix suitably moist and follow storage, temperature and application instructions | Use the interval printed for that product | Nematodes can be harmed by poor storage, unsuitable temperature or a dry application medium |
| Fresh-mix repot | Infested old mix and stages physically removed with it | Useful when the pot is waterlogged, compacted or the plant is already declining | Usually a one-time reset, followed by moisture monitoring | Root disturbance can stress a plant, and adults elsewhere in the room remain |
Bti is short for Bacillus thuringiensis israelensis, a microbial larvicide used in products for particular insect larvae. The abbreviation alone does not tell you whether a bottle is suitable for your plant. Read the label for the pest, crop or growing medium, dose and repeat timing. A product intended for one water system is not automatically appropriate for an edible container or a houseplant. For that decision, check national pesticide regulator and product-label guidance for Bti products labelled for fungus gnats.
Beneficial nematodes are microscopic roundworms supplied alive. In this use, Steinernema feltiae is the name I look for on a product intended for fungus gnat larvae. They need a moist route through the mix, which is why nematodes and a hard dry-down are conflicting strategies. Keep them within the product’s stated temperature range, use them before the storage limit, and apply them as directed. Do not leave an unopened packet in a hot delivery box or assume a refrigerator is suitable unless the instructions say so.
If I repot, I prepare the clean container first. It needs a working drainage hole and fresh soilless potting mix, not garden soil. I then:
- Set the new pot, mix and a waste bag beside the plant before disturbing it.
- Slide the plant out while supporting the stems and root ball.
- Remove as much old mix as practical without tearing fine roots just to achieve a perfectly bare root system.
- Inspect for soft, dark or collapsing roots and trim only damaged tissue with a clean tool.
- Wash the old container and remove mix from the rim, drainage area and saucer before reusing it.
- Set the plant at its previous depth, fill around the roots with fresh mix, and water according to the plant’s needs rather than flooding it by habit.
Fresh mix is a reset, not sterilisation. If another pot stays wet nearby, adults can simply move back. That’s why I pair repotting with a card and an inspection of the whole group. None of these larval methods is an instant guarantee: eggs, larvae, pupae and adults do not all meet the treatment at the same moment.
A 21-day monitoring plan tells you whether the treatment worked
My 21-day check is long enough to catch delayed emergence without turning the process into a daily guessing game. I write the dates on the sticky-card packet or in my phone, then make the same observations each time.
- Day 3: note how many adults are on the card, whether the surface is wet, and whether runoff is sitting under the pot. This is a baseline, not a verdict.
- Day 7: inspect the card and mix again. Replace a card if it is dusty, coated with debris or crowded enough that you cannot read new catches. Repeat a larval product only if its label says to do so.
- Day 14: compare the direction of adult activity with the first check. A few new flies can be delayed adults emerging from pupae, particularly if the mix stayed wet.
- Day 21: inspect the original pot and every plant that shared its tray or shelf. Keep the card in place for continued monitoring if the count is still changing.
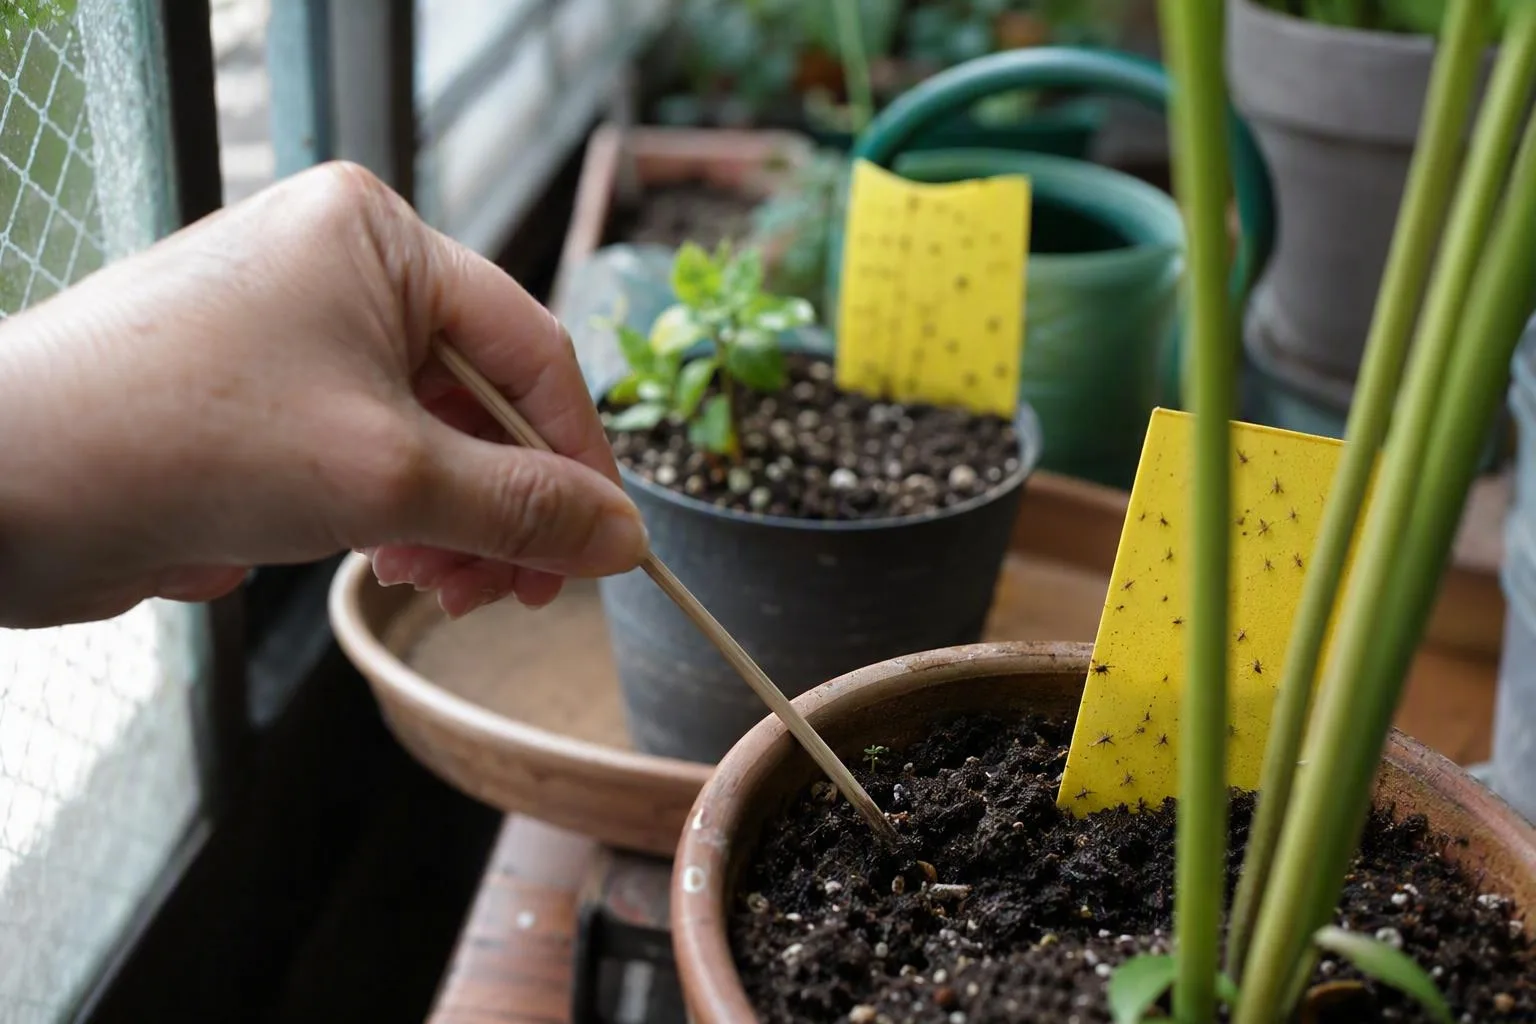
Read the pattern rather than one isolated fly. Falling numbers suggest that fewer adults are being replenished. If numbers stay flat or rise after two or three permitted treatment rounds, I check in this order: an untreated neighbouring pot, a wet cachepot or saucer, a newly purchased plant, then mix that remains saturated below the surface. That order follows the life cycle: look first for a second breeding site, then for a condition that is protecting larvae.
If the plant is wilting, yellowing or collapsing, don’t respond by adding more sticky cards. Check the root zone and pot weight. A plant can have fewer adult gnats and still be suffering from poor aeration, root damage or a watering mistake. The treatment count and the plant-health diagnosis are related, but they are not the same test.
Keep treating only at the interval permitted by the chosen product label. A card can show adults emerging from an earlier generation, while the mix may already be less suitable for new larvae. That is a reason to continue the inspection plan, not a reason to double a dose.
Make the pot inhospitable: drainage, saucers, mix and a 2–3 week quarantine
After the flies fall, fix the water path that made the pot attractive. Start with the basics covered in drainage holes in pots: water needs a route out, and the pot needs enough open mix for air to return after watering. A decorative cachepot can hide runoff, so lift the inner pot and empty the outer container rather than judging moisture from the visible surface.
Compacted or decomposed mix can stay wet in the centre even when the rim looks dry. For a new container, I’d rather buy an appropriate container gardening soil blend than amend garden soil and hope it drains in a small pot. Garden soil can settle into a dense mass in a container, leaving fewer air spaces for roots and slowing the movement of water.
Don’t add gravel to the bottom as a supposed fungus gnat barrier. The gravel does not create a useful dry layer above it. Water is held in the fine mix by capillary forces, and the transition to coarse material can leave a wetter zone sitting higher in the pot. The term perched water table sounds technical, but it means water temporarily held above a drainage transition instead of dropping freely to the hole. The cure is a suitable mix, a real hole and sensible watering, not a layer of stones.
Remove dead leaves from the surface, keep saucers empty, and store opened potting mix in a closed bag or lidded tub. Sealed storage is a practical precaution against contamination and moisture entry; it does not sterilise the mix. If an opened bag smells sour, is visibly wet or contains moving insects, I would not add it to a clean pot.
For new plants, I keep them separate for 2–3 weeks and place a sticky card nearby during that period. This is a judgement call, not a guarantee of pest-free status. I tie the quarantine window to the roughly 3–4 week fungus gnat life-cycle window: two to three weeks gives hidden adults time to emerge and gives me more than one chance to inspect the surface before the plant joins the collection. If space is tight, even a separate tray and a different shelf are more useful than placing a new plant directly among established pots.
If seedlings are involved, inspect them gently and avoid keeping the surface constantly wet just to prevent damping off. A seedling’s need for steady moisture is the condition that makes the dry-down rule less suitable, so use the larval-control route and improve air movement without blasting the leaves.
Will cinnamon get rid of fungus gnats?
I wouldn’t rely on cinnamon as a fungus gnats treatment. It may change surface fungi or smell, but it does not provide a dependable way to remove larvae already living through the root zone. Use a plant-tolerant dry-down where appropriate, a labelled larval control or a fresh-mix repot instead.
Can I use hydrogen peroxide to kill fungus gnat larvae?
I avoid giving one household dilution as if it suits every plant. Concentration, application frequency, root condition and plant tolerance vary, and repeated or overly strong applications can injure roots and affect useful organisms in the mix. A product labelled for the pest and growing medium, Bti, nematodes or a fresh-mix repot gives you a clearer target than an improvised recipe.
Do fungus gnats damage adult houseplants or only seedlings?
Adults are mainly a nuisance, while larvae can feed on fungi, decaying material and fine roots. Seedlings, cuttings and stressed plants have less root reserve, so they can show trouble sooner. An established plant that is declining still deserves a root and moisture check; don’t assume every yellow leaf is caused by the flies.
Tonight, tap each pot over white paper, place one sticky card at the mix line of the suspect plant, and empty any hidden runoff. Put a reminder in your phone for days 3, 7, 14 and 21. By the first check, you should know whether you’re dealing with one wet pot or a whole shelf that needs the same fungus gnats treatment.
Frequently Asked Questions
Will cinnamon get rid of fungus gnats?
Do not present cinnamon as a reliable treatment for larvae already living in the pot; it may affect surface fungi but does not replace a safe dry-down, a labelled larval control or repotting.
Can I use hydrogen peroxide to kill fungus gnat larvae?
Avoid a universal household dilution because concentrations and plant tolerance vary, and repeated applications can injure roots or beneficial organisms. Prefer a product labelled for the crop and pest, Bti, nematodes or a fresh-mix repot.
Do fungus gnats damage adult houseplants or only seedlings?
Adults are mainly a nuisance, while larvae can feed on fungi, decaying material and fine roots; seedlings, cuttings and stressed plants are more vulnerable than established plants, but declining mature plants still need a root and moisture check.