Squash Vine Borer: 7 Signs and Practical Ways to Stop It
If a squash plant wilts at midday, don’t reach for the hose until you’ve looked at the lowest few centimetres (1–2 in) of stem. A pinhole with fresh, damp frass—sawdust-like waste—at the base is much stronger evidence of squash vine borer than wilt on its own; a stem that is soft, split or collapsing needs a more urgent response.
On my own patio, I learned this the annoying way. A zucchini drooped on a hot afternoon, and I watered it before checking the stem. The next morning it was still limp. When I moved the leaf stalks aside, I found a damp opening and pale material at the base. Since then, my order has been photograph, inspect, then water—not the other way around.
One damaged runner may be worth saving. A crown that has been girdled, meaning the pest has cut through most of the stem’s water-conducting tissue, is a much poorer rescue prospect. The seven signs below move from early warning to serious collapse, followed by container-friendly ways to interrupt the cycle.
The first check: look at the stem base before you blame heat
Start where the plant enters the potting mix. Look at the crown and the lowest few centimetres of the main stem, then inspect the lower leaf stalks and the underside of nearby leaves. You’re looking for an entry hole, damp waste, swelling, splitting or a small patch of tissue that looks chewed rather than cleanly broken.
Use this quick sequence:
- Pause the watering. Feel the mix several centimetres below the surface with a finger or bamboo skewer. A hot, dry pot can wilt a squash without any insect being involved.
- Inspect the stem. Check all sides of the lowest stem, not just the side facing you. A railing or wall can hide the first hole.
- Check nearby tissue for eggs. Look at the lower stem, petioles and leaves close to the crown. Remove anything suspicious only after taking a photograph.
- Photograph before cutting. A close-up of the opening, frass and surrounding tissue gives you a record if the plant deteriorates and prevents a hurried cut through healthy stem.
If you find fresh frass beside a stem opening, move squash vine borer high on your list. If the plant is simply limp in afternoon heat and recovers by morning, check moisture and root health first. Wilt is a symptom of interrupted water movement; it doesn’t identify the cause by itself.
Seven squash vine borer signs, in the order they usually appear
The table is arranged from warning signs to damage that may already be advanced. The first two signs tell you to scout more closely. An entry hole plus fresh frass is the combination I take most seriously, because it links the outside clue to feeding inside the stem.
| Sign | What you see | What may be happening inside | Next check |
|---|---|---|---|
| 1. A day-flying moth | A fast-moving moth near the squash, often with dark wings and an orange abdomen. | An adult may be searching for a place to lay eggs. | Inspect the lower stem and nearby leaves rather than trying to catch the moth. |
| 2. Small, single eggs | Tiny eggs, roughly 1 mm across, usually sitting singly on lower plant tissue. | An egg may be waiting to hatch before the larva enters the stem. | Check the stem, petioles and leaves every day or two during local moth activity. |
| 3. A pinhole or chewed opening | A small hole near the stem base or a rough-looking patch where tissue has been disturbed. | A newly hatched larva may have entered or begun feeding at the surface. | Look for fresh material pushed out below or beside the opening. |
| 4. Fresh frass | Waste may look greenish, cream-coloured, damp or like fine sawdust. | Feeding is occurring inside the stem, and the waste is being pushed back out. | Do not brush it away before photographing the hole and checking whether it is being renewed. |
| 5. Swelling, splitting or ooze | The stem bulges, cracks lengthwise or becomes wet around the entry point. | Internal feeding and plant tissue damage are disrupting the stem’s structure. | Test whether the tissue is still firm and whether the vine beyond the damage remains upright. |
| 6. One vine wilts | One runner or section droops while other parts still look reasonable. | A tunnel may be interfering with water movement through that section. | Inspect the stem below the wilt, then check the potting mix before adding water. |
| 7. Whole-plant yellowing or collapse | Leaves yellow, the crown softens or the whole squash fails to recover. | Damage may have reached enough conducting tissue to starve the plant of water. | Check for a girdled crown and decide whether removal is more sensible than rescue. |
Before you decide the moth is the culprit, compare its shape with cooperative-extension squash vine borer identification guides. The useful distinction is not a perfect insect identification from memory; it’s recognising that a day-flying moth, a lower-stem egg and fresh frass belong to the same inspection trail.
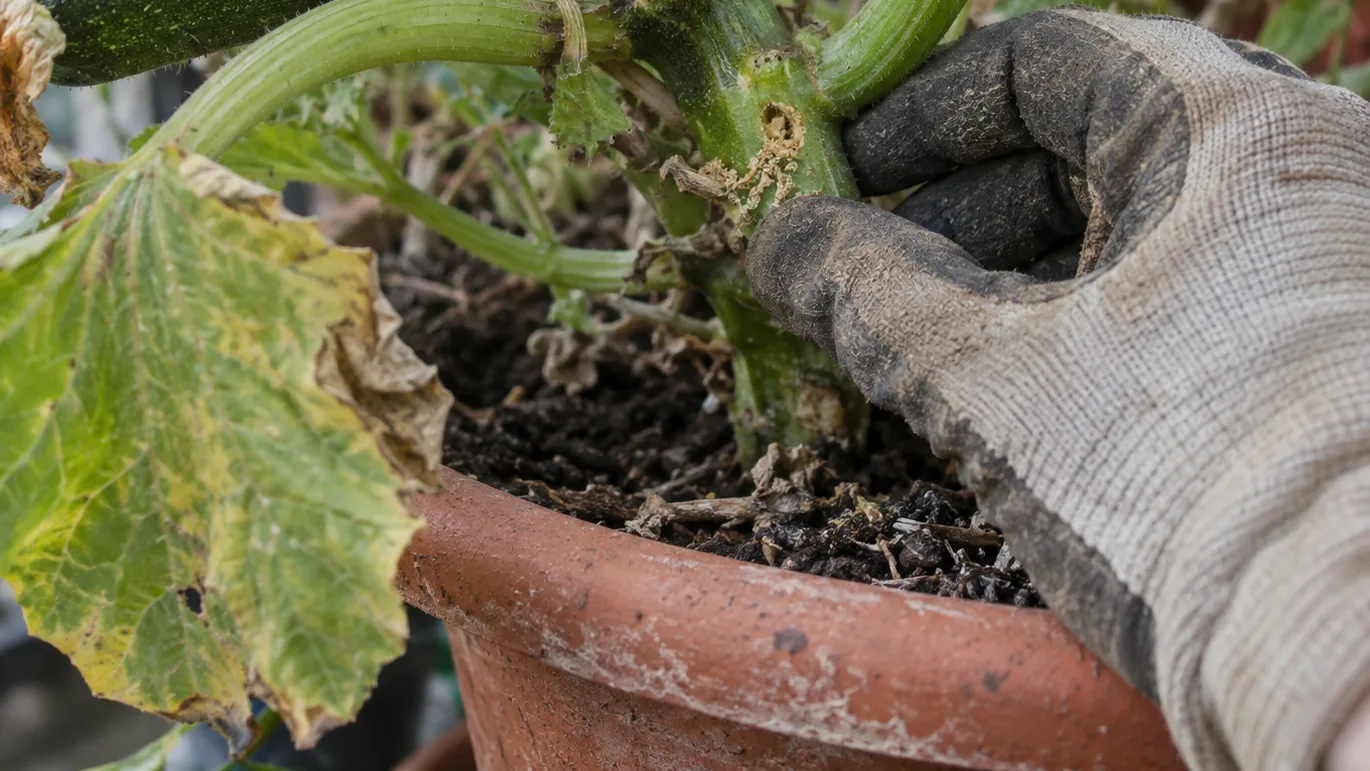
The eggs are easy to miss because they are not usually gathered in a conspicuous patch. Squash vine borer eggs are treated here as small, roughly 1 mm and usually laid singly on lower plant tissue. An exposed larva is commonly cream-coloured with a darker head. Finding that larva beside fresh frass is direct confirmation, but you don’t need to wait for it before acting on a convincing entry hole.
My practical rule is simple: wilt tells me to investigate; fresh frass tells me where to investigate. That keeps me from treating every hot-afternoon droop as an insect emergency.
Borer or something else? A symptom-to-cause decision path
Squash vine borer damage overlaps with ordinary container problems because each can reduce water reaching the leaves. Use the following order rather than choosing a treatment from the leaf symptom alone.
- Does the plant recover by morning? If the leaves droop in bright afternoon heat but are firm again at dawn, heat load or temporary water stress is more plausible than a fully girdled stem. Check the pot before deciding.
- Is the mix dry several centimetres down? If it is dry below the surface, the plant may simply need water. The hand-check in how much to water container plants is more useful here than a fixed daily schedule, because pot size, wind and material change the drying rate.
- Is the mix staying wet? Persistently wet mix, brown mushy roots or a soft crown point toward root trouble. Those are useful overwatered plant symptoms, and adding more water will not correct them.
- Is there a hole or fresh frass? A lower-stem opening with renewed greenish, cream or sawdust-like waste moves squash vine borer to the top of the list, even if the leaves also look heat-stressed.
- Is there rapid wilt without stem evidence? Bacterial or fungal wilt remains possible when the plant collapses quickly but the lower stem has no entry hole or frass. Don’t cut into the stem solely because the leaves wilted.
Some growers use a cut-stem streaming test as an additional aid for suspected bacterial wilt. If you try it, treat the result as one clue rather than proof from a single symptom. The diagnostic condition that changes my response is fresh frass coming from a visible stem entry point. That is physical evidence of feeding at the location where the plant is failing.
Stop the cycle before entry: scouting, covers and stem barriers
Prevention is mostly a timing problem. Adult moth activity often falls somewhere between late spring and midsummer, but the useful dates depend on region, weather and which generation occurs locally. Start scouting when local reports or your own previous observations suggest adult activity, then keep the routine going rather than relying on one inspection.
During that flight window, inspect every one to two days. Eggs hatch in roughly a week under favourable conditions, and the young larvae soon disappear into the stem where they are harder to reach. Frequent inspection gives you a chance to remove a single egg or notice a fresh entry before the tunnel becomes extensive.
A row cover works only while it is sealed around the plant. Put it over a young squash from transplanting until female flowers open, and secure the edge around the pot so a moth cannot simply crawl underneath and reach the stem. Once flowers appear, remove the cover for pollination or hand-pollinate while the plant remains covered. A cover draped loosely over the top but open at the pot rim protects the leaves visually, not necessarily the stem base.
A loose barrier around the lowest 10–15 cm (4–6 in) of stem can make egg laying more difficult. Use a breathable material and leave room for the stem to expand. It is a partial deterrent, not a cure. Tight wrapping can constrict new growth or hold moisture against the stem, creating a different problem in a humid pot.
Variety choice can shift the odds without removing the risk. Some Cucurbita moschata types are commonly considered less vulnerable because their stems tend to be more solid, but that is not the same as borer-proof. I’d choose a suitable compact variety first, then add scouting and a cover rather than treating the variety name as insurance.
Insecticide advice belongs here because timing controls whether it can matter. A product labelled for edible squash may be relevant before larvae tunnel inside, but a spray applied after the larva is protected within the stem is a poor rescue strategy. Follow the local label for crop, timing, application and harvest instructions, and observe pollinator precautions. A regional integrated pest management resource can help with local adult-flight timing and host recommendations; the product label controls what may legally be applied.
A balcony setup that makes the pest easier to catch
Containers change the inspection problem. In a garden bed, a sprawling squash can hide its crown under leaves and runners. On a balcony, you can design the pot so the stem base stays visible from every side.
- For one compact bush squash: start with at least 19 L (5 gal) of mix.
- For a larger or vining type: allow roughly 38–57 L (10–15 gal), with the variety label deciding whether the larger end is sensible.
- Keep the crown at its original depth: don’t bury the base deeply while trying to create a barrier.
- Leave 15–30 cm (6–12 in) of lower stem reachable: remove clutter that hides the inspection zone.
- Keep the saucer from holding standing water: a wet root zone can mimic or worsen wilt and makes recovery harder.
Don’t mound mulch or dense foliage against the stem just because the pot dries quickly. A thin surface mulch can help in some exposed setups, but the crown and lowest stem still need to be visible. Train a long vine along a railing, trellis or support where you can inspect it; don’t let the first section disappear behind a wall.
The container trap is easy to fall into: a squash in a small, dark pot may genuinely need water on a hot, windy day, while a squash with a damaged stem may wilt even though the mix is damp. Check several centimetres down before watering. If you’re adjusting a summer routine, compare the pot’s actual moisture with the guidance in how often to water potted plants in hot weather rather than copying a calendar reminder.
For balcony squash, visibility is a control measure. I would accept a slightly less decorative pot arrangement if it lets me see the crown, reach both sides of the stem and spot frass before the leaves hide it.
Larva already inside? The smallest-cut salvage method
Rescue makes sense only when the crown and at least part of the vine remain firm. If you see a confirmed hole and fresh frass, work in daylight so you can follow the damaged section without cutting blindly.
- Confirm the entry point. Photograph the hole and frass, then wipe only enough material aside to see whether the waste is being pushed from the opening.
- Make the shortest practical opening. With a clean, sharp blade, make a shallow lengthwise cut beside the damaged section. The aim is to expose the tunnel, not remove a long strip of healthy stem.
- Remove the larva. Use tweezers if you can reach it. Work slowly; slicing through the whole stem can turn a repairable tunnel into a severed water pathway.
- Support healthy tissue. For a vining squash, guide one or two healthy nodes onto the potting mix and cover them with about 5–8 cm (2–3 in) of moist, not saturated, mix. A node is the point on the stem where a leaf or side shoot emerges, and covered nodes can sometimes form additional roots.
- Keep the crown uncovered. Do not bury the original crown or keep the wound waterlogged. The goal is to support new roots while leaving the damaged area observable.
Leaf sprays are usually too late once the larva is inside the stem because the target is physically protected by plant tissue. That is why the order matters: confirm first, make the smallest cut second, remove the larva third, then provide support.
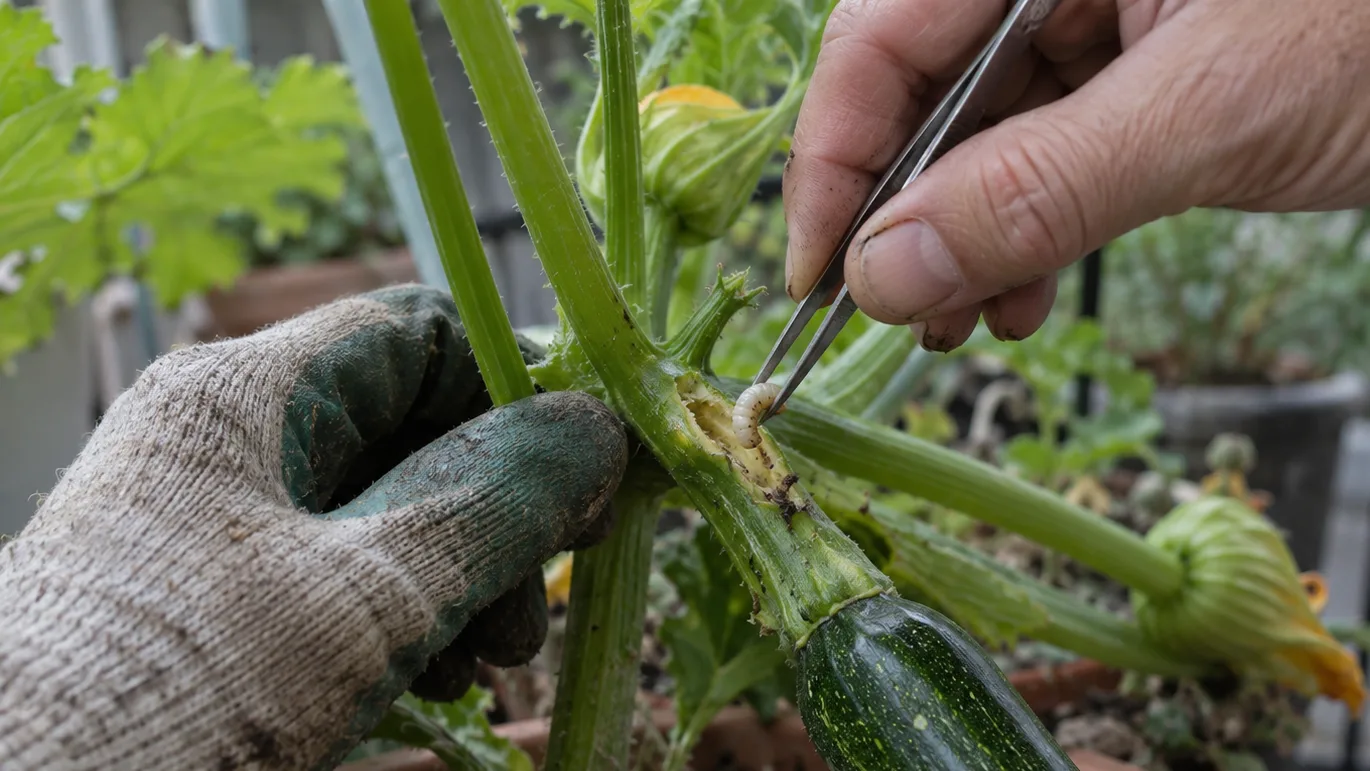
Check the plant the next morning and again over the following two or three days. Renewed leaf firmness and continued growth would suggest that enough conducting tissue remains for recovery; persistent wilt, a severed crown, soft tissue or multiple tunnels make removal more realistic. Those are projections, not guarantees, and hot weather can obscure the result for another day.
If the plant is badly infested, bag the vine, crown and roots and put them in the appropriate household waste stream rather than home compost. Feeding should wait until the plant is visibly growing again. Fertiliser cannot repair a severed stem, and pushing soft tissue with extra feed adds stress without fixing the tunnel.
After the plant is done, remove the nursery for next season
The season doesn’t necessarily end when you pull the vine. Squash vine borer larvae can leave the stem and pupate in soil or potting mix, so an infested container can provide a starting point for the next crop.
At cleanup, remove the entire vine, crown and roots. Bag heavily infested material instead of putting it in home compost, where the pest may survive the composting conditions available in a small household pile. Wash the pot and saucer, brush soil from cracks and drainage openings, and let the container dry before storing it.
If the infestation was confirmed, replacing the mix is the more dependable container option. Scraping off the top layer may miss pupae lower in the pot, especially if the squash was planted in a large volume of mix. If replacing all the mix is impractical, move the next squash to fresh mix in a different container where possible and treat the old pot as a higher-risk location.
Before the next planting, decide where the cover will attach and how you’ll reach the lower stem. Put the inspection dates on your calendar for the local flight window, not just the transplant date.
- Inspect every squash stem base this week.
- Buy or make a breathable cover or loose lower-stem barrier before adult moths appear.
- Check the pot size and leave the crown visible from all sides.
- Photograph any hole or frass before cutting or watering.
That is the next physical step: walk to the pot, move the leaves aside and inspect the lowest few centimetres of stem before you reach for the hose.