Yellow Leaves on Pepper Plants: 6 Causes and Fixes
Yellow leaves on pepper plants send me to the pot before the fertilizer shelf: a wet, heavy root ball and a light, dry one call for opposite fixes. The six patterns below help sort out water stress, feeding problems, pests, and ordinary aging, starting with checks you can make without buying anything.
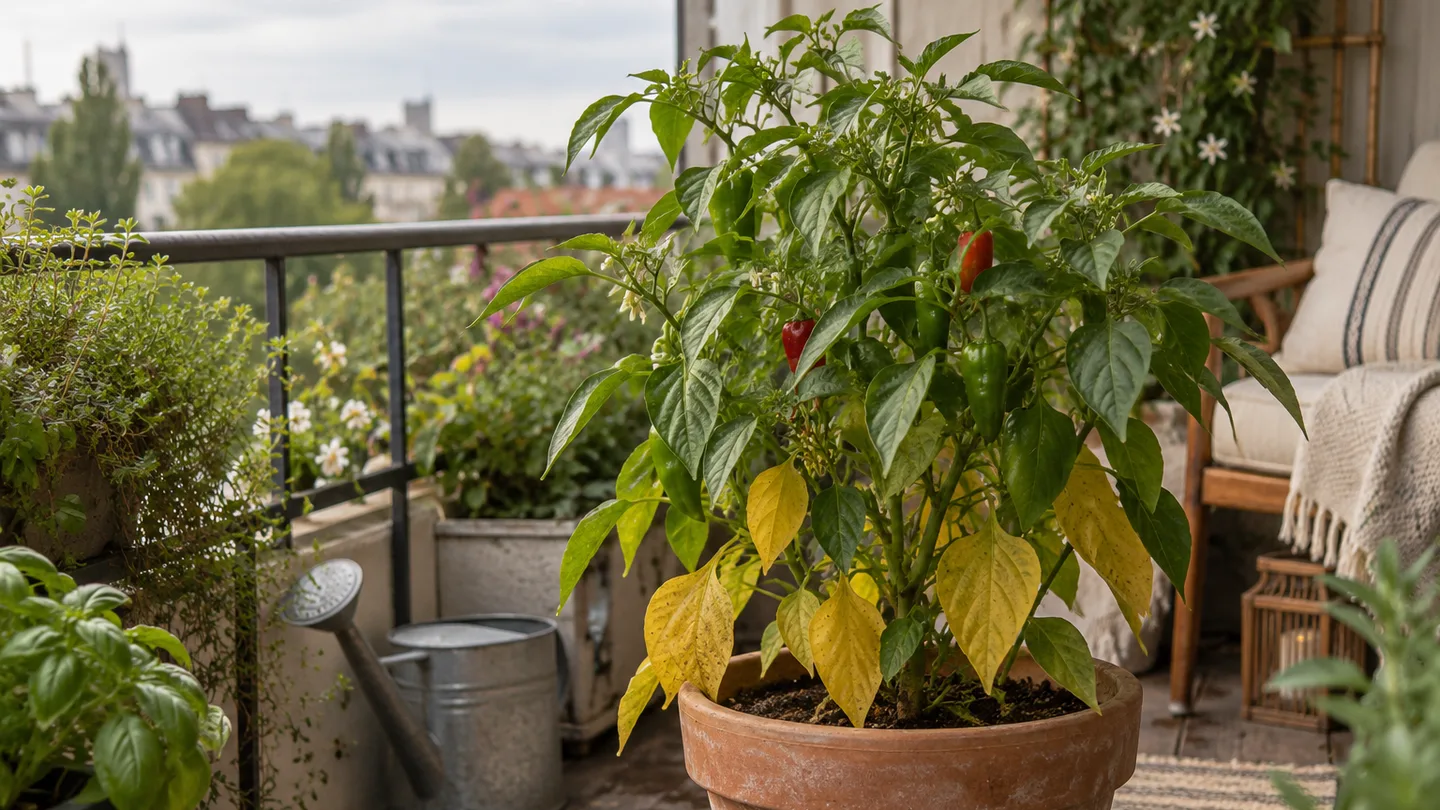
Wet mix, yellow lower leaves: check for roots short of air
When lower leaves fade and the potting mix stays wet, I check the drainage before I reach for fertilizer. Roots need both water and air around them. If the mix remains saturated, air spaces can fill with water, making it harder for roots to function and take up what the plant needs. The leaves may look generally pale or yellow; the pot and mix tell you more than leaf colour alone.
First, feel the top 2–3 cm (about 1 in) of mix and lift the container if you can. That surface check is a screening habit, not a moisture meter: a large pot can be damp deeper down even when the top feels dry. Look at the drainage holes and saucer, too. A blocked hole or water left standing under the pot can keep the root zone wet.
Fix it in this order: clear the holes, tip out standing water, then let the mix begin to dry before watering again. Don’t immediately unpot a plant that’s simply recovering from a rainy spell. Repot only if water can’t escape, the mix has collapsed into a dense mass, or roots are packed tightly enough to interfere with drainage. Moving a stressed pepper adds another disturbance, so I reserve that step for a problem the current pot can’t solve.
For a concrete example, imagine a 10-litre (about 2.6-gallon) plastic pot that is still heavy four days after a storm. If its saucer is full or the holes are blocked, I’d deal with that before adding water or feed. If the holes are clear and the pot is gradually getting lighter, leave it to drain and keep checking. One or two old bottom leaves fading slowly can be normal; a pattern that keeps spreading deserves a closer look.
A light pot and limp, dry leaves point to a watering shortfall
A pepper in a small pot can lose moisture quickly in sun and balcony wind. If the mix is dry near the surface and the container feels noticeably lighter than it does after watering, a watering shortfall moves up my list. Leaves may droop or curl, and repeated dry spells can be followed by yellowing. A single wilt, though, doesn’t tell you whether the plant is thirsty: heat can make leaves droop temporarily even when the root zone still has moisture.
Check the mix and pot together. If the top 2–3 cm (about 1 in) is dry and the pot is light, water slowly over the surface until water runs from the drainage holes. Pause if water rushes straight down the sides; dry potting mix can sometimes pull away from a container wall, so apply a little, wait, then water again. Empty the saucer afterward. If the mix is already damp and the pot is heavy, more water is the wrong first move.
Then adjust how often you check, not just how often you water. Pot size, material, sun exposure, wind, and plant size all affect how quickly the mix dries. A small plastic pot in a hot, exposed spot may need attention more often than a larger glazed pot in partial shade. Use the pot’s weight and the mix as your cues rather than copying a calendar from another balcony. The guide to how often to water container plants can help you build a check-in routine; how much to water container plants is a separate question from how frequently to check.
I don’t try to make a pepper’s soil follow a perfect schedule. My practical preference is to check more often during hot, windy spells and water only when the root zone needs it. That means a quick lift or finger check before watering, not a little splash every day by habit. A shallow drink can wet only the top layer, leaving deeper roots dry; a thorough watering followed by time to drain is a more useful reset.
Older leaves fading evenly: nitrogen may be running low
When the oldest leaves turn pale fairly evenly and growth also seems slow, low nitrogen is one possibility. Nitrogen is used in leafy growth, and a plant short of it may shift resources toward newer growth, leaving older foliage to fade first. That pattern is a clue, not a diagnosis: wet roots and repeated drying can also interfere with growth and produce yellow leaves.
Before feeding, ask what has happened in the pot. Has it stayed soggy, dried hard between waterings, or been growing in the same container mix for a long time? Was it recently transplanted? Fix an obvious water or drainage problem first. If the roots are struggling, adding fertilizer won’t repair them and may add another stress to the root zone.
If watering and drainage look reasonable and older leaves continue to fade, choose a fertilizer labelled for edible crops and follow the label rate. Don’t compensate for uncertainty by doubling the dose or applying several products at once. More fertilizer can raise the concentration of dissolved salts around roots; the plant may then struggle to take up water even when the mix is moist. I prefer one measured change and a chance to see how new growth responds over a quick stack of treatments.
Keep in mind that fertilizer won’t turn already yellow leaves green again in every case. Watch the leaves that emerge after you correct the likely cause. If you’re deciding whether your routine is too sparse or too heavy, how often to fertilize container plants is worth checking before you add another feed.
Green veins in yellow leaves: check pH and fertilizer salts before adding nutrients
Yellow tissue between greener veins can point toward a nutrient-availability problem. The veins stay green while the areas between them pale, but that appearance doesn’t identify a single missing nutrient by itself. A root problem, accumulated fertilizer salts, or a mix whose pH is outside a useful range can all complicate nutrient uptake.
For peppers, a practical target often cited for growing mix is roughly pH 6.0–6.8. If the pattern persists, use a test suited to potting mix rather than trying to judge acidity by colour or by a handful of kitchen ingredients. A pH reading gives you a direction to investigate; it doesn’t tell you which nutrient to add. If a result looks surprising, repeat the test according to its instructions or ask a local garden centre about testing options.
Check the surface and your feeding history as well. A pale or crusty deposit on the mix or pot rim can be a reason to review how much fertilizer has gone in and how freely water drains. It isn’t a chemical analysis of the root zone, so don’t treat a crust as proof of salt buildup. But it’s a useful prompt to pause feeding and inspect drainage rather than adding a second nutrient product.
Flushing the pot with water may help move excess soluble material out when the mix drains freely. Water in stages and let it run out of the holes; don’t leave the pot sitting in the runoff. If the mix is already waterlogged or the drainage holes are blocked, flushing adds water without solving the underlying problem. Fix drainage and let the pot begin to dry first. For more context, consult practical guidance on pepper nutrient symptoms and soil pH, especially if you’re interpreting a test result.
Stippling, sticky leaves, or fine webbing: inspect for sap-feeding pests
Fine pale speckles scattered across leaves can fit spider-mite feeding. With a larger infestation, you may also see delicate webbing, often on leaf undersides or around growing tips. Aphids tend to gather in visible clusters on tender growth, and their honeydew can leave a sticky feel on leaves. These signs give you a reason to inspect closely; they’re not a substitute for checking what is actually on the plant.
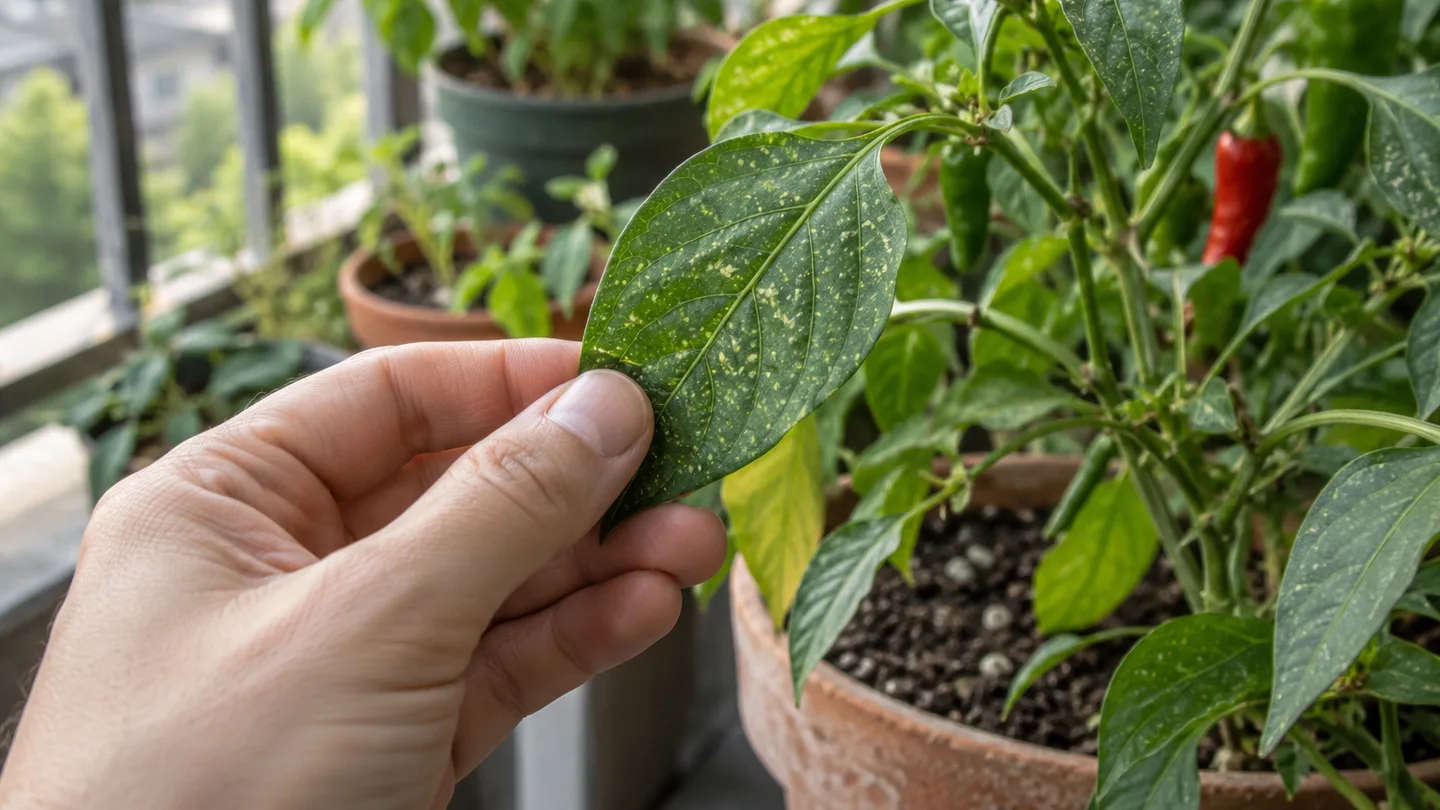
Turn over several leaves and look at new growth. A hand lens can make tiny mites easier to spot, but bright daylight and a careful look are a good start. Check nearby pots while you’re there. If pests are present, move a badly affected container away from others if that’s practical. Then rinse the leaves, including their undersides, with a gentle stream of water. Recheck over the next few days rather than assuming one rinse solved the problem.
If you still need a treatment, use only a product whose label permits use on edible plants and follow its directions. I’d rather inspect and rinse first than spray every yellowing pepper on the balcony: a colour change without visible pests is a weak reason to treat. Read practical integrated pest-management guidance for aphids and spider mites on edible plants if you’re weighing additional steps.
One or two old leaves yellowing may be normal; widespread yellowing is not
A pepper doesn’t have to keep every old leaf forever. If one or two of the lowest leaves yellow gradually while the rest of the plant stays steady, ordinary aging may explain it. A brief change after transplanting or moving a pot can also reflect stress from the change in conditions. Those possibilities fit best when the yellowing is limited and fresh growth still looks healthy.
By contrast, yellowing that spreads to several leaves, moves into new growth, or comes with persistent wilting is a reason to revisit the earlier checks. Start with the pot: is it heavy and wet, or light and dry? Next inspect drainage, then leaf undersides for pests. Only after those checks would I move on to feeding history or a pH test. This order keeps you from treating a leaf symptom with fertilizer when the actual issue is at the roots.
Try not to strip the plant or change watering, fertilizer, and pot location all at once. If you change several things together, you won’t know which one helped, and another change may add stress. Keep conditions steady after the first clear correction and watch what happens to new growth. Old yellow leaves may remain discoloured even after the cause is addressed, so use the next leaves as your better signal.
On your next balcony check, lift the pot, feel the mix just below the surface, and turn over a few leaves. Write down what you find. Check the same plant again in a week: the useful sign is whether yellowing has stopped spreading and new growth is holding its colour.