DIY Self-Watering Container: Build One With a Simple Wick
A DIY self-watering container needs three parts: a pot of mix, a separate reservoir, and a wick bridging them. The wick draws water upward, but the mix should not sit in standing water; the overflow opening sets the highest safe waterline.
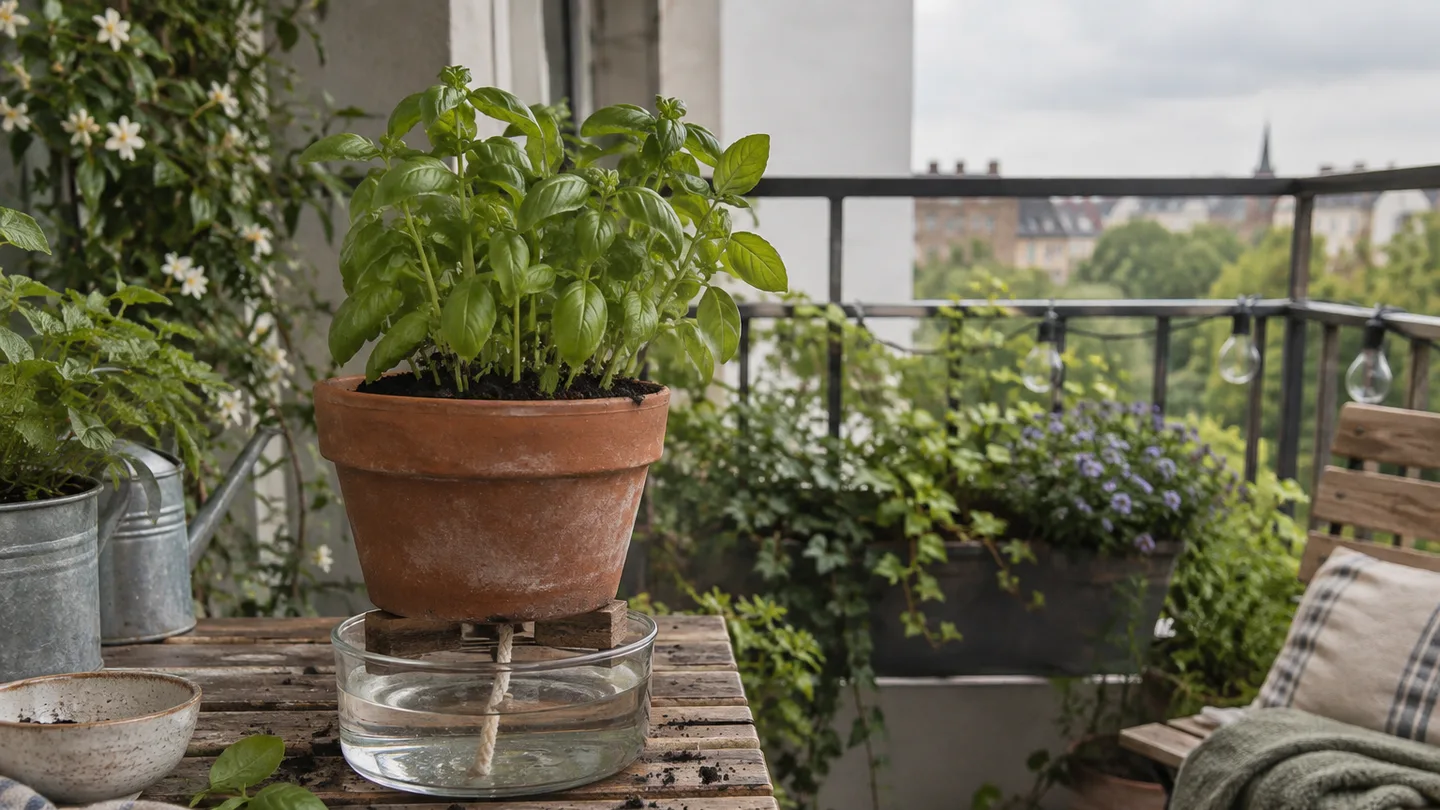
That’s the whole idea. The tricky part is getting your particular pot, wick, and mix to work together without leaving the roots soggy or the top of the pot dry. I’d build a small version first, test it before planting, and let the test—not a guess about wick size—tell me whether it needs adjusting.
Start with the water path: one pot, one reservoir, one wick
Picture the water’s route: reservoir, wick, potting mix, roots. A wick is an absorbent strip or cord. Water clings to its fibres and moves into the mix through capillary action—the same tendency that lets a paper towel draw up a spill. The mix then spreads moisture around the nearby root zone.
Keep the reservoir separate from the pot’s base. If the pot sits in the water, the bottom of the mix can stay saturated, leaving less air around roots. Instead, support the inner pot above the waterline and let only the wick dip into the reservoir. A simple version can use a lid or platform to hold the pot, with an overflow opening below that support.
For a concrete small-build example, I’d pair a nursery pot with a sturdy, food-contact storage tub and use a strip cut from an old cotton T-shirt as the wick. That’s a starting setup, not a guarantee: fabric thickness, pot shape, mix, and plant all affect how much water moves.
Choose a plant that can use a steady supply of moisture
A wick planter suits plants that appreciate fairly even moisture, such as many leafy greens and herbs. It’s a less natural match for succulents and other plants that need the mix to dry substantially between waterings. The reservoir doesn’t make a plant more drought-tolerant; it changes how water reaches the roots.
Don’t assume a small herb planter can simply be enlarged for a thirsty vegetable. A bigger plant has more roots and may draw water faster, while a larger pot holds more mix and may need a different wick arrangement. Those changes interact. If you’re trying a crop with a high water demand, treat the first build as a trial of the system and keep checking the root zone.
My preference is to start with a modest herb or greens pot rather than build a large, heavy reservoir as a first attempt. You’ll learn whether the wick is moving enough water before you commit more space and weight to the design.
Reservoir size is a refill calculation, not a bucket guess
Estimate a refill interval from water actually used: divide the usable reservoir volume by the plant’s observed daily water use. For example, if the reservoir holds 2 litres of usable water and the planter uses 0.5 litre a day, the arithmetic gives about four days. That’s an illustration of the calculation, not a promised refill schedule.
To estimate your own use, mark the water level, note how much you add, and check again under the conditions you expect to grow in. Heat, wind, plant size, pot size, and the mix all affect demand. A measurement from a mild week may not predict a hot, exposed spell. Use the result as a prompt to check, not permission to ignore the planter for that many days.
Also count the water as weight. Each litre of water adds about 1 kilogram; a US gallon adds about 8.34 pounds. That is before the container, supports, and wet potting mix. On a balcony, check the actual dimensions and total load, then consult your building’s rules or local building or property guidance on balcony load limits if you’re unsure. A large reservoir is convenient only if the location can safely support the whole planter.
Two-container fit: leave room for a wick and a water gap
Choose the inner pot and reservoir by measuring the actual pieces, not by trusting a label such as “large.” Check the pot’s base width, the support surface that will hold it, the vertical space below it, and the height where you intend to place the overflow. The fit should be stable, with enough open space for the wick to reach the water and for you to inspect the reservoir.
For edible plants, I’d choose containers made for food contact, or use a clean planter whose material and prior use are known. Don’t reuse a container that held chemicals. If you’re considering a reclaimed plastic tub, check government guidance on food-contact materials and the container’s original use rather than assuming every plastic is suitable.
One practical trade-off: a narrow tub can be easier to tuck beside a railing, but it may tip more readily and leave little room to see the waterline. I’d prioritize a broad, stable base over a shape that saves a small patch of floor.
One wick first; add capacity only if the mix stays dry
Use one absorbent wick for a small build, wet it before installation, and make sure it reaches both the reservoir water and the mix. Braided synthetic cord may hold up longer than cotton in a persistently damp setup, while cotton can break down sooner. Neither material has a universal flow rate: thickness, weave, and contact with the mix matter.
After assembly, check the mix after an overnight soak and again at about 24 hours. If the upper mix is still dry while the lower part is damp, first check whether the wick is actually touching the mix and whether the mix is open enough to draw water through it. If contact is good and the mix still dries out, a second wick or a more absorbent cord is a reasonable adjustment.
Don’t add extra wicks just because the first one looks small. More wick can move more water, but the goal is steady moisture, not a permanently saturated pot. Make one change at a time so you can tell what helped.
Set the overflow opening below the pot’s base
The overflow opening limits how high free water can rise. Place it so the reservoir drains before water reaches the inner pot’s base or the growing mix. The wick can still hang down into the reservoir; it’s the body of free water that should remain below the pot.
If the opening sits too high, or gets blocked, water may reach the pot’s base. The mix can then stay overly wet, and roots may have less air. If the opening is too low, the reservoir may hold little usable water. Set the pot in place, mark the intended maximum waterline, and check that the opening is below the support and remains accessible.
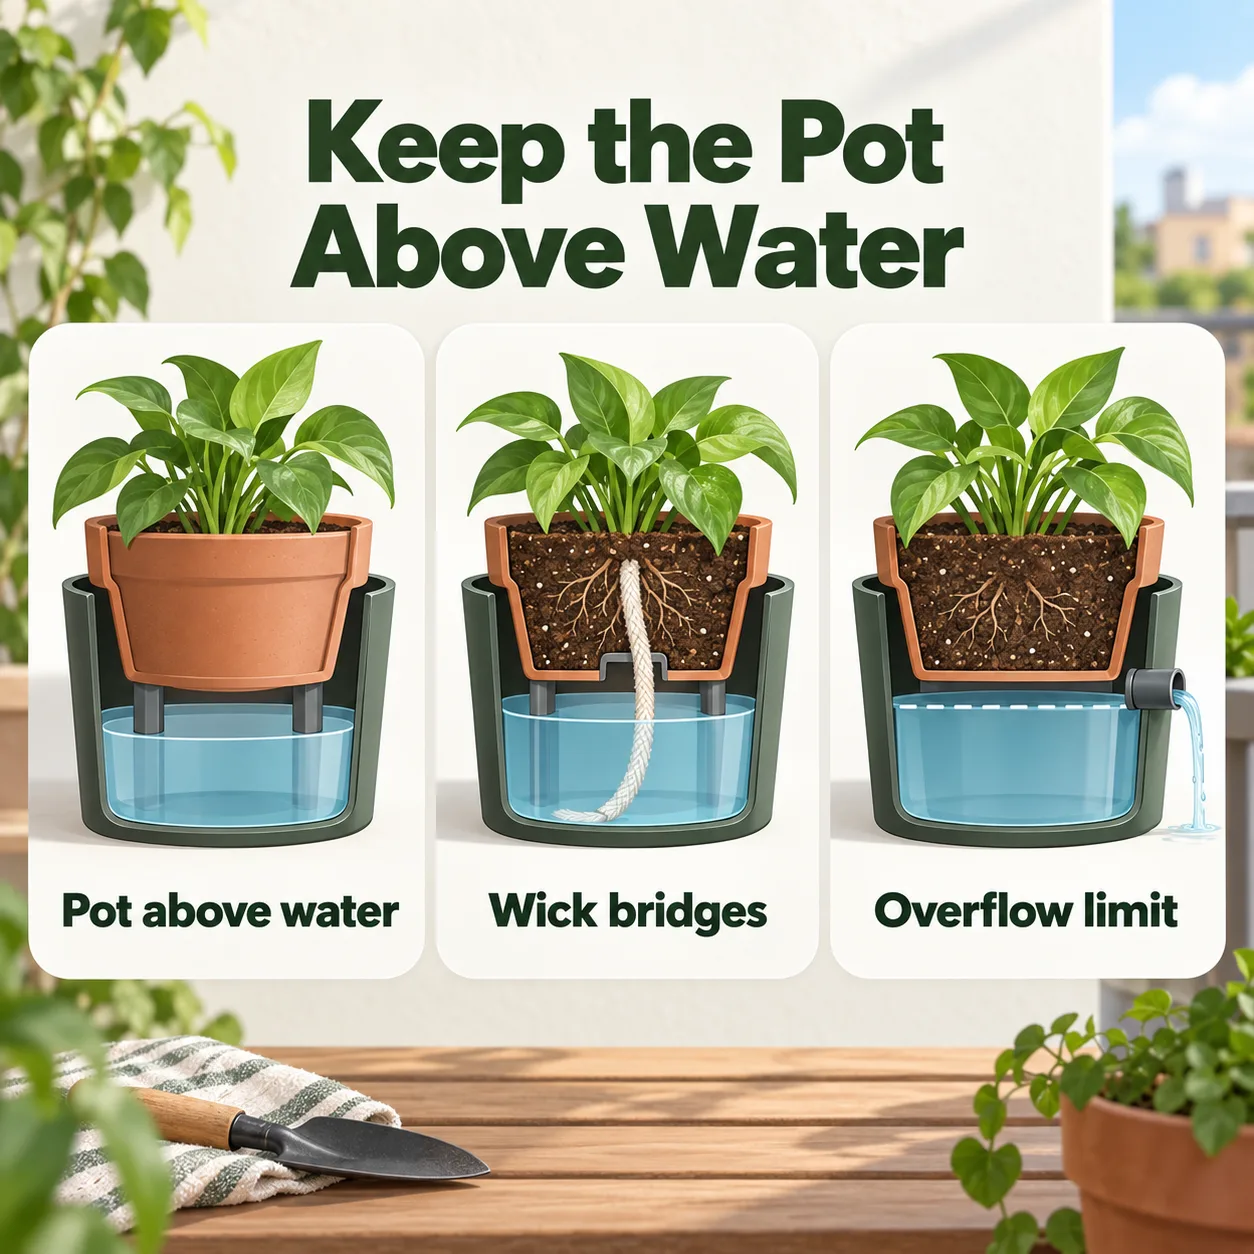
Think of the overflow as a limit, not a drain you can ignore. Keep it clear of soil, fabric, and debris, and make sure water can escape without running somewhere it will damage a floor or annoy a neighbour.
Cut the support and drainage openings to fit the parts you chose
Mark the lid or support while the inner pot is sitting in its intended position. Cut an opening that holds the pot securely without pinching it or leaving it able to slide through. Before cutting, check that the support still leaves room for water to move around the reservoir and that the overflow opening won’t be covered.
Next, make sure the inner pot has drainage openings and add a separate passage for the wick if needed. Size that passage to the cord you selected; one hole size won’t suit every cord or pot. Smooth sharp edges so they don’t cut the wick, then fit the parts together without filling the reservoir yet. If cutting the container makes it crack or flex, choose another support rather than relying on a damaged edge.
Thread the wick so it contacts both water and root-zone mix
For a small balcony build, route the wick through the inner pot so its lower end reaches the reservoir floor and its upper end spreads into the mix near where roots will grow. As a practical starting point, let about 5–8 cm (2–3 in) of wick lie within the mix. This is a starting contact length, not a rule that overrides the material or planter size.
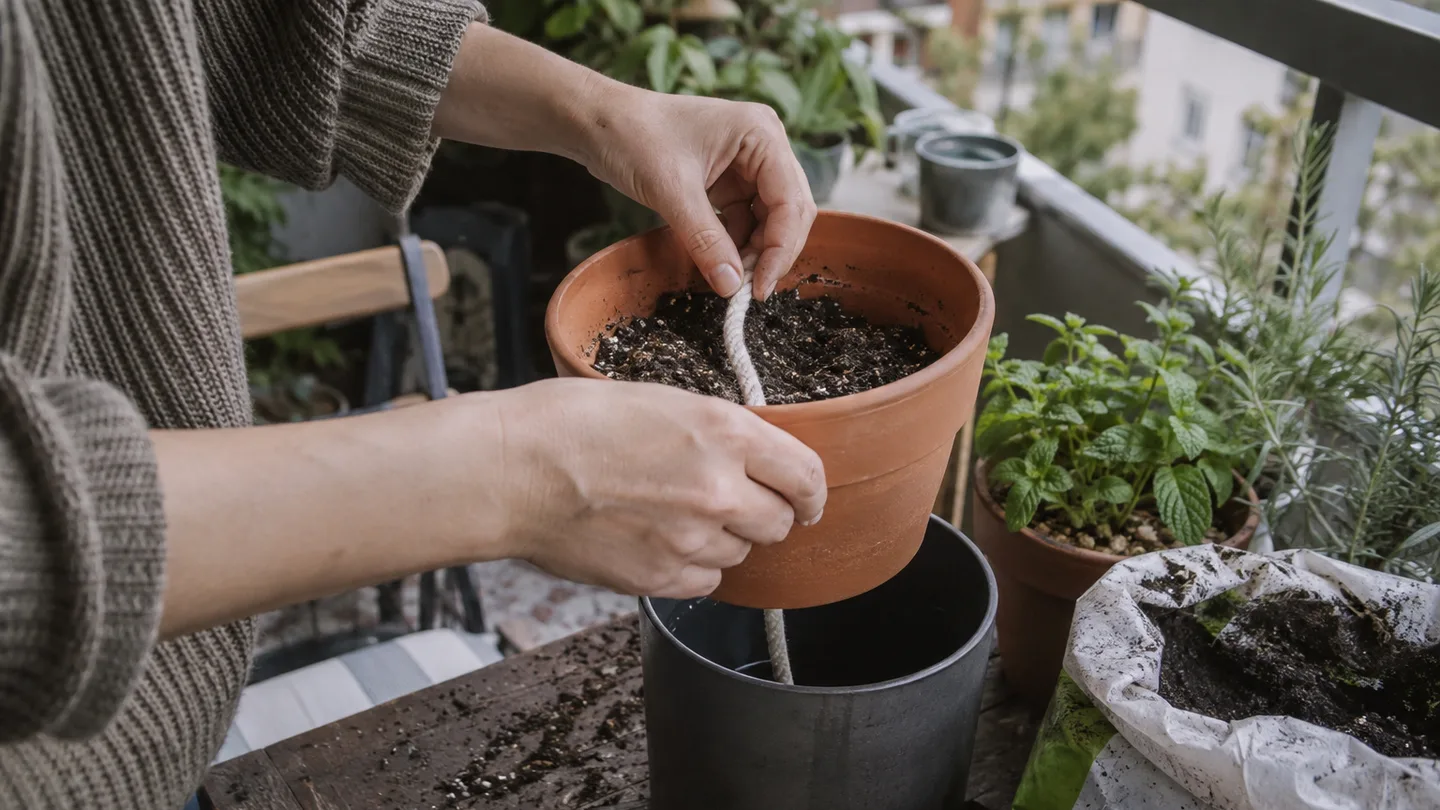
Spread the wick rather than leaving it folded into a tight ball. You want contact with the mix, not a wad that creates one wet spot. Keep enough cord below the pot to stay in the water as the level falls, and secure it so it can’t slip back through the opening during filling or planting. If the wick has a dry, water-resistant finish, wet it thoroughly before you set up the test.
Use potting mix that can wick without packing tight
Use a container potting mix with an open, loose structure. Garden soil can compact in a pot, making it harder for water and air to move through the root zone. A wick also needs the mix to touch it: a large air gap between cord and mix interrupts the route water is meant to follow.
Fill around the wick gently and make sure it’s surrounded by mix rather than pressed against the pot wall. Don’t tamp the pot down hard to make it look neat. The target is contact without compression.
Skip the gravel layer at the bottom. Gravel doesn’t turn compacted mix into a better-wicking medium, and it takes up room that could otherwise hold mix. Keep the reservoir and drainage arrangement doing their separate jobs: the reservoir stores water, and the overflow controls its height.
The 24-hour wet-up catches leaks and weak wicking before planting
Test the actual combination you’ve built before adding a plant. Wet the wick, fill the pot with mix, and moisten the mix from above. Then fill the reservoir slowly to the intended maximum waterline. Check that water leaves through the overflow when it reaches that point, and look around the container and support for leaks.
After an overnight soak, feel the mix at the surface and just below it. Check again at about 24 hours. The result applies to this cord, this mix, and these containers; changing one can change the way water moves.
- Top still dry: check that the wick reaches the reservoir, stays wet, and has good contact with the mix. If those are right, consider a less compact mix or another wick.
- Water in the pot or a soaked root zone: inspect the overflow height and make sure the opening is clear.
- Reservoir level drops unexpectedly: check for leaks first. If it’s dry and intact, the plant or mix may be drawing water faster than you expected.
This is not a pass-or-fail test of the idea of wick watering. It’s a check of your particular build. Adjust one thing, refill it, and observe again before planting.
Planting day: top-water before relying on the reservoir
Newly planted roots may not yet be spread through the pot, and dry mix may not immediately draw evenly from the wick. After planting, water from above until the mix is evenly moist and excess water can drain. Then fill the reservoir and check the plant and mix rather than assuming the wick has taken over perfectly.
For the first stretch, feel the top few centimetres (about 1 inch) of mix between checks. Aim for even moisture, not a surface that is constantly glossy or waterlogged. Once the root zone is drawing steadily, you can use the reservoir as the main supply and refill it as needed.
Use the planter’s condition to guide you, not a fixed calendar. If the weather turns hot or windy, your checks may need to be closer together; the guide to how often to water container plants in hot weather can help you think through that change. A wick reduces some hand-watering, but it doesn’t remove the need to inspect a living plant.
When the top stays dry, the wick, contact, or mix is usually the clue
A full reservoir with a dry surface gives you a useful order for troubleshooting. First, confirm that the lower end of the wick is submerged. Then check that the cord is wet, its upper end is embedded in the mix, and the mix touches it. If those checks pass, consider whether the cord is too thin or the mix has settled into a dense block.
If the pot stays too wet, check the overflow before changing the wick. A high waterline or obstructed opening can let free water reach the pot’s base. If the reservoir empties quickly, look for leaks, then consider plant size, wind, heat, and how much water the mix is using. The guide to how much to water container plants is useful for comparing your observations with the conditions around your pot.
Don’t use the reservoir as a fertilizer tank by default. Repeated feeding through it can leave soluble salts behind as water is used, while the plant’s needs vary through the season. Follow the fertilizer label and feed the mix when appropriate; the guide to how often to fertilize container plants covers the timing decision.
Rain can overfill an outdoor reservoir if its overflow is missing, blocked, or unable to drain freely. Keep the opening clear, and shelter or move the planter during prolonged rain if water can’t escape. Before freezing weather, empty or move the container if its material could be damaged by expanding ice; a full reservoir doesn’t protect a tender plant from cold. See how to protect plants from frost for the plant-side decision.
Before you walk away, mark the reservoir level. Tomorrow, check the mark, the wick’s contact with the mix, and the moisture just below the surface. That small check will tell you more about this planter than a generic watering schedule.
Quick questions
Can rain overfill a self-watering wick container?
Yes, if the overflow opening is missing, blocked, or unable to drain. Keep it clear and shelter the planter during prolonged rain if water can’t escape freely.
Can I put liquid fertilizer directly into the reservoir?
I wouldn’t make the reservoir your default fertilizer tank. Follow the fertilizer label and apply feed to the mix when appropriate, rather than adding concentrated or repeated feed without considering residue and plant needs.
Should I leave the reservoir full during a frost?
Not as a way to protect the plant. Water can expand as it freezes and damage some containers, so empty or move a planter when freezing conditions are expected if its material may be vulnerable.
Frequently Asked Questions
Can rain overfill a self-watering wick container outdoors?
It can if the overflow opening is blocked or missing. Keep that opening clear, and move or shelter the planter during prolonged rain if the reservoir cannot drain freely.
Can I put liquid fertilizer directly into the reservoir?
Explain why concentrated or repeated reservoir feeding can leave salts behind; suggest following the fertilizer label and applying feed to the mix when appropriate, rather than treating the reservoir as a fertilizer tank.
Should I leave the reservoir full during a frost?
Explain that freezing water can expand and damage some containers, and that a full reservoir does not protect a tender plant from cold. Recommend emptying or moving the planter when freezing conditions are expected.