Tomato Hornworm: 7 Signs, Safe Removal and Prevention
The quickest check: green pellets beneath a stripped tomato plant
A tomato hornworm can strip a potted tomato before you spot the culprit: look for fresh ragged holes, dark-green pellet-like droppings, and a suddenly thinner canopy. If the plant looked intact yesterday and has bare stems today, I’d inspect the leaves and pot rim before I reach for spray.
In late June, I was checking a Sungold tomato growing in a 20-litre (5-gallon) pot on my balcony. One side of the plant had gone sparse overnight. I found two thick green caterpillars, one tucked beneath a leaf and one low in the canopy, along with dark pellets on the potting mix. I put both straight into a small container of soapy water, then checked the plant again the next morning. That incident changed my search habit: I now look for the droppings before I start blaming watering, pruning or disease.
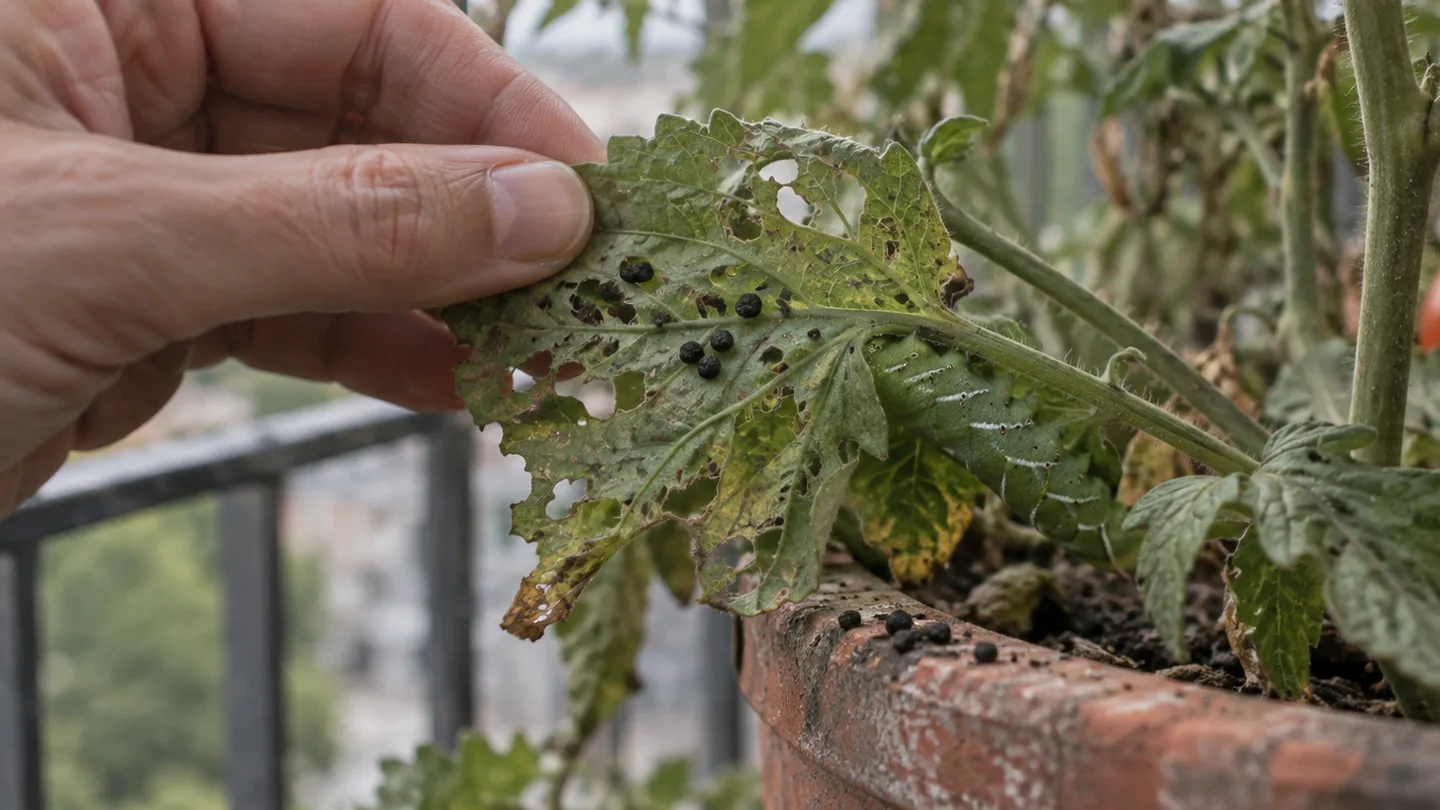
Those droppings are called frass. On a balcony tomato, frass beneath the plant is useful because a large caterpillar can feed high in the canopy while its waste falls out of sight. Check the undersides of nearby leaves, every stem fork and the soil surface around the pot, preferably at dusk or just before sunrise.
On a balcony, one caterpillar is a location problem, not a population problem. Finding the first one quickly is often more useful than planning a complicated spray programme.
The 7 signs of a tomato hornworm, ranked by reliability
These are the seven signs I use, in order from damage clues to direct confirmation. No single leaf hole proves you have a hornworm; the pattern matters.
The first sign is usually not the caterpillar. It is the shape of the damage left behind.
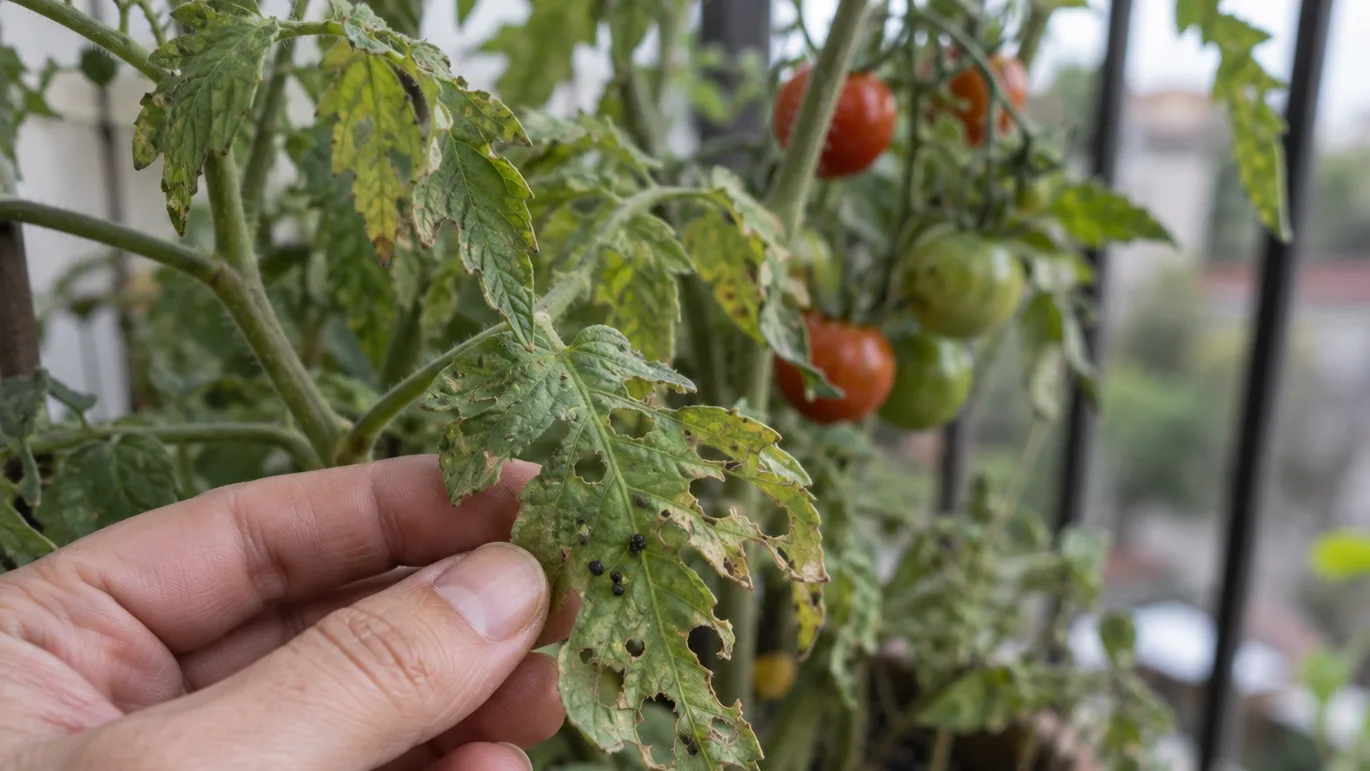
- Large, irregular holes in the leaves. Hornworm feeding can leave ragged openings rather than the tiny pinpricks associated with some small chewing insects. Start with the newest damage and follow the edge of the missing tissue toward the main stem.
- Whole leaflets disappearing. A tomato leaf is made of several smaller leaflets. A large larva may remove an entire leaflet, leaving a bare gap where you expected a leafy spray. On a small container plant, that missing section can make the damage look more dramatic than it would in a garden bed.
- Stripped petioles or bare green stems. The petiole is the stalk that joins a leaf to the main stem. If the leaf tissue is gone but the green stalks remain, inspect the forks and the underside of the remaining foliage before cutting anything away.
- Large dark-green frass pellets. Frass is the caterpillar’s waste. Look on leaves below the feeding site, on the pot rim and on the potting mix. A few small specks are not conclusive, but several large green pellets under fresh feeding damage are a strong reason to search carefully.
- Fresh damage appearing between evening and morning. Compare the plant at dusk and again at breakfast rather than relying on a fixed clock. If a new section has disappeared overnight, inspect the plant while the damage is still fresh.
- Small pale-green eggs on leaf undersides. Eggs are an early and weak clue because they do not prove that a larva is feeding on your plant yet. Check the undersides of leaves near the newest growth, but do not stop searching just because you find no eggs.
- A visible green caterpillar about 5–10 cm (2–4 in) long. Once you see a large green larva with a rear horn, the diagnosis becomes much easier. Look around it for frass and fresh chewing rather than judging the insect from its colour alone.
The strongest confirmation is the combination of fresh feeding, dark-green frass and a live caterpillar. A tomato that is wilted but has intact leaves is telling me to investigate moisture, roots or heat first. If the soil is wet while the leaves droop, compare the symptoms with overwatered plant symptoms before blaming a hornworm.
Likewise, don’t confuse ordinary leaf thinning with a pest diagnosis. A tomato can lose vigour after a dry spell, root damage or a crowded pot. Hornworm damage has a physical trail: missing tissue, stripped stems and waste below the feeding site.
Tomato hornworm or tobacco hornworm? Use the 10-cm identification check
The 10-cm check is a scale cue, not a species test. A large larva can approach 10 cm (4 in), which makes its side markings and rear horn easier to see than they are on a newly hatched caterpillar.
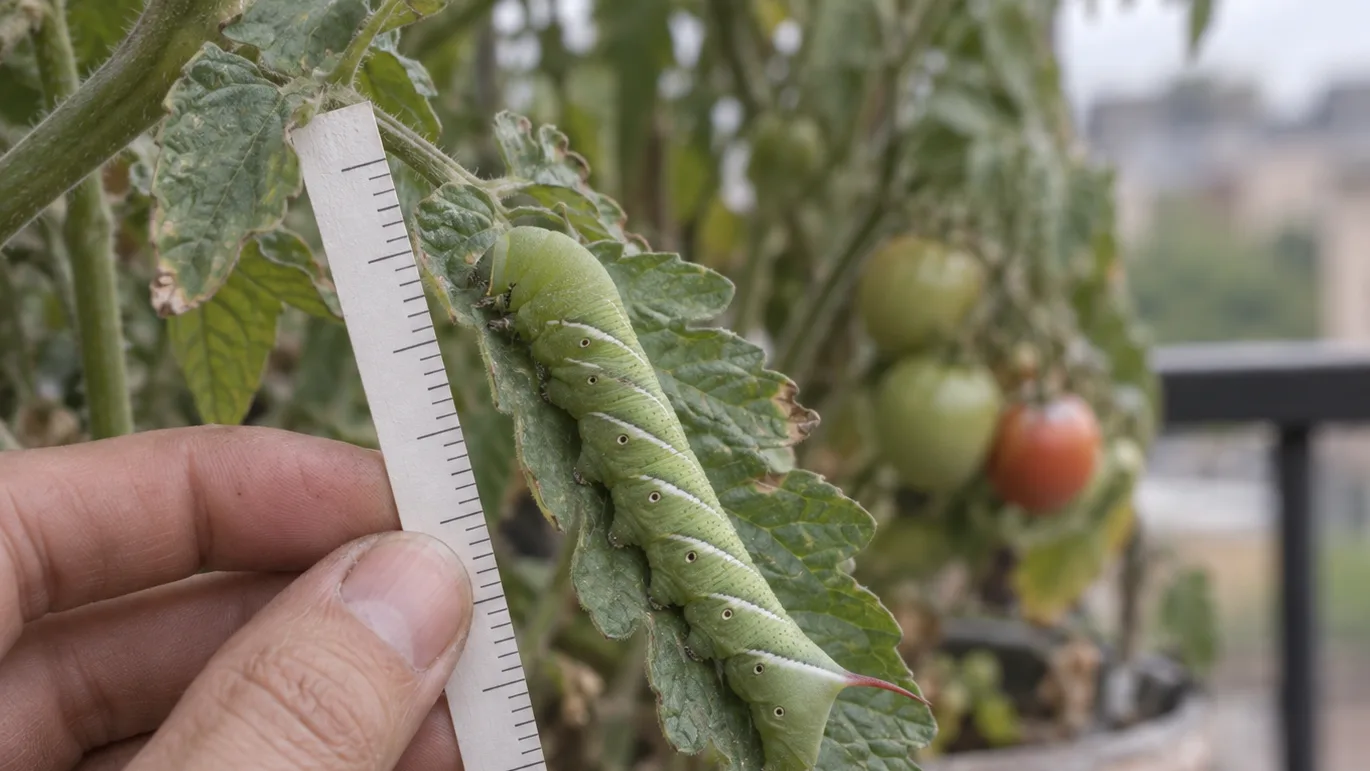
The commonly used field description I work from is this: a tomato hornworm is often described as having eight pale V-shaped markings and a blue-black horn, while a tobacco hornworm is commonly described as having seven diagonal pale stripes and a red horn. If the caterpillar is small, shaded or covered in leaf dust, those markings may be difficult to read. For a balcony grower, that uncertainty rarely changes the first response: both types chew tomato foliage and can be handpicked from the plant.
| What you can see | Working identification clue | Practical response |
|---|---|---|
| Eight pale V-shaped marks; dark blue or blue-black horn | Commonly described as tomato hornworm | Search for frass, then handpick if no white cocoons are present |
| Seven diagonal pale stripes; red or reddish horn | Commonly described as tobacco hornworm | Use the same inspection and removal process |
| Green larva with unclear markings | Too blurred or small for a confident field comparison | Use damage, frass and the cocoon check instead of guessing |
I keep university extension guidance on tomato and tobacco hornworm identification and lifecycle as a second look when a photograph or a shaded caterpillar makes the markings hard to compare. I don’t need a perfect species label before protecting one potted tomato. I need to know whether the insect is actively eating and whether it has been parasitized.
Search in five passes: where a hornworm hides on a potted tomato
Start at the freshest damage, not at the outside of the pot. The newest missing leaflets give you a direction to follow.
- Circle the damage. Stand back and identify the thinnest part of the canopy. Then move closer and inspect the leaves immediately above and below that area.
- Turn over nearby leaves. Use one hand to support the leaf and the other to look underneath. A green caterpillar can sit along the midrib or stay motionless beside a leaf stalk.
- Trace every stem to a fork. Check where side shoots meet the main stem, where the plant touches its support and where a tie creates a shaded crease. Those sheltered joints are easy to skip.
- Work down through the lower canopy. Look behind the pot rim, around the base of the support and on the potting mix. Frass may have fallen below the actual feeding position.
- Repeat with a flashlight at dusk or before sunrise. Shine the beam from the side rather than straight down. The body may blend into the tomato foliage in daylight, while a sideways beam can outline its shape.
A daylight search can fail because the caterpillar is green, still and positioned on the shaded side of a stem. That isn’t evidence that the insect has gone. If the damage is fresh and the first search is empty, repeat the five passes later the same day.
On a container plant, also inspect the support tie. A hornworm that has been disturbed may shift a few centimetres along the stem, but it may not drop to the ground. I check the tie, the stem fork and the leaf underside as one small search zone.
Safe removal in four moves: gloves, support, soapy water, recheck
For one or two reachable caterpillars, hand removal is the method I’d choose first. It avoids coating an edible plant unnecessarily and lets me inspect the insect before deciding what to do next.
- Prepare before touching the plant. Put on gloves and set a small container of water with a little dish soap beside the pot. The rear horn isn’t a stinger, but gloves are still sensible because tomato foliage can be sticky and the caterpillar may startle you.
- Support the stem. Place one hand beneath the stem or leaf cluster before lifting the caterpillar with the other. Pulling a heavy larva from an unsupported soft shoot can snap new growth or loosen a plant already carrying fruit.
- Place it directly into the container. I don’t drop a removed hornworm beside the pot. If it is still alive and close to a tomato or another host plant, it may simply return. Soapy water gives me a clear endpoint without leaving the caterpillar in the balcony planting area.
- Recheck the plant. Inspect the same stem forks, leaf undersides and potting mix again. Finding one hornworm doesn’t prove there is another, but it does tell me to repeat the search instead of assuming the first one was alone.
If a tomato fruit has a small feeding mark, I use a simple kitchen rule: wash firm, sound fruit and cut away the damaged section; discard fruit that is soft, leaking or mouldy. I don’t treat one surface nibble as a reason to throw away every tomato on the plant, but I also don’t keep damaged fruit that is breaking down.
My preference for handpicking applies to a small, accessible infestation. It changes if the plant keeps receiving fresh damage after a careful search or if several larvae are present in the canopy.
White cocoons mean stop: the beneficial-wasp exception
A hornworm wearing white cocoons gets a pause. If the caterpillar is covered in small, pale, rice-like capsules attached to its back, leave that particular caterpillar in place rather than putting it into soapy water.
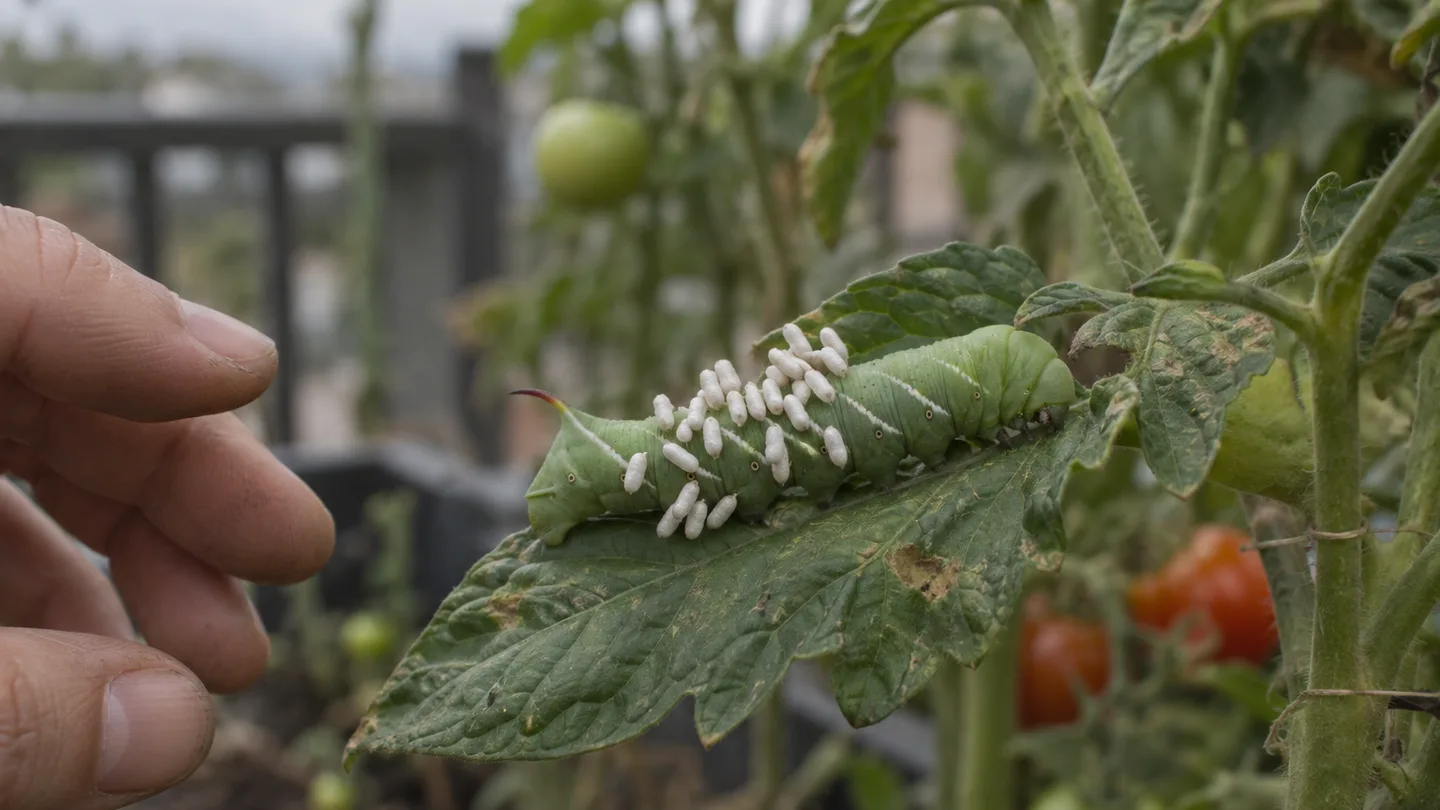
The common grower-and-extension explanation is that these are braconid-wasp cocoons. In plain terms, a tiny parasitic wasp has used the caterpillar as a host, and the white capsules are the next visible stage of that process. The caterpillar may still be alive, but the useful decision for the gardener is to leave it where it is so the emerging wasps can continue the natural control cycle.
Don’t confuse the caterpillar’s ordinary pale stripes or V-shaped markings with cocoons. Cocoons look like separate little capsules attached across the outside of the body. If one hornworm has cocoons and another nearby has a clean back, leave the cocoon-covered one and remove the clean one if it is feeding.
This is the exception that makes a quick spray a poor first move. The goal isn’t to preserve every insect on the plant. It is to avoid killing the insect that may be helping with the next hornworm.
If handpicking fails: Bt timing and when to escalate
The treatment decision turns on persistence. If I find one or two larvae and can reach them, I handpick. If several live caterpillars remain after a thorough search, or new foliage disappears after removal, I consider a product labelled for caterpillars on edible tomatoes.
Bacillus thuringiensis var. kurstaki, often shortened to Bt or Btk, has to be eaten by the caterpillar. That makes coverage of the foliage important, and it makes timing important too: smaller larvae are generally the more practical target because they have had less time to remove leaves. Bt isn’t a reason to skip the search, since a hidden large caterpillar may continue feeding until treated foliage reaches it.
Before using any product, I read the official pesticide-label guidance for Bacillus thuringiensis var. kurstaki on edible crops. The label is where I check whether tomatoes are listed, how the product is applied, what protective equipment is required and how long to wait before harvest. I don’t invent a spraying timetable from memory, and I don’t assume one Bt product’s directions apply to another.
I’d avoid broad-spectrum spraying when the problem is one removable caterpillar, when the plant has open flowers or when beneficial insects are active around it. A spray that solves one visible hornworm can also reach insects I didn’t intend to target. The condition that flips my advice is continued fresh feeding after hand removal, not the mere sight of a single large caterpillar.
Prevent a repeat and give the tomato 7–14 days to respond
Once the caterpillars are gone, prevention is mostly a search routine rather than a promise that moths cannot return. I inspect container tomatoes at least twice a week, and I make one of those checks at dusk. I look at the newest growth, the lower canopy and the soil surface instead of giving the plant a quick glance from across the balcony.
Fine insect mesh can help on a small plant if it is fitted without pressing into the leaves, trapping excessive heat or interfering with flowering and hand pollination. I treat mesh as a physical barrier with conditions, not as a set-and-forget cure. Remove or adjust it if the canopy stays hot and still, or if flowers cannot open properly.
At the end of the season, remove old tomato stems and fallen foliage from the container. Hornworms can spend part of their life cycle in soil, so I also inspect old potting mix when I empty an annual pot. Replacing or refreshing the mix may reduce carryover, but it cannot guarantee that a new adult moth won’t lay eggs later.
For recovery, keep the remaining healthy leaves. If you’ve been following a light routine for pruning tomato plants, don’t strip every leaf that has a hole; the plant needs usable foliage to rebuild. Remove only leaves that are fully dead, diseased-looking or hanging in a way that will tear the stem.
Water according to the actual moisture in the pot rather than a fixed calendar. In a hot, windy plastic pot, the plant may need checking far more often than the same tomato in a shaded glazed container, so use how often to water potted plants in hot weather as a starting point rather than a command. If the soil is already wet and the plant is drooping, pause and compare the leaves and mix with overwatered plant symptoms.
I’d also avoid a heavy dose of fertiliser as compensation for lost leaves. Extra feed doesn’t replace tissue overnight, and a stressed root system may not use it well. Follow a measured routine for how often to fertilize container plants instead of feeding every time the canopy looks thin.
If the growing tip is still intact, I give the tomato 7–14 days to show new leaves before judging its recovery. That is a checking window, not a guarantee. If the tip was eaten, the pot is drying repeatedly or the roots are damaged, recovery can take longer or fail. New growth at the top is the sign I want; a plant that stays bare despite reasonable moisture deserves a wider check for root, heat or disease problems.
Hornworms can return in a later season because soil and nearby host plants remain part of the life cycle. Cleaning the container reduces hiding places, but it does not make the balcony sealed against moths. That is why I prefer a twice-weekly inspection to a single end-of-season clean-up.
Tonight, check the underside of every tomato leaf, trace the stems into their forks and look on the potting mix for dark-green pellets. Put on gloves and set a small soapy-water container beside the pot before you start; if you find a cocoon-covered hornworm, leave that one in place.
Frequently Asked Questions
Are tomato hornworms poisonous or dangerous to touch?
No: the tail horn is not a stinger, but gloves are sensible for hygiene and to avoid rubbing plant residue into the eyes. The white-cocoon exception is about protecting beneficial wasps, not human danger.
Can I eat a tomato after a hornworm has chewed it?
Usually, if the fruit is otherwise firm and sound: wash it, cut away the damaged area, and discard fruit that is soft, leaking or mouldy. Hornworm feeding itself does not make intact tomato flesh poisonous.
Will tomato hornworms come back next year?
They can, because the larvae pupate in soil; removing plant debris and checking or replacing potting mix when a seasonal container is emptied may reduce carryover but cannot guarantee that adult moths will not lay new eggs.